This is step 5 of setting up a fully working Brand in Enterprise Server 10 for everyday use in a standard workflow environment. (See a list of all steps)
Now that a Brand has been fully set up and the necessary structure is in place, deadlines can be assigned in more detail.
Note: This step is optional. When deadlines are not going to be used, continue with Step 6 Assigning user authorizations.
Assigning deadlines is done by setting relative deadlines for Categories, Statuses, and Category/Status combinations. The aim of this is to finely control deadlines for each part of the Brand structure.
IMPORTANT: For the deadline functionality to work properly, it is imperative that the steps outlined in the next sections are followed in order.
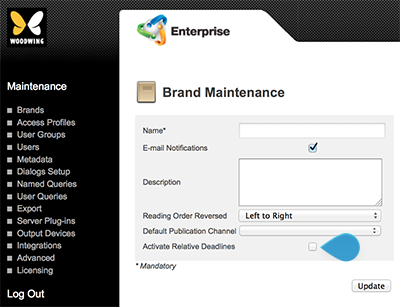
Step 1. On the Brand Maintenance page, select the option named Activate Relative Deadlines.

Figure: The Activate Relative Deadlines option on the Brand Maintenance page.
The Time Settings icon appears.

Figure: The Time Settings icon.
Step 1b. Click the icon.
The Relative Deadline page appears.
Step 2. For each of the sections on the page, set the required deadline.
Step 3. When you have finished entering values, click the Update button to recalculate the deadlines.
Note: All these tables must be updated to have a complete definition. Ensure therefore to fill in the form from top to bottom. Click on ALL update buttons at least once to complete the definition. If you decide to add a Category or Status to the Brand definition, keep in mind that you have to update the relative deadlines as well in order to have correctly working deadlines.
- Relative Deadlines of Categories. Controls how long before the Issue Deadline — set for the Issue in which the Category is used — each Category must be ready at.
Example: An Issue has been assigned a Deadline of 10 PM and contains several Categories. For one of these Categories, a Relative Deadline of 1 hour has been set, meaning that all items that belong to that Category have a Deadline of 9 PM.
- Relative Deadlines of Statuses. Controls how long each Workflow Status is supposed to last in relation to the next status (or in the case of the final status in the Workflow, the Category).
All statuses are categorized by Workflow File Type and are ordered by the order in which the statuses appear in the Workflow list. The highest numbered item will come last, so the time needed for this Status represents the time until the Category deadline.
- Relative Deadlines of Category/Statuses. Normally, the above information is enough to manage your deadlines, but it may be that for certain Categories certain statuses normally take longer. With the options in this section, more time for these statuses can be reserved in the same manner as for setting Relative Deadlines for statuses.
Reviewing Issue Deadlines
To review how all the various deadline settings affect a particular Issue in a Brand, follow these steps:
Step 1. Return to the Brand Maintenance page.
Step 2. Click on the name of the Publication Channel of an Issue for print, followed by the Edit button of the Issue which needs to be viewed.
The Issue Maintenance page appears.
Step 3. Click on the Alarm Clock icon next to Deadlines.
The Issue Deadlines page appears, showing all Deadlines that have been calculated for each part of the system.
Next step
Step 6. Assigning user authorizations
Comment
Do you have corrections or additional information about this article? Leave a comment! Do you have a question about what is described in this article? Please contact Support.
0 comments
Please sign in to leave a comment.