This is step 2 of setting up a fully working Brand in Enterprise Server 10 for everyday use in a standard workflow environment. (See a list of all steps)
In this step, one or more Publication Channels are set up. A Publication Channel defines the method in which the publication is published such as in print or in a digital format.
It is possible to set up multiple Publication Channels per Brand. This way, content of the same Brand can be used for publishing in print or web.
Note: A Brand needs to have at least one Publication Channel defined.
Step 1. On the Brand Maintenance page, locate the Publication Channel options.
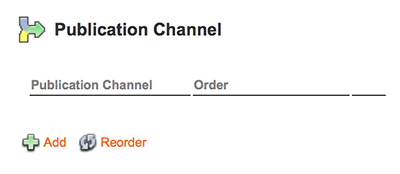
Since no Publication Channels have been set up yet for the Brand, the list of Publication Channels is empty.
Step 2. Click Add.
The Publication Channel Maintenance page appears.
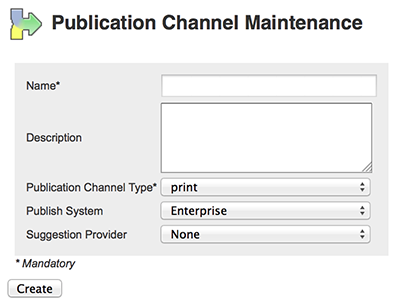
To continue, choose the type of Publication Channel to create:
Note: Per Brand, only one Publication Channel of type Print can be set up.
Step 3. In the Name field, enter a name. This name is shown to users to indicate to which type of channel a file is or should be part.
Step 4. In the Description field, enter a description. This is for internal use in Enterprise Server only. Use it to describe the purpose of the channel.
Step 5. From the Publication Channel Type list, choose Print.
Step 6. From the Publish System list, choose Enterprise (this is the default setting which does not use a publishing system).
Step 7. The Suggestion Provider option was used in Content Station 9 which has been discontinued. It can be ignored here.
Step 8. Click Create.
New items appear on the page:
- An additional property named 'Current Issue' appears below the Publication Channel Type property. Since Issues still need to be set up, we will come back to setting this option later in the process.
- Below the Publication Channel properties area, sections for adding Editions and Issues appear. We will add these now.

Figure: After clicking Create, additional options appear.
Creating Editions
Editions make it possible to create different instances of the same Issue. For example, a newspaper may produce a North City edition and a South City edition printed on the same day. The two editions can share much of the same content, but some stories or advertisements may be unique to the North City edition or the South City edition.
Step 9. Click Add Edition.
The Edition Maintenance page appears.
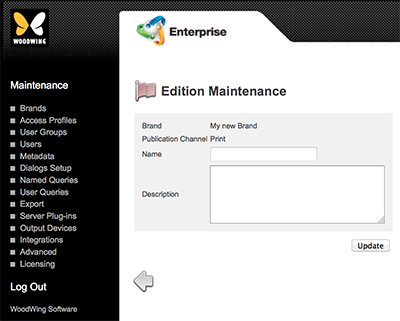
Step 10. Enter a name in the Name box such as 'Edition North', 'Edition South' and so on. This name is shown to users to indicate to which Edition a file is or should be part.
Step 11. (Optional) Enter a description in the Description box. This is for internal use in Enterprise Server only. Use it to describe the purpose of the Edition.
Step 12. Click Update.
The Publication Channel Maintenance page appears with the newly created Edition added to the Editions menu.
Step 13. (Optional) Add additional Editions as required.
Step 14. (Optional) In the Order box on the Publication Channel Maintenance page, enter an order number for each Edition and click Reorder. This will determine in which order the Editions are displayed in the client application interfaces.
Note: We recommend using a unique order number in order to prevent technical issues when a search is performed.
Creating Issues
An issue is the actual publication such as today’s or tomorrow’s newspaper, a blog post, the yearly report, and so on.
Step 15. On the Publication Channel Maintenance page, click Add Issue.
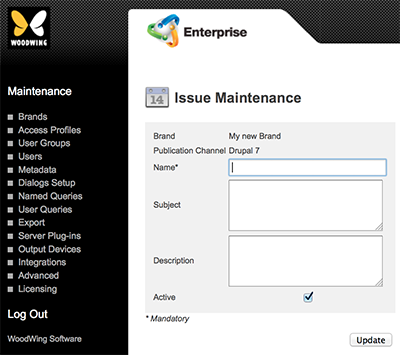
The Issue Maintenance page appears.

Step 16. Fill out the details.
Note: At the most basic level, only a name needs to be entered; all other options can also be set at a later stage by modifying the created Issue.
- Name. Name of the Issue such as 'Daily News 1 January 2021', 'My Magazine issue 1', and so on.
- Publication Date. Date (and time, if required) when the Issue needs to be published by.
- Deadline. Date (and time, if required) when the Issue needs to be finished by. Users will be notified at certain points when the deadline is nearing.
Tip: Instead of entering a date, enter the number of days, hours, and/or minutes before the publication date should be reached and click the Recalculate icon. This will automatically calculate the Deadline based on the entered Publication Date.
- Expected Pages. Number of expected pages.
- Subject.This feature is currently not functional.
- Description. Description of the Issue. This is for internal use in Enterprise Server only. Use it to describe the purpose of the Issue.
- Active. Use to deactivate the Issue. This will hide the Issue from the users without actually removing the Issue from the system.
Note: Any objects that are assigned to the Issue can still be found by searching on All Issues.
- Overrule Brand. (Not supported in Enterprise Server 10.7 or higher) Use to determine if the new Issue should have its own Categories, Workflow, and User Authorization definitions. After selecting this option, click the Update button to display the options for setting the Categories, Workflow, and Authorizations for this Issue.
- Reading Direction. Only available when Overrule Brand is active (and after clicking Update). Determines whether the pages in the Issue are displayed left to right or right to left (reversed) when viewed in the Publication Overview of Content Station
- Activate Relative Deadlines. Only available when Overrule Brand is active (and after clicking Update). Activates the functionality for assigning deadlines to Categories and Workflow Statuses. When selected, the 'Time Settings' icon appears.
- Time Settings. Only available when Overrule Brand is active (and after clicking Update), and after clicking 'Activate Relative Deadlines'. Displays the Relative Deadline page. Leave this setting for now, it is covered in a later step.
- Deadlines. (Only available when the option 'Activate Relative Deadlines' is selected on the Brand Maintenance page.) Displays the Issue Deadlines page. Leave this setting for now, it is covered in a later step.
Step 17. Click Update.
Finishing the setup
Step 18. Click the arrow at the bottom of the page to return to the Publication Channel Maintenance page.
Step 19. (Optional) Add additional Issues as needed.
Step 20. (Optional) In the Current Issue field, define which Issue should be the Current Issue.
Note: When making use of the Current Issue feature, make sure that each Issue has a unique order number so that the system can determine the correct Previous and Next Issues.
Step 21. Click the arrow at the bottom of the page to return to the Brand Maintenance page.
Step 22. (Optional) Add additional Publication Channels as needed.
Step 23. (Optional, only if multiple Publication Channels have been created) From the Default Publication Channel list at the top of the Brand Maintenance page, choose the default Publication Channel that should act as the default print channel used by InDesign/InCopy.
Note: In order for this feature to work properly, it is imperative that an order sequence for the created Issues is correctly specified on the Publication Channel Maintenance page. If this is not done (or not done correctly), Enterprise may not be able to properly determine the Previous and Next issues.

Figure: The Default Publication Channel list.
Step 24. Click Update.
Step 25. (Optional, only if the Overruled Brand option has been selected) In order for the Overruled Issue to be visible in Content Station, enable the Enterprise Server plug-in named Content Station Overrule Compatibility.
Step 25a. In Enterprise Server, click Server Plug-ins in the Maintenance menu or on the Home page.
Step 25b. Click the Unplugged icon  for the plug-in named Content Station Overrule Compatibility. It changes to a Plugged In icon
  .
.
Info: Support for publishing to Drupal has been dropped in Enterprise Server 10.6. Customers are advised to move to the publishing methods in Studio instead.
Step 3. In the Name field, enter a name.
Step 4. In the Description field, enter a description.
Step 5. From the Publication Channel Type list, choose Web.
Step 6. From the Publish System list, choose Drupal 7 — Publish Forms.
Step 7. (Optional, only when tags should be automatically suggested. See About adding tags to Web articles). From the Suggestion Provider list, choose the provider for suggesting tags.
Note: The default Suggestion Provider in Enterprise is the one from OpenCalais.
Step 8. Click Create.
New items appear on the page:
- An additional property named 'Current Issue' appears below the Publication Channel Type property. Since Issues still need to be set up, we will come back to setting this option later in the process.
- Options for the Drupal account appear. We will set these next.
- Below the Publication Channel properties area, a section for adding Issues appears. We will add these in a moment.
Drupal account settings
Step 9. Set the options for the Drupal account:
- Web Site URL. The URL of your Drupal site.
Note: Make sure that the URL ends with a forward slash "/".
Example: http://127.0.0.1/drupal/
- Consumer Key. The consumer key as set up on Drupal.
Step 1. Access your Drupal Web site.
Step 2. In the top menu bar, click People.
Step 3. Click Edit for a user account that is used for publishing content.
Step 4. Access the OAuth Consumers tab.
Step 5. In the Operations column, click Edit for the displayed consumer.
Step 6. Copy the displayed key.
- Consumer Secret. The consumer secret as generated on Drupal.
Step 1. Access your Drupal Web site.
Step 2. In the top menu bar, click People.
Step 3. Click Edit for a user account that is used for publishing content.
Step 4. Access the OAuth Consumers tab.
Step 5. In the Operations column, click Edit for the displayed consumer.
Step 6. Click Show Secret.
Step 7. Copy the displayed Secret.
- Certificate. (Optional, required for HTTPS (SSL) connections only.) The full file path of the local CA certificate file (in PEM format). See the SSL SDK for how to generate certificates.
Creating Issues
Step 10. Click Add Issue.
The Issue Maintenance page appears.
Step 11. Fill out the details.
Note: At the most basic level, only a name needs to be entered; all other options can also be set at a later stage by modifying the created Issue.
- Name. Name of the Issue.
- Subject. This feature is currently not functional.
- Description. Description of the Issue.
- Active. Use to deactivate the Issue. This will hide the Issue from the users without actually removing the Issue from the system.
Note: Any objects that are assigned to the Issue can still be found by searching on All Issues.
Step 12. Click Update.
Finishing the setup
Step 13. Click the arrow at the bottom of the page to return to the Publication Channel Maintenance page.
Step 14. (Optional) Add additional Issues as needed.
Step 15. Click the arrow at the bottom of the page to return to the Brand Maintenance page.
Step 16. (Optional) Add additional Publication Channels as needed.
Step 17. (Optional, only if multiple Publication Channels have been created) From the Default Publication Channel list at the top of the Brand Maintenance page, choose the default Publication Channel that should act as the default Drupal 6 channel.
Note: In order for this feature to work properly, it is imperative that an order sequence for the created Issues is correctly specified on the Publication Channel Maintenance page. If this is not done (or not done correctly), Enterprise may not be able to properly determine the Previous and Next issues.
Figure: The Default Publication Channel list.
Step 18. Click Update.
Info: Support for publishing to Facebook has been dropped in Enterprise Server 10.6. Customers are advised to move to the publishing methods in Studio instead.
Step 3. In the Name field, enter a name.
Step 4. In the Description field, enter a description.
Step 5. From the Publication Channel Type list, choose Web.
Step 6. From the Publish System list, choose Facebook — Publish Forms.
Step 7. Leave the Suggestion Provider option set to None.
Step 8. Click Create.
New items appear on the page:
- An additional property named 'Current Issue' appears below the Publication Channel Type property. Since Issues still need to be set up, we will come back to setting this option later in the process.
- Options for the Facebook account appear.
- Below the Publication Channel properties area, a section for adding Issues appears. We will add these in a moment.
Facebook account settings
Step 9. Set the options for the Facebook account:
- Application ID: Obtain this from the Basic settings page for your app on https://developers.facebook.com/apps.
- Application Secret: Obtain this from the Basic settings page for your app on https://developers.facebook.com/apps.
- Page ID: Access your Facebook page, click Edit Page > Update Page Info.
Step 10. Click Update.
Creating Issues
Step 11. Click Add Issue.
The Issue Maintenance page appears.

Step 12. Fill out the details.
Note: At the most basic level, only a name needs to be entered; all other options can also be set at a later stage by modifying the created Issue.
- Name. Name of the Issue.
- Subject. This feature is currently not functional.
- Description. Description of the Issue.
- Active. Use to deactivate the Issue. This will hide the Issue from the users without actually removing the Issue from the system.
Note: Any objects that are assigned to the Issue can still be found by searching on All Issues.
Step 13. Click Update.
Finishing the setup
Step 14. Click the arrow at the bottom of the page to return to the Publication Channel Maintenance page.
Step 15. (Optional) Add additional Issues as needed.
Step 16. Click the arrow at the bottom of the page to return to the Brand Maintenance page.
Step 17. (Optional) Add additional Publication Channels as needed.
Step 18. (Optional, only if multiple Publication Channels have been created) From the Default Publication Channel list at the top of the Brand Maintenance page, choose the default Publication Channel that should act as the default Facebook channel.
Note: In order for this feature to work properly, it is imperative that an order sequence for the created Issues is correctly specified on the Publication Channel Maintenance page. If this is not done (or not done correctly), Enterprise may not be able to properly determine the Previous and Next issues.
Figure: The Default Publication Channel list.
Step 19. Click Update.
Info: Support for publishing to Twitter has been dropped in Enterprise Server 10.6. Customers are advised to move to the publishing methods in Studio instead.
Step 3. In the Name field, enter a name.
Step 4. In the Description field, enter a description.
Step 5. From the Publication Channel Type list, choose Web.
Step 6. From the Publish System list, choose Twitter Publishing Connector.
Step 7. Leave the Suggestion Provider option set to None.
Step 8. Click Create.
New items appear on the page:
- An additional property named 'Current Issue' appears below the Publication Channel Type property. Since Issues still need to be set up, we will come back to setting this option later in the process.
-
Below the Publication Channel properties area, a section for adding Issues appears.We will add these now.
Creating Issues
Step 9. Click Add Issue.
The Issue Maintenance page appears.

Step 10. Fill out the details.
Note: At the most basic level, only a name needs to be entered; all other options can also be set at a later stage by modifying the created Issue.
- Name. Name of the Issue.
- Subject. This feature is currently not functional.
- Description. Description of the Issue.
- Active. Use to deactivate the Issue. This will hide the Issue from the users without actually removing the Issue from the system.
Note: Any objects that are assigned to the Issue can still be found by searching on All Issues.
- Consumer Key: Obtain this from the Application Details page for your app on https://dev.twitter.com.
- Consumer Secret: Obtain this from the Application Details page for your app on https://dev.twitter.com.
Step 11. Click Update.
Finishing the setup
Step 12. Click the arrow at the bottom of the page to return to the Publication Channel Maintenance page.
Step 13. (Optional) Add additional Issues as needed.
Step 14. Click the arrow at the bottom of the page to return to the Brand Maintenance page.
Step 15. (Optional) Add additional Publication Channels as needed.
Step 16. (Optional, only if multiple Publication Channels have been created) From the Default Publication Channel list at the top of the Brand Maintenance page, choose the default Publication Channel that should act as the default Twitter channel.
Note: In order for this feature to work properly, it is imperative that an order sequence for the created Issues is correctly specified on the Publication Channel Maintenance page. If this is not done (or not done correctly), Enterprise may not be able to properly determine the Previous and Next issues.
Figure: The Default Publication Channel list.
Step 17. Click Update.
Info: Support for publishing to WordPress has been dropped in Enterprise Server 10.6. Customers are advised to move to the publishing methods in Studio instead.
Step 3. In the Name field, enter a name.
Step 4. In the Description field, enter a description.
Step 5. From the Publication Channel Type list, choose Web.
Step 6. From the Publish System list, choose WordPress Publishing Connector.
Note: When this option is not available, make sure that the WordPress Enterprise Server plug-in is installed and enabled.
Step 7. (Optional, only when the auto-complete feature for tags is going to be used. See Linking WordPress tags to a Suggestion Provider). From the Suggestion Provider list, choose the provider for suggesting tags.
Note: The default Suggestion Provider in Enterprise is the one from OpenCalais.
Step 8. Click Create.
The Issues section appears.
Step 9. Click Add Issue.
The Issue Maintenance page appears.

Step 10. Fill out the details.
- Name. Name of the Issue.
- Subject. This feature is currently not functional.
- Description. Description of the Issue.
- Active. Use to deactivate the Issue. This will hide the Issue from the users without actually removing the Issue from the system.
Note: Any objects that are assigned to the Issue can still be found by searching on All Issues.
Step 11. Click Update.
Finishing the setup
Step 12. Click the arrow at the bottom of the page to return to the Publication Channel Maintenance page.
Step 13. (Optional) Add additional Issues as needed.
Step 14. Click the arrow at the bottom of the page to return to the Brand Maintenance page.
Step 15. (Optional) Add additional Publication Channels as needed.
Step 16. (Optional, only if multiple Publication Channels have been created) From the Default Publication Channel list at the top of the Brand Maintenance page, choose the default Publication Channel that should act as the default WordPress channel.
Note: In order for this feature to work properly, it is imperative that an order sequence for the created Issues is correctly specified on the Publication Channel Maintenance page. If this is not done (or not done correctly), Enterprise may not be able to properly determine the Previous and Next issue.
Figure: The Default Publication Channel list.
Step 17. Click Update.
Next step
Step 3. Creating Categories
Comments
0 comments
Please sign in to leave a comment.