This is step 1 of setting up a fully working Brand in Enterprise Server 10 for everyday use in a standard workflow environment. (See a list of all steps)
In this step, the Brand itself is created. It represents the publication such as the Times, National Geographic, Yamaha, and so on. Multiple Brands can be set up within Enterprise Server.
Step 1. Access the Brands page.
In the Maintenance menu or on the Home page, click Brands.
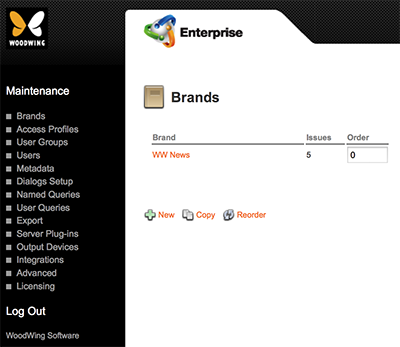
A page showing all created Brands appears.

Figure: The Brands page.
A default Brand named 'WW News', already exists.
Step 2. Click New.
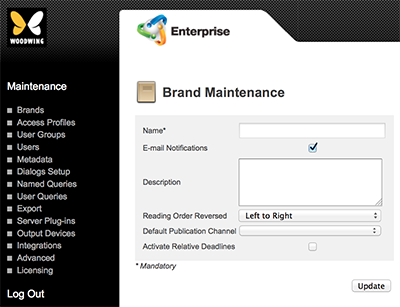
The Brand Maintenance page appears.

Figure: The Brand Maintenance page.
Step 3. Fill out the details.
Note: At the most basic level, only a name needs to be entered; all other options can also be set at a later stage by modifying the created Brand.
- Name. Name of the Brand. This is the name of the publication such as the Times, National Geographic, Yamaha, and so on. The publication that is eventually distributed (today's newspaper, next month's magazine, and so on) is created as an Issue later in the process.
- E-mail Notifications. Determines whether e-mail notifications should be enabled for this Brand when files are routed to a user or user group.
- Description. Description of the Brand. For internal use in Enterprise Server only. Use it as a reference to indicate what the Brand is about to distinguish it from other Brands in the system.
- Reading Order Reversed. Determines whether the pages in the Issue are displayed left-to-right or right-to-left (reversed) when viewed in the Publication Overview of Studio.
- Auto Purge. (Only available when the Enterprise Server Job named AutoPurgeTrashCan is made active.) Defines the time period (in days) after which objects are permanently removed from the Trash Can. Enter 0 (zero) to disable the Auto Purge feature for the Brand.
- Default Publication Channel. Defines the Default Publication Channel. Setting this option will be possible when Publication Channels have been set up. This will be covered in a later step.
- Activate Relative Deadlines. Activates the functionality for assigning deadlines to Categories and Workflow Statuses. When selected, the 'Time Settings' icon appears.
- Time Settings. (This option only appears when 'Activate Relative Deadlines' is selected.) Opens the Relative Deadlines page. Setting this option will be covered in a later step; leave it as it is for now.
Step 4. Click Update.
The Brand is created and the areas for managing the Brand appear on the Brand Maintenance page:
- Publication Channel
- Category
- Workflow
- User Authorizations
- Routing
- Admin Authorizations
- Dossier Templates
Next step
Step 2. Creating a Publication Channel
Comment
Do you have corrections or additional information about this article? Leave a comment! Do you have a question about what is described in this article? Please contact Support.
0 comments
Please sign in to leave a comment.