In publications such as printed newspapers, a story can start on one page and continue on another page. To make the reader aware of this, text such as 'Continued on page x' and 'Continued from page x' needs to be added.
The Smart Jump feature that is part of Studio for InDesign automates this process. This article explains how to use this feature.
How it works
The Smart Jump feature makes it possible to start an article on one page and let it continue on another page — even on a different layout — and automatically have continuation elements created showing on which page the rest of the article continues or on which page the article started.
Page numbers are automatically added, while the text that is shown is fully customizable.
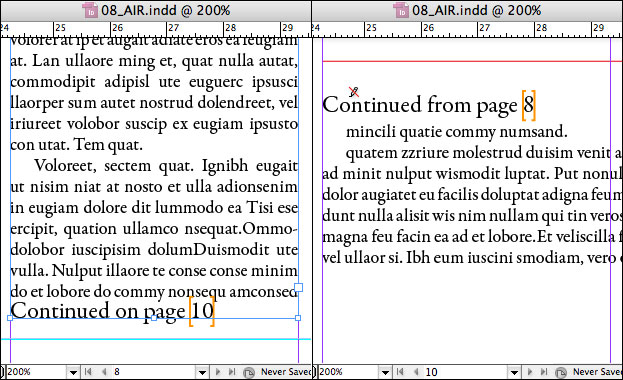
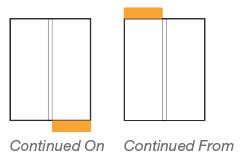
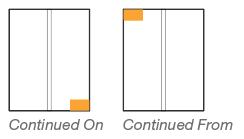
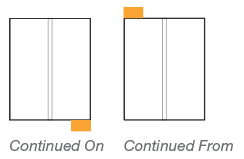
In the following example, two pages are shown that are part of the same layout: page 8 (left) and page 10 (right). Using Smart Jump, the article that starts on page 8 has been made to “jump” to page 10. Continuation elements have been added to the bottom of the text frame on page 8 and to the top of the text frame on page 10 showing on which page the article starts and continues respectively.
Using Smart Jump - Quick Start
In short, the process of using Smart Jump is as follows:
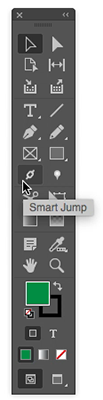
Step 1. Select the Smart Jump tool in the Tools panel.
Step 2. Click on the text frame to which the element 'Continued on page x' should be added.
Note: This frame should be an article stored in Studio Server and should be checked out.
Step 3. Click on the text frame to which the element 'Continued from page x' should be added.
Note: This frame should not already be an article stored in Studio Server. It can be a text frame on the same layout or on another layout.
The following actions take place:
- A continuation element will be created for the first text frame.
- The second text frame is filled with the overset text of the first text frame.
- A continuation element will be created for the second text frame.
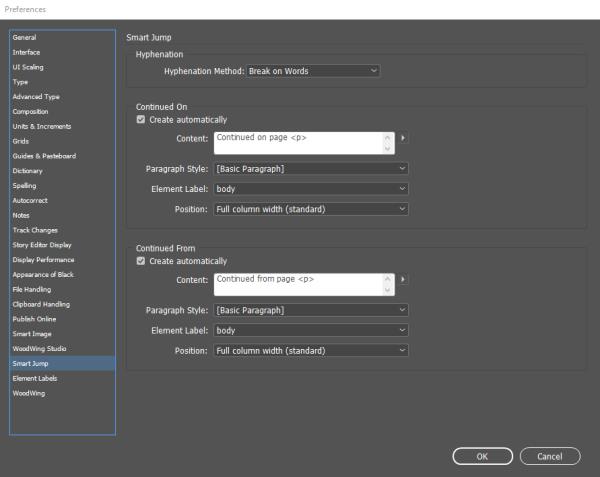
Smart Jump preferences
Smart Jump automatically adds continuation elements. The following aspects of these elements can be controlled:
- The hyphenation of the text.
- Whether or not a continuation element should be automatically created.
- The text itself and how it is styled. (See also Defining the text.)
- Which Element label is assigned to the frame.
- How the element is positioned. (See also Positioning.)
Setting these options is done by accessing Preferences > Smart Jump.
Defining the text
The text in the continuation element is initially loaded with the text that is entered in the Content field in the preferences. Once created, the text is fully editable.
The default text is "Continued on page <p>” and “Continued from page <p>", where <p> is a variable that is automatically filled with the relevant page number.
Variables can be added through the menu of the field (accessed by clicking the triangle pointing to the right) or can be entered manually.
The following variables can be added:
| Variable | Description |
|---|---|
| <p> | Smart Jump page number. Variable holding the page number of the previous or next Smart Jump component respectively. |
| ^8 | Bullet character |
| ^2 | Copyright symbol |
| ^e | Ellipsis |
| ^7 | Paragraph symbol |
| ^r | Registered trademark symbo |
| ^6 | Section symbol |
| ^d | Trademark symbol |
| ^_ | Em dash> |
| ^= | En dash |
| ^m | Em space |
| ^> | En space |
| ^| | Hair space |
| ^% | Sixth space |
| ^< | Thin space |
| ^4 | Quarter space |
| ^3 | Third space |
| ^. | Punctuation space |
| ^/ | Figure space |
| ^f | Flush space |
| ^{ | Double left quotation marks |
| ^} | Double right quotation marks |
| ^[ | Single left quotation mark |
| ^] | Single right quotation mark |
| ^t | Tab |
| ^y | Right indent tab |
| ^i | Indent to here |
| ^h | End nested style here |
| ^j | Non-joiner> |
Positioning
The Position field controls the position and width of the continuation elements.
The Continued On element is always placed at the bottom of the last column of the text frame or text thread; the Continued From element is always placed at the top of the first column of the text frame or text thread.
Either element can be placed in its position in four different ways:
- Full Column Width (Standard). The element is placed inside the text frame and spans the full column width.
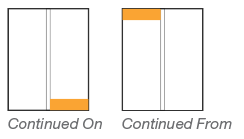
- Full Column Width (Offset). The element is placed outside the text frame and spans the full column width.
- Indented (Standard). The element is placed inside the text frame; the width is controlled by the length of the text but will not exceed the column width.
- Indented (Offset). The element is placed outside the text frame; the width is controlled by the length of the text but will not exceed the column width.
Styling
When jumping a story from one layout to another, any styles applied to the text are moved with it and will become part of that layout. In case the name of the imported style is identical to the name of an existing style, the text is styled according to the existing style.
Tip: To make sure that all styles in all layouts are identical, you may want to synchronize the styles using InDesign's Book feature.
Smart Jump objects
The Smart Jump feature consists of the following objects:
- A Continuation Element. A separate text containing the text "Continued on..." or "Continued from...". It is added to the bottom of the frame where the article is jumped from, and to the top of the frame where the article is jumped to.
- Smart Jump Variables. Text variables specific to Smart Jump. Their content is automatically inserted, such as a page number. When viewing the layout in Normal mode, the text variable can be recognized by the square orange brackets.
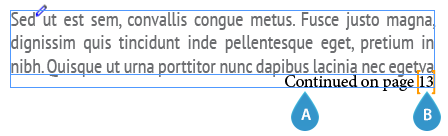
Figure: The Smart Jump components: A - a continuation element, B - a Smart Jump variable.
Creating a Smart Jump
Creating a Smart Jump can be done in the following ways:
- By using the Smart Jump tool. This method should be used when both the starting and ending Continuation Elements are available (with the ending element either in the same layout or in a different layout).
- By using the menu commands. This method should be used when only the starting Continuation Element is available (for example when the page that should hold the ending Continuation Element is not available).
|
Notes:
|
Using the Smart Jump tool
Note: This method should be used when both the first and the second Smart Jump components are available (with the second component either in the same layout or in a different layout).
Use the steps as outlined in the Quick Start earlier in this article.
Using the menu commands
Note: This method should be used when only the first Smart Jump component is available (for example when the page that should hold the second Smart Jump component is not available).
Step 1. Select the text frame to which the element 'Continued on page x' should be added.
Note: This frame should be an article stored in Studio Server and should be checked out.
Step 2. Choose Object > Smart Jump > Create Smart Jump from Here.
The following actions take place:
- A continuation element is created for the first text frame.
- A new — unplaced — article component is created (as can be seen in the Elements panel). When placed, this will hold the 'Continued on page x' element.
Step 3. Place the unplaced article component:
- On the other layout as soon as it becomes available by using the Studio panel.
- On the same layout by using the Studio panel or the Elements panel.
Modifying the Smart Jump functionality
Once Smart Jump functionality has been added to text frames, it can be modified in the following ways:
- Text can be re-flowed
- Smart Jump variables can be updated
- A page number can be inserted
- Smart Jump variables can be converted to regular text
- A Continuation element can be removed and recreated
- The Smart Jump functionality can be removed
Re-flowing text
When adding text to or removing text from one of the linked text frames, the text needs to be re-flowed in both frames so that it fits properly.
Note: Unlike threaded text frames in InDesign, text in frames that are linked through Smart Jump does not automatically flow when making changes to the text.
Step 1. Make sure that the article is checked-out.
Step 2. Select the frame to which the 'Continued on...' text frame is linked.
Step 3. Choose Object > Smart Jump > Reflow Smart Jump Article.
The following actions take place:
- The text is re-flowed across the text frames.
- A new version of the article is saved to Studio Server.
Updating Smart Jump variables
The content of Smart Jump variables is automatically filled when the Continuation element is created. To update the value of the variable, make sure that the article is checked-out and do one of the following:
- Save a version of the layout by choosing Studio > Save Version... .
- Check-in the layout by choosing Studio > Check In... .
- Select the Continuation element and choose Object > Smart Jump > Update All Smart Jump Variables.
- (Optional, when working with Editions only) In the Editions panel, switch the visible Edition by selecting a different Edition and re-selecting the Edition that the article with the Smart Jump functionality belongs to.
Inserting a page number
When no page number variable was included in the default text for the Continuation elements (see Smart Jump preferences), a page number can be added by doing the following:
Step 1. Make sure that the article is checked-out.
Step 2. In the Continuation element, place the text cursor at the position where the page number reference needs to appear.
Step 3. Choose Object > Smart Jump > Insert Smart Jump Page Number.
Converting Smart Jump variables to regular text
At some point, you may want to convert the Smart Jump variables to regular, static text.
Step 1. Make sure that the article is checked-out.
Step 2. Select a frame to which a Continuation element is linked.
Step 3. Do one of the following:
- Choose Object > Smart Jump > Convert Smart Jump Variable To Text.
- Choose Object > Smart Jump > Convert All Smart Jump Variables To Text.
Removing and recreating a Continuation element
To remove a Continuation element, simply remove the frame as you would any other frame.
At this point, the Smart Jump functionality is still available for the text frame from which the Continuation element was removed. No visual clue identifies the text frame as having Smart Jump functionality, other than the fact that the Smart Jump menu commands are available when the text frame is selected.
To re-create the Continuation element, do the following:
Step 1. Select the text frame to which the Continuation element needs to be added.
Step 2. Choose Object > Smart Jump > Create Continuation Elements.
Removing the Smart Jump functionality
Step 1. Make sure that the article is checked-out.
Step 2. Remove the text frame holding the Continuation element 'Continued from...'.
Step 3. Select the text frame holding the Continuation element 'Continued on...'.
Step 4. Choose Object > Smart Jump > Remove Smart Jump.
The following actions take place:
- Smart Jump functionality is removed from the text frame.
- The text from the second text frame is added to the end of the text of the first frame.
- The second frame is removed from the article.
- The Continuation element is removed from the first text frame.
- A version of the article is stored in Studio Server.
Comments
0 comments
Please sign in to leave a comment.