A Brand is a representation of a publication: it defines a newspaper, magazine, catalog, and so on.
Example: A Brand is named 'My Newspaper', 'My Magazine', and so on.
A Brand contains one or more published issues, such as each a daily newspaper, each monthly magazine, each yearly report, and so on.
For each Brand in Enterprise Server, the following settings can be defined:
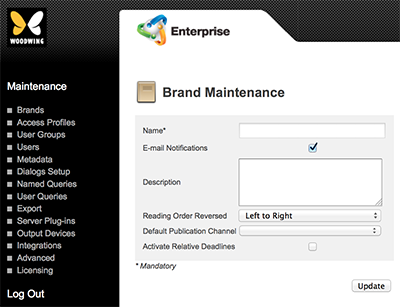
- Name. The name of the Brand.
- E-mail Notifications. Select when users should be notified by e-mail when a file of this Brand has been routed to them or the groups they are part of.
- Description. A short description of the Brand.
- Reading Order Reversed. Define how pages are displayed in the Publication Overview of Content Station: left-to-right or right-to-left (reversed).
- Auto Purge. (Only available when the Enterprise Server Job named AutoPurgeTrashCan is made active.) Enter the number of days when a file should be permanently removed after it has been added to the Trash Can. Enter 0 (zero) to disable the feature for the Brand.
- Default Publication Channel. Choose the Publication Channel that should act as the default print channel used by InDesign/InCopy.
- Actiate Relative Deadlines. Select when deadlines should be assigned to Categories and Workflow Statuses.
- Time Settings. (This option only appears when 'Activate Relative Deadlines' is selected.) Opens the Relative Deadlines page.
To modify these settings, follow these steps:
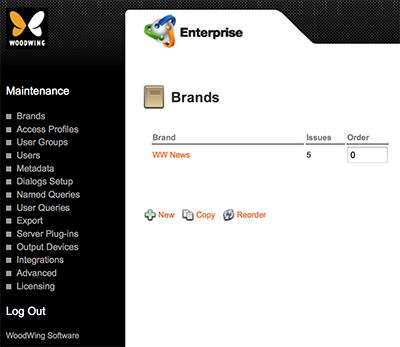
Step 1. Access the Brands Maintenance page.
Step 1a. In the Maintenance menu or on the Home page, click Brands.
A page showing all created Brands appears.

Figure: The Brands page.
Step 1b. Do one of the following:
- When creating a new Brand: click New.
- When updating an existing Brand: click the name of the Brand.
The Brand Maintenance page appears.

Figure: The Brand Maintenance page.
Step 2. Enter the details.
Step 3. Click Create or Update.
Comment
Do you have corrections or additional information about this article? Leave a comment! Do you have a question about what is described in this article? Please contact Support.
0 comments
Please sign in to leave a comment.