Info: This feature requires Enterprise Server version 9.8.1 or higher.
The functionality of publishing content to Drupal is provided through an Enterprise Server plug-in. This plug-in provides a Publish Form template with which a post can be published to Drupal.
This article describes how to integrate Drupal 8 in Enterprise to make it possible to publish from Enterprise to a Web environment based on Drupal 8.
|
Note: For other versions of Drupal, see: |
Steps to perform
Steps need to be performed in Drupal and in Enterprise Server.
Steps in Drupal
3. Setting up users and assigning permissions
Steps in Enterprise Server
5. Installing the Enterprise Server plug-in
6. Configuring the Enterprise Server plug-in
7. Creating a Drupal 8 Publication Channel
9. Importing the Drupal content types and taxonomies
1. Setting up Drupal
|
Note about verifying the installed version of PHP: Drupal 8 requires PHP 5.4 or higher to be installed. Therefore, verify that at least this version is installed or if needed, upgrade to this minimum required version. See also Installing and configuring PHP for use with Enterprise Server 9. |
Step 1. Set up a default installation of Drupal by following the instructions as outlined on www.drupal.org:
2. Installing Drupal modules
The Drupal integration requires the following modules:
- XML-RPC. Download this from the Drupal Web site.
- HTTP Basic Authentication. This module is available by default, it does not need to be downloaded.
- WoodWing Enterprise. Download the file named Enterprise Drupal 8 Integration from the software download page.
Step 2. Unzip the downloaded files and copy them to the following location:
<drupal directory>/modules/
Step 3. Modify the XML-RPC module:
Step 3a. Open /Drupal8/modules/xmlrpc/xmlrpc.routing.yml
Step 3b. Add the following :
options:
_auth: [ 'basic_auth' ]
Note: Make sure that these lines contain leading spaces.
|
Example: |
Step 3c. Save and close the file.
Step 4.Enable the 3 modules:
- XML-RPC
- HTTP Basic Authentication
- WoodWing Enterprise
3. Setting up users and assigning permissions
Users need to be set up and given permissions to perform specific tasks.
Typically you will set up the following types of users:
- One administrator account that is used for importing Publish Form templates and taxonomies from Drupal into Enterprise Server
- One or more regular users who will publish content from Content Station to Drupal
Step 3. Create a user with the role of 'Administrator' and one or more user with the role of 'Authenticated User'.
Caution: Do not use the user that was created during installation for the administrator role. This user has ID '1' and is therefore made exempt from any permission check by Drupal. As a result, the Drupal core will always state that the user has the requested permission. Instead, create a dedicated user for the administrator role.
Step 3a. Assign the following permissions to the Administrator role:
- Bypass content access control. This allows import rights for all content types.
- Administer vocabularies and terms. This allows importing the taxonomies for the auto-complete and suggestion services.
Step 3b. Assign the following permissions to the Authenticated User role:
- Node > (Content Type name): Create new content. This allows to create a new post on Drupal.
- Node > (Content Type name): Delete any content. This allows to remove a published post from Drupal.
- Node > (Content Type name): Edit any content. This allows to edit a published post on Drupal.
4. Configuring Content Types
The components of a Drupal post (a title, teaser, body text, images and so on) are configured in Drupal as fields in a content type. Enterprise can import these content types and convert them into Publish Form templates. The content type fields are used as custom properties in the Publish Form template.
Step 4. Create a content type in Drupal for each type of Drupal post and add the required fields.
In Drupal, access Structure > Content Types and click + Add content type.
Example: Content types that could be created are those for a news article, blog post, recipe, poll, and so on.
Note: Restrictions exist for the types of fields and their properties that can be imported by Enterprise. For more information, see Supported Drupal fields for use in Publish Form templates in Enterprise 9.
5. Installing the Enterprise Server plug-in
The Drupal functionality in Enterprise is provided through the "Drupal 8 - Publish Forms" Server plug-in. This plug-in needs to be installed and enabled.
Installing the plug-in:
Step 6. Download the file named Drupal8_Enterprise_Plugin_v9.x.x_Buildxxx.zip from the software download page.
Step 6a. Unzip the file and place the resulting 'Drupal8' folder in the following location:
- <your Enterprise Server installation>/config/plugins/
Enabling the plug-in:
Step 6b. Log in to Enterprise Server.
Step 6c. Click Server Plug-ins in the Maintenance menu or on the Home page. The Server Plug-ins page appears.
Step 6d. Enable the plug-in named Drupal 8 - Publish Forms by clicking the Unplugged icon  . It changes to a Plugged In icon
  .
.
6. Configuring the Enterprise Server plug-in
The Enterprise Server plug-in needs to be configured with the URL for the Drupal site and the credentials for the administrator.
Step 7. Open the following file:
- <your Enterprise Server installation>/config/plugins/Drupal8/config.php
Step 7a. Locate the 'sites' section:
$sites = array(
'label_of_the_first_instance' => array( // Site label.
'url' => '', // Url of the Drupal instance.
'username' => '', // The username used for importing / publishing.
'password'=> '', // The password of the selected user.
),
);
For each Drupal site, enter the following details:
- Label. A representative name for the Drupal site.
Note: This name will appear on the Publication Channel Maintenance page as an option in the 'Web Site' list.
- url. The URL of the Drupal site.
Note: This needs to end with a forward slash '/'.
- username. The user name of the user who is assigned as the administrator
- password. The password for the user.
|
Example. In this example, 2 sites are configured:
|
7. Creating a Drupal 8 Publication Channel
Publishing to your Drupal 8 Web site from Enterprise is done through a Publication Channel.
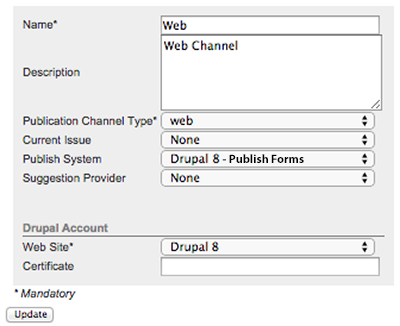
Step 8. In Enterprise Server, create a new Publication Channel for a Brand:
Step 8a. In the Name field, enter a name.
Step 8b. In the Description field, enter a description.
Step 8c. From the Publication Channel Type list, choose Web.
Step 8d. From the Publish System list, choose Drupal 8 — Publish Forms.
Step 8e. (Optional, only when tags should be automatically suggested. See About adding tags to Web articles). From the Suggestion Provider list, choose the provider for suggesting tags.
Note: The default Suggestion Provider in Enterprise is the one from OpenCalais.
Step 8f. Click Create. The Drupal Account options appear.

Step 8g. Fill out the properties:
- Web Site: the name of your Drupal site.
- Certificate: (Optional, required for HTTPS (SSL) connections only.) The full file path of the local CA certificate file (in PEM format). See the SSL SDK for how to generate certificates.
Step 8h. Click Update.
Step 8i. Create an Issue by clicking the Add Issue button and subsequently entering at least a name for the Issue.
Step 8j. Click Update.
8. Testing Enterprise Server
Step 9. Test if the integration has been performed successfully by following these steps:
Step 9a. In the Maintenance menu, click Advanced. A page showing links to advanced Enterprise options appears.
Step 9b. Click Health Check. The Health Check page appears.
Step 9c. Run the Publish to Drupal - Publish Forms test. The test result is displayed.
Step 9d. (Optional, only if the test failed). Follow the instructions and run the test once more after making any changes to the Drupal configuration. Repeat this process until the test is performed successfully.
9. Importing the Drupal content types and taxonomies
The content types that were set up in Drupal need to be imported into Enterprise so that they can be used as Publish Form templates. Similarly, any taxonomies that are defined in Drupal can be imported for use as tags in a Publish Form.
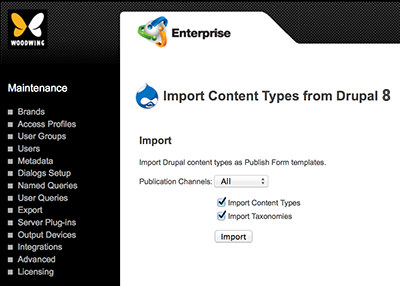
Step 10a. Access the Drupal 8 Maintenance page in Enterprise Server.

- In Enterprise Server, click Integrations in the Maintenance menu or on the Home page. A page with all integrated services appears.
- Click Drupal 8. The "Import Content Types from Drupal" Maintenance page appears.
Step 10b. (Optiona) From the Publication Channels list, choose the channel from which you want to import.
Step 10c. Make sure that the check boxes for importing content types and taxonomies are both selected.
Step 10d. Click Import.
The import is performed and the result of the import action is displayed.
Related Information
About Publish Forms and Publish Form templates in Enterprise 9
Publish Form components in Enterprise 9
Related Tasks
Creating a Publish Form in Enterprise 9
Adding or removing Publish Form components (Drupal) in Enterprise 9
Creating a Publish Form template in Enterprise 9
Updating a Publish Form template (Drupal) in Enterprise 9
Importing content types from Drupal 7 or Drupal 8 into Enterprise Server 9
Importing taxonomies into Enterprise Server 9 from Drupal 7 or Drupal 8
Integrating Drupal 7 in Enterprise Server 9
Setting the initial height of Publish Form fields (Drupal) in Enterprise 9
Cleaning up unused Publish Form properties for Drupal 7 from Enterprise Server 9
Reference Materials
Enterprise Server 9 documentation
Supported Drupal fields for use in Publish Form templates in Enterprise 9
Invalid status error when importing Drupal content types in Enterprise Server 9
Comment
Do you have corrections or additional information about this article? Leave a comment! Do you have a question about what is described in this article? Please contact Support.
0 comments
Please sign in to leave a comment.