Info: Adobe AEM was formerly known as Adobe DPS (2015).
The functionality of uploading content from WoodWing Enterprise to Adobe Experience Manager (AEM) by using InDesign is provided through an Enterprise Server plug-in together with the use of Smart Connection plug-ins.
This article describes how to integrate Adobe AEM in WoodWing Enterprise.
Note: If you are looking for steps to integrate the Adobe Digital Publishing Suite, see Integrating Adobe DPS in Enterprise Server 9.
Compatibility
Publishing content from WoodWing Enterprise to Adobe AEM requires the following to be installed:
- InDesign CS6 or Adobe InDesign CC 2014, containing the latest version of the Adobe Digital Publishing plug-ins.
- Smart Connection CS6 for InDesign (v8.3.13 or higher) or Smart Connection CC 2014 for InDesign (v10.0.3 or higher)
- Enterprise Server 9.6 or higher
Steps to perform
Steps need to be performed to install the necessary software and to configure Enterprise Server.
|
Note: It is assumed here that:
|
Adobe steps
1. Obtaining a unique Adobe AEM API key and secret
2. Creating a user role specific for the integration
3. Creating a Device Token and Device ID
Enterprise Server steps
4. Installing the crossdomain.xml file
5. Making the PHP ZIP Module available
6. Activating the Adobe AEM license
7. Installing and configuring the Enterprise Server plug-in
8. Setting up Enterprise Server Jobs
9. Setting up a Publication Channel
10. Setting up Multiple Device support
11. Registering Adobe AEM and the Publication Channels
12. Enabling the e-mail feature
13. Defining the Adobe article file format
14. Setting up Workflow Statuses
15. Making the "Upload Status" column available to Smart Connection users
17. Adding custom metadata properties to dialog boxes
19. Testing the upload to Adobe AEM
20. (Optional) Logging the communication with Adobe AEM
1. Obtaining a unique Adobe AEM API key and secret
Every Enterprise customer requires a unique Adobe AEM API key and secret from Adobe.
This can be obtained by sending an e-mail to wwds@adobe.com.
2. Creating a user role specific for the integration
Step 1. In the Adobe AEM Portal, create a role (specific for the integration) and grant the role to an Adobe ID.
Note: It is advised not to use an Adobe ID with a Master Admin role granted to it.
Step 2. E-mail the Adobe ID to wwds@adobe.com for whitelisting.
3. Creating a Device Token and Device ID
To connect Enterprise Server with Adobe AEM, a Device Token and Device ID are required.
Create these by using the Adobe AEX tool.
4. Installing the crossdomain.xml file
Creating the content for the publication is done in InDesign by using the Digital Publishing Tools panels which are part of Smart Connection for InDesign.Some of these panels (such as the Widget panel) need to receive information from and send information to Enterprise Server. This communication is established through the crossdomain.xml.
Step 1. Download the crossdomain.xml file from the software download page (click on either 'Enterprise Server Innovation' or 'Enterprise Server Maintenance').s
Step 2. Unzip the file and place it in the root of your server.
|
Example:
|
5. Making the PHP ZIP Module available
The Adobe DPS (2015) Server plug-in makes use of the ZIPArchive class of the PHP ZIP Module, which therefore needs to be installed.
- For Linux/Mac OS X: Compile PHP with ZIP support by using the --enable-zip configure option.
|
Note: If you have valid reasons not to (re)compile PHP, please use this alternative method. Show me
When PHP is not compiled with the --enable-zip option, the Adobe DPS (2015) Server plug-in falls back on the Info-ZIP command line tools (zip and unzip). For Mac OS X these tools are pre-installed so no further steps are therefore needed. For Linux, make sure that these tools are installed: Step 1a. Open the Terminal and enter the following command: zip When you see the help page starting with Copyright (c) 1990-2008 Info-ZIP, then the ZIP tool is already installed and no further steps are needed. When you see an error: The program 'zip' is currently not installed, then the ZIP tool is missing. Continue with the next step. Step 1b. Enter the following command: sudo apt-get install zip |
- For Windows: No installation is required; the ZIP extension is built into PHP (since PHP 5.3).
6. Activating the Adobe AEM license
In order for Smart Connection users to use the Digital Publishing Tools panels, activate the Digital Magazine license in Enterprise Server:
- Smart Connection CS6 for InDesign: activate the license named "Digital Magazine (8)"
- Smart Connection CC 2014 for InDesign: activate the license named "Digital Magazine (10)"
Step 1. In Enterprise Server, access the License Status page.
Choose Licensing in the Maintenance menu on the left side of the screen or on the Home page.
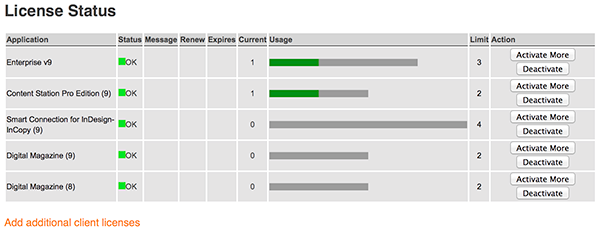
Step 2. Click the link Add Additional Client Licenses.
The Activate page appears.
Step 3. Activate your license by choosing one of the following methods:
Note: To continue with the automated process, a Web browser with Internet access is required. A browser connection status is displayed at the bottom of the page, indicating whether or not your current browser can be used for this process. If your browser cannot be used, check your Internet connection, such as your proxy settings, (software) firewalls, router configuration, and so on. Your browser needs to support Javascript, but you will see an error message in cases when Javascript support has been switched off.
The activated server license will be stored server-side, but the client system which runs the browser will actually make the connection to the WoodWing Activation server via Internet. This allows your server to be located in a subnetwork without internet-out access.
Step 4. Click Next.
The Serial Number page appears.
Step 5. From the Product list, choose Digital Magazine (8) or Digital Magazine (10).
Step 6. Enter the serial number and number of concurrent licenses (this allows you to divide your licenses among several application servers).
Step 7. (Optional) If you are unsure of the number of concurrent licenses available for this serial number, click the Check button.
Step 8. Click Next.
The License Status page appears. If all has gone well, a message displays that the license has been activated successfully.
Step 9. Return to the License Status page by clicking License Status.
Note: When activating a license offline, it takes 2 working days to process your request.
Offline activation is a 2-step process:
- Sending the activation request by email
- Processing the received activation
Sending the activation request by email
Step 4. Select the check box I don’t have access to the Internet or I prefer activating by e-mail.
Step 5. Click Next.
The Offline Activation page appears.
Step 6. Send the following details by e-mail to authorize [at] woodwing.com:
- Product name and version
- Per product: the serial number
- Per product: the number of concurrent users/connections for this installation.
- The installation code (as provided on screen)
Step 7. Click Cancel to terminate the process for now and wait for WoodWing to send you an activation code.
Processing the received activation
Step 8. Repeat Steps 1 to 6.
Step 9. Enter the received serial number and activation code.
Step 10. Click Next.
The License Status page appears. If all has gone well, a message displays that the license has installed successfully.
Step 11. Return to the License Status page by clicking License Status.
7. Installing and configuring the Enterprise Server plug-in
Step 1. Access the download page for the latest version of "Enterprise Server Innovation" or "Enterprise Maintenance", depending on the version used. The pages can be accessed from the Software Release page.
Step 2. Extract the file.
A folder named "AdobeDps2" is created.
Step 3. Place the folder in the following location:
<Enterprise Server path>/config/plugins
Step 4. In Enterprise Server, access the Server Plug-ins page.
Click Server Plug-ins in the Maintenance menu or on the Home page. The Server Plug-ins page appears.
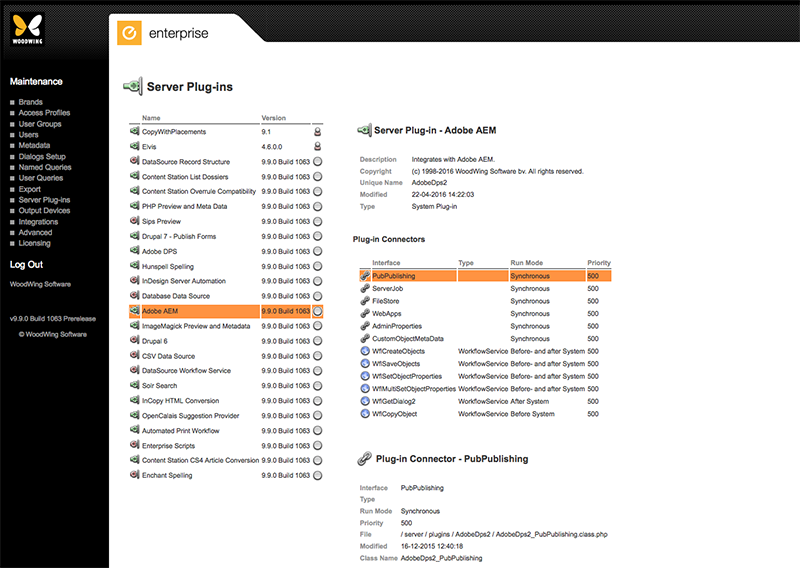
Step 5. Locate the plug-in named Adobe AEM and verify that it is enabled, as indicated by the green Plugged In icon  .
.
Note: In case it shows a different icon such as the Unplugged icon  , click the icon to activate the plug-in.
Step 6. (Optional, only required when Adobe has informed you that they have changed their paths to the Adobe AEM Distribution Service.) Open the file <Enterprise Server path>/config/plugins/AdobeDps2/config.php in a plain-text editor and check that the following URLs have not been changed by Adobe during the beta phase:
- Authentication Server URL: https://ims-na1.adobelogin.com
- Authorization Server URL: https://authorization.publish.adobe.io
- Producer Server URL: https://pecs.publish.adobe.io
- Ingestion Server URL: https://ings.publish.adobe.io
Step 7. Test Enterprise Server by running the Server Plug-ins test on the Health Check page.
Step 7a. In Enterprise Server, click Advanced in the Maintenance menu or on the Home page. A page with all advanced Maintenance features appears.
Step 7b. Click Health Check. The Health Check page appears.
Step 7c. At the bottom of the page, click Clear All.
Step 7d. Only select the Server Plug-ins test.
Step 7e. Click Test.
The test is executed and the result is displayed next to the test. It should display “OK”.
Note: If the test fails, an error is displayed together with instructions for solving it. Follow the instructions and then run the test once more.
8. Setting up Enterprise Server Jobs
The actual process of uploading content to Adobe AEM is performed by Enterprise Server Jobs.
Step 1. Make sure that Enterprise Server Jobs are fully set up and configured.
Step 2. In Enterprise Server, access the Enterprise Server Job Config page.
Step 2a. Click Integrations in the Maintenance menu or on the Home page.
Step 2b. In the Enterprise Server Jobs section, click Job Configurations. The Enterprise Server Job Config page appears.
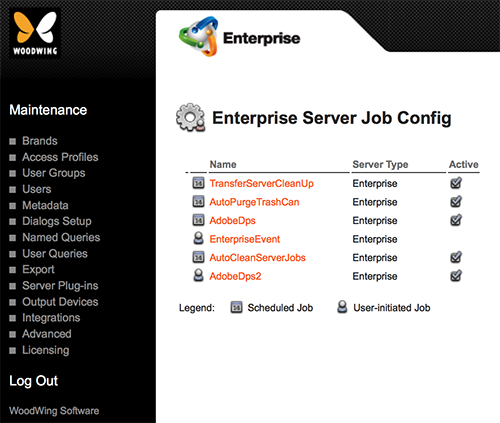
Step 3. Verify that the Job named "AdobeDps2" is listed and active.
9. Setting up a Publication Channel
In Enterprise, uploading content to Adobe AEM is done through a Publication Channel.
Step 1. Set up a Publication Channel of type dps2 and Publish System Adobe AEM.
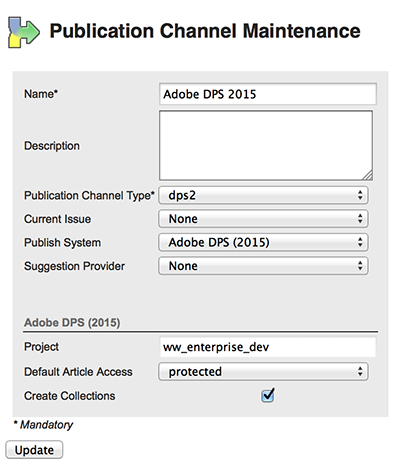
Step 1a. On the Brand Maintenance page, locate the Publication Channel options.
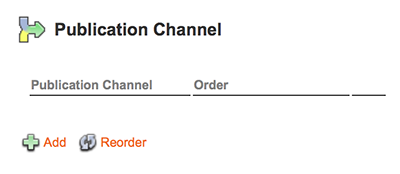
Step 1b. Click Add.
The Publication Channel Maintenance page appears.
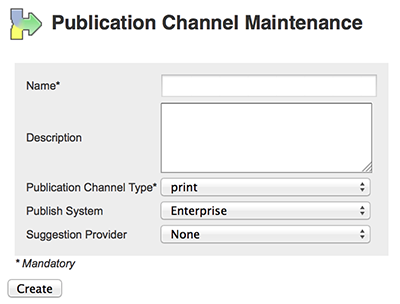
Step 1c. In the Name field, enter a name that is unique within that Brand.
Step 1d. (Optional) In the Description field, enter a description.
Step 1e. From the Publication Channel Type list, choose dps2.
Step 1f. From the Publish System list, choose Adobe AEM.
Step 1g. Leave the Suggestion Provider field set to None, it is not used for Adobe AEM.
Step 2. Click Create.
An additional section named Adobe AEM appears as well as sections for creating Editions and Issues.
Filling out the Adobe AEM section

Note: The Project field is a read-only field and is automatically filled by Enterprise (this occurs at a later stage during the integration process).
Step 4. From the Default Article Access list, choose from the following options:
- Metered. Enables a user to preview an article for free, but only as long as the total number of free articles that can be viewed for that publication has not yet been reached. Once that total is reached, the user is prompted to purchase the publication or a subscription.
Note: Setting the total number of free articles is done in the account administration panel of Adobe AEM.
- Protected. Protects the story from sharing it through social media in the following ways:
- Viewing a representation of the story in a desktop browser.
- Sharing the story through Facebook, Adobe AEM, e-mail and by Copy Link.
Sharing is done by making a URL available:
- For unprotected stories, this URL links to a representation of the story which can be viewed in a supported desktop browser or on a smartphone or tablet.
- For protected stories, this URL links to the publication URL (a URL that contains information about the publication).
- Free. Makes the story available to all users for free.
Step 5. Select the check box Create Collections. This makes sure that when a layout is checked in, a Collection is automatically created when that Collection does not yet exist.
Editions represent the output device that is published to. In Adobe AEM, output devices are of a generic type such as a smartphone or a tablet, and not for a specific device such as an iPhone 6 or Samsung Galaxy S4.
An Edition should therefore be created for each of these output device types.
Step 6. Create an Edition named phones and an Edition named tablets.
Step 6a. Click Add Edition.
The Edition Maintenance page appears.
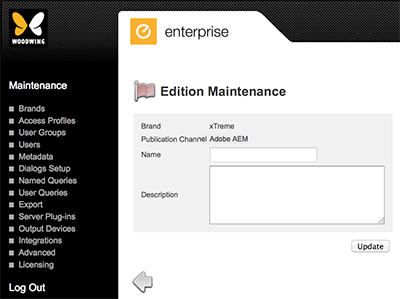
Step 6b. Enter the name "phones" in the Name box.
Step 6c. (Optional) Enter a description in the Description box.
Step 6e. Click Update.
The Publication Channel Maintenance page appears with the newly created Edition added to the Editions menu.
Step 6f. Add another Edition named tablets.
Step 6g. (Optional) In the Order box on the Publication Channel Maintenance page, enter an order number for each Edition and click Reorder. This will determine in which order the Editions are displayed in the client application interfaces.
Creating Issues
Step 7. Create one or more Issues.
Step 7a. On the Publication Channel Maintenance page, click Add Issue.
The Issue Maintenance page appears.
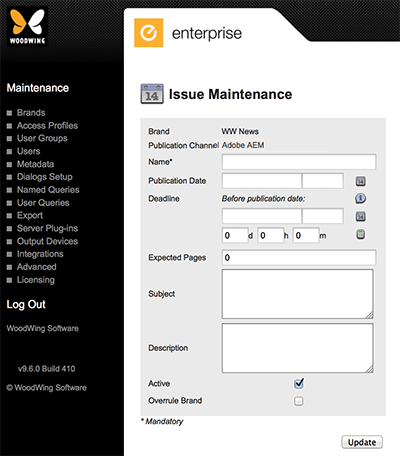
Step 7b. Fill out the details.
Note: At the most basic level, only a name needs to be entered; all other options can also be set at a later stage by modifying the created Issue.
- Name. Name of the Issue.
- Publication Date. Date (and time, if required) when the Issue needs to be published by.
- Deadline. Date (and time, if required) when the Issue needs to be finished by.
Tip: Instead of entering a date, enter the number of days, hours, and/or minutes before the publication date should be reached and click the Recalculate icon. This will automatically calculate the Deadline based on the entered Publication Date.
- Expected Pages. Number of expected pages.
- Subject. This feature is currently not functional.
- Description. The description of the Issue. For internal use only.
- Active. Use to deactivate the Issue. This will hide the Issue and all objects assigned to the Issue from the users without actually removing the Issue from the system.
- Overrule Brand. This feature is not functional for Adobe AEM Issues.
Step 7c. Click Update.
Step 7d. Click the arrow at the bottom of the page to return to the Publication Channel Maintenance page.
Step 7e. Click the arrow at the bottom of the page to return to the Brand Maintenance page.
Step 7f. (Optional, only if multiple Publication Channels have been created) From the Default Publication Channel list at the top of the Brand Maintenance page, choose the default Publication Channel that should act as the default AEM channel.
Note: In order for this feature to work properly, it is imperative that an order sequence for the created Issues is correctly specified on the Publication Channel Maintenance page. If this is not done (or not done correctly), Enterprise may not be able to properly determine the Previous and Next issues.
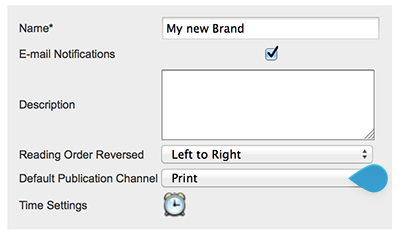
Figure: The Default Publication Channel list.
10. Setting up Multiple Device support
In the previous step, the output devices "phones" and "tablets" were defined in the form of Editions. For each of these devices, exact settings need to be defined such as width, height, the image quality to use, and so on.
Step 1. Decide for each type of output device (phone and tablet) which physical device is the main device to output content to.
Example: You might decide to target the iPhone 6 and the iPad Air 2 as the main devices to output content to.
This means that on these devices the content will fit exactly while on devices in which this content does not fully fit (because their dimensions are different), pillar boxes (vertical black bars to the left and right of the screen) or letter boxes (horizontal black bars at the top and bottom of the screen) are displayed.
Step 2. In Enterprise Server, access the Output Devices Maintenance page.
In Enterprise Server, choose Output Devices in the Maintenance menu on the left side of the screen or on the Home page.
The Output Devices Maintenance page appears.
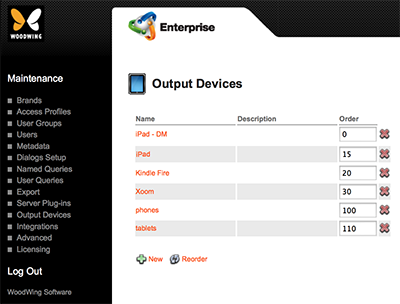
Figure: The Output Devices Maintenance page.
The devices "phones" and "tablets" are defined by default.
Step 2. Click phones to verify its settings and adjust them when necessary.
- Name. The name of the device. This should be "phones" or "tablets" (lower case).
- Description. A general description of the device.
- Landscape Width. The available screen width of the device (in pixels) when held in landscape orientation.
- Landscape Height. The available screen height of the device (in pixels) when held in landscape orientation.
- Portrait Width. The available screen width of the device (in pixels) when held in portrait orientation.
- Portrait Height. The available screen height of the device (in pixels) when held in portrait orientation.
- Preview Quality. Controls the quality of the page preview of the exported pages. Choose from the following values:
- 1 - JPEG low quality
- 2 - JPEG good quality
- 3 - JPEG Excellent quality
- 4 - JPEG great quality
|
Example: On the iPad, the Preview Quality settings result in the following dpi values (based on a 1024x768px image):
|
- Landscape Layout Width. Defines the width of a page in landscape orientation (in points), used by Enterprise to distinguish pages in different orientations.
Note: When a layout has multiple devices assigned (in the form of Editions), the first Edition assigned to the layout is used as the primary device. The Landscape Layout Width setting of this primary device is used for determining whether the layout should be treated as a layout in landscape orientation or portrait orientation. Make sure therefore that an order is set for the created Editions.
The number of Editions assigned to the layout could of course be different than the total number of devices configured. For example, assume that the following devices have been configured:
10 phones
20 tablets
If for a layout only the tablet Edition has been assigned, then the tablet is considered as the primary device, even though the phones Edition precedes it in the configuration.
- Pixel Density. Indicates the pixel density (PPI) in which the magazine has been designed.
- PNG Compression. The level of compression used for generating PNG images in InDesign, defined in a scale from 0 (zero) to nine.
Note: PNG images are created when Hotspot elements (Hotspot, Selected Hotspot, Hotspot content, and Hotspot Close button) or Scrollable Area content contain transparency. When undefined, the setting defaults to '5'. A higher compression takes slightly longer to generate but is still advised as it reduces the overall size of the folio file.
- Text View Padding. This option is not used by Adobe AEM.
Step 3. Click Update.
Step 4. Click the Left Arrow icon to return to the Output Devices page.
Step 5. Repeat this process to verify the settings for tablets.
11. Registering Adobe AEM and the Publication Channels
This step will register the Issue in Enterprise Server with Adobe AEM and connect the Publication Channel to the Adobe Project.
Step 1. Access the Adobe AEM Maintenance page in Enterprise Server.
Step 1a. In Enterprise Server, click Integrations in the Maintenance menu or on the Home page. A page with all integrated services appears.
Step 1b. Click Adobe AEM. The Adobe AEM Maintenance page appears, showing all Publication Channels that are set to publish to Adobe AEM.
Step 2. Connect Enterprise Server to Adobe AEM by clicking Register.
Note: Should the registration process fail, test the Enterprise integration as explained in Testing Enterprise Server.
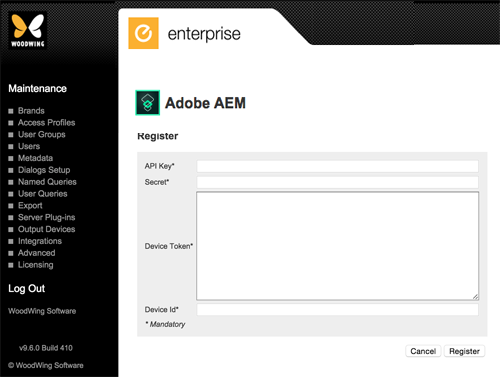
Step 3. On the page that appears, enter the following:
- The API key and Secretas received from Adobe (see 1. Obtaining a unique AEM API key and secret)
- The Device Token and Device ID as created by the Adobe AEX tool (see 3. Creating a Device Token and Device ID)
Step 4. click Register.
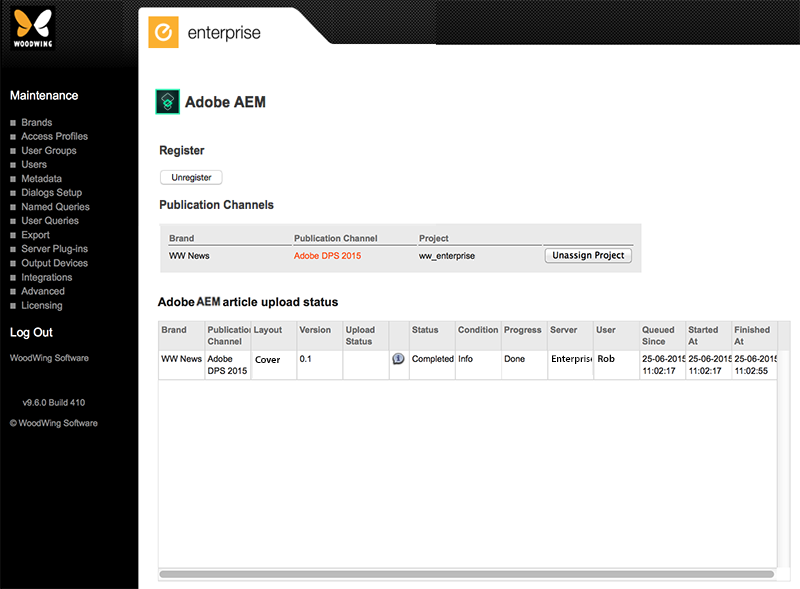
Step 5. On the Adobe AEM Maintenance page, click Assign Project for the Publication Channel that needs to be connected to its defined Adobe AEM Project.
Step 6. For the listed Publication Channel, click the link in the column named "Publication Channel". The Publication Channel Maintenance appears. Verify that the Project field is filled in.
12. Enabling the e-mail feature
When uploading content to Adobe AEM fails, an e-mail can be sent to inform the user who checked-in the layout in InDesign. This functionality needs to be configured and the e-mail address of the recipient needs to be set.
Step 1. Configure Enterprise Server by following the steps in Configuring e-mail notifications in Enterprise Server 9.
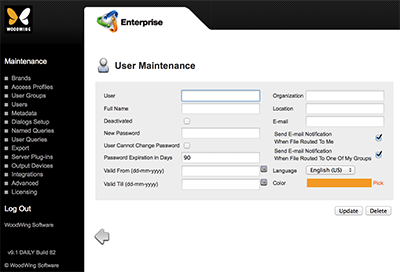
Step 2. On the User Maintenance page for the user who checks in the layout, fill out an e-mail address in the E-mail field.
13. Defining the Adobe article file format
A page in an article is essentially an image with optionally interactive objects placed on top of it.
These background images can be exported in one of the following formats:
- JPEG. Default setting.
- PDF. Allows zooming in on the page.
- PNG. Ensures color consistency with any content placed on top of the background (see comment below).
In case a format other than JPEG needs to be used, follow these steps:
Step 1. In the configserver.php file, locate the SERVERFEATURES section.
<Enterprise Server path>/config
Step 2. Add or enable the DPSFolioFormat ServerFeature:
new Feature( 'DPSFolioFormat', '<EditionID>, <format>;<EditionID>,<format>' ),
Step 3. Use the following values:
- EditionID: the ID of the Edition (device) to which the issue is assigned. Obtain this from the URL of the Edition Maintenance page.
|
Example: In the following example, the Edition ID is 45: http://<server path>/server/admin/hpeditions.php?id=45&publ=1&channelid=63 |
- format: the file format to use. Possible values: PDF or PNG. In case any other value or an empty value is used, the article is exported in JPEG format.
|
Example:
|
14. Setting up Workflow Statuses
Uploading a story to Adobe AEM is done as a 2-step process:
- The layout is turned into an Adobe article. This is done by checking in the layout with the "Create Adobe DPS Article" check box selected in the Check-in dialog box.
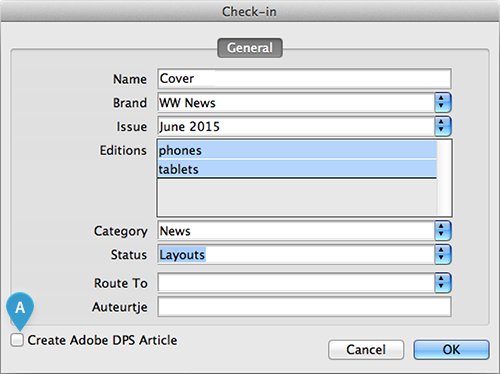
Figure: The "Create Adobe DPS Article check box (A) in the Check-in dialog box.
- The Adobe article is uploaded to Adobe. This is done when the layout is assigned to a Workflow Status for which in Enterprise Server the "Ready for Publish" option is enabled. As the name implies, normally this option is enabled for a status that is used to indicate that the layout is ready for publishing. Assigning the Workflow Status can be done by saving the layout or by changing the properties of the layout.
Use of the "Ready for Publish" option within an Adobe AEM workflow
The "Ready for Publish" option of a Workflow Status is used within an Adobe AEM workflow for 2 purposes:
- It triggers an upload of the most recent Adobe article to Adobe when a layout is assigned to the Workflow Status.
- It controls the default state of the "Create Adobe DPS Article" check box in InDesign:
- When the option is enabled, the check box is selected by default
- When the option is not enabled, the check box is not selected by default
|
Example: Two Workflow Statuses exist: Status A with the "Ready to be published" option enabled and Status B with the "Ready to be published" option not enabled. When a user chooses Status A in the Check In dialog box, the "Create Adobe DPS Article" check box is automatically selected. When a user chooses Status B in the Check In dialog box, the "Create Adobe DPS Article" check box is automatically cleared. |
Configuring the Workflow statuses
Do the following:
- For each Workflow Status for which the created Adobe article needs to be uploaded to Adobe, enable the "Ready to be published" option.
- For all other Workflow Statuses for which no upload should be performed (such as when working on the content), disable the "Ready to be published" option.
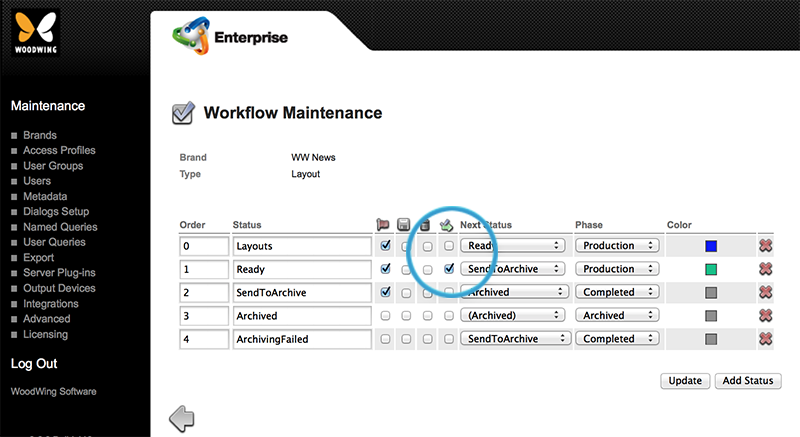
Figure: The Workflow Maintenance page for layouts where the "Ready to be Published" option is set for the Workflow Status named "Ready".
Step 1. Access the Workflow Maintenance page.
Step 1a. In the Maintenance menu or on the Home page, click Brands.
A page showing all created Brands appears.
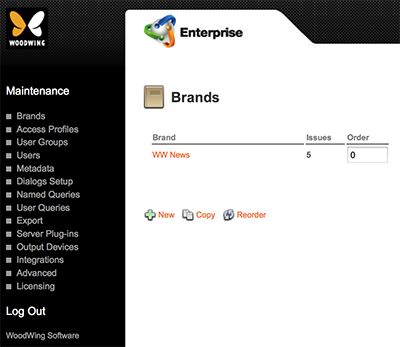
Figure: The Brands page.
Step 1b. Click the name of the Brand.
The Brand Maintenance page appears.
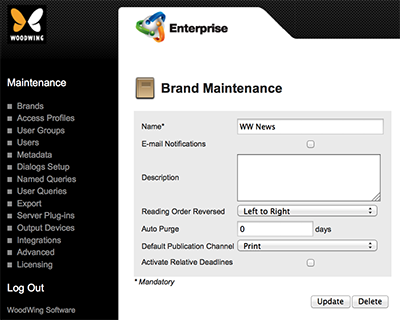
Figure: The Brand Maintenance page.
Step 1c. Locate the Workflow options.
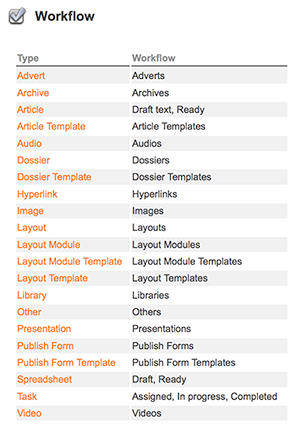
Step 1d. Click "Layout" or create a new Workflow for object type "Layout".
The Workflow Maintenance page appears.
Step 2. For each Workflow Status, enable of disable the Ready to be Published option.
15. Making the "Upload Status" column available to Smart Connection users
Uploading a layout to Adobe AEM is done in the background by Enterprise Server. The progress of this process can be verified in the "Upload Status" column in the Smart Connection panel in InDesign.
This column needs to be made available to Smart Connection users by configuring it in Enterprise Server. Do this by adding the "* Upload Status" column through the Dialog Setup page, as explained in Adding properties to the Smart Connection panel in InDesign and InCopy.
16. Adding custom metadata
When an InDesign user creates certain content such as adding a Slide Show or audio files, Enterprise needs to know which files are to be included. This is done by setting the "Intent" property of these files.
This property therefore needs to be made available.
Step 1. In Enterprise Server, access the Metadata Maintenance page.
Click Metadata in the Maintenance menu or on the Home page. The Metadata Maintenance page appears.
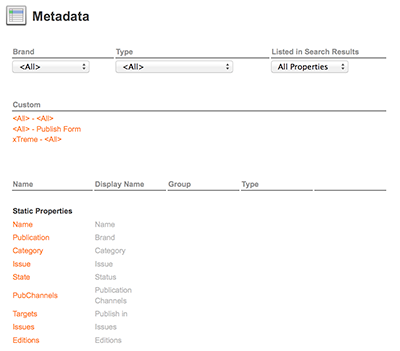
Step 3. Scroll to the bottom of the page and click Add Custom Property. The Custom property page appears.
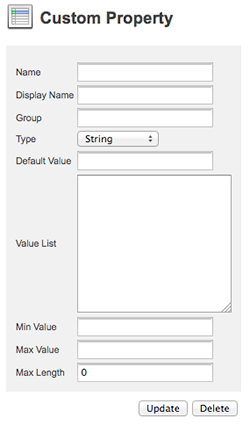
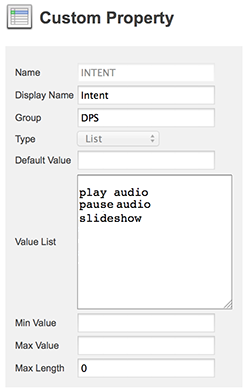
Step 4. Add the property:
Name: INTENT
Display Name: Intent
Assigned to: images
Description: Used for defining the intent with which an object is to be used.
Type: List
Default value: blank
Values:
Note: All values should be written in lower case.
- Blank. Add a blank value (by pressing Return) as a way for users to choose the option of 'none'.
- play audio. Used for images; it specifies that the image is to be displayed when an audio file is played. Multiple images in a Dossier can be assigned this intent. When a set of images is used, this results in an animated play progress. Multiple images are sorted by name.
- pause audio. Used for images; specifies that the image is to be displayed when an audio file is paused. Multiple images in a Dossier can be assigned this intent. When a set of images is used, this results in an animated pause progress. Multiple images are sorted by name.
- slideshow. Used for Slide Show Widgets; specifies that the Widget is to be used for creating a Slide Show with the use of the InDesign Slide Show panel.
Step 5. Click Update.
Step 6. Click the Left Arrow icon to return to the Metadata page.
17. Adding custom metadata properties to dialog boxes
The custom metadata property "Intent" that was added to Enterprise in the previous step needs to be made available to the user. This is done by adding it to the Workflow dialog boxes of the objects for which the properties are to be used.
Example: The property for setting the intent of a image needs to be added to the Properties dialog box of an image.
Step 1. In Enterprise Server, access the Dialog Setup page.
Click Dialog Setup in the Maintenance menu or on the Home page. The Dialog Setup page appears.
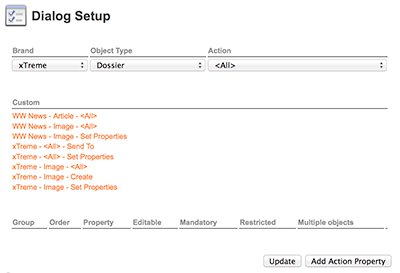
Step 2. In the Brand list, choose the Brand to which you want the properties to be available.
Step 3. Add the properties listed in the table below by doing the following:
Step 3a. From the Object Type list, choose the object listed in the Object Type column.
Step 3b. From the Action list, choose the action listed in the Action column.
Step 3c. At the bottom of the page, click Add Action Property. Options for adding a property appear.

Step 3d. (Optional) In the Order field, enter a number that defines the order in which the property should appear.
Step 3e. From the Property list, choose the property listed in the Property column of the table.
Step 3f. Select the check box for the option Editable and (optionally) for the option Multiple objects (requires Enterprise 9.2 or higher).
Step 3g. Click Add Action Property. The property is added and a new set of options appear for adding another property.
Step 3h. Repeat steps 3a to 3g until all properties in the table are added.
| Object Type | Action | Property |
|---|---|---|
| Image | Create | *Intent (INTENT) |
| Image | Set Properties | *Intent (INTENT) |
| Other | Create | *Intent (INTENT) |
| Other | Set Properties | *Intent (INTENT) |
Note: The custom property named 'Widget Manifest' does not need to be added to a dialog box; it is used internally by Enterprise Server only.
Step 4. (Optional) To enable users to automatically add an image or layout to a Dossier when the file is added to the system, also add the following properties:
| Object Type | Action | Property |
|---|---|---|
| Image | Create | Dossier (DOSSIER) |
| Layout | Create | Dossier (DOSSIER) |
18. Testing Enterprise Server
Step 1. In Enterprise Server, access the Health Check page.
Step 1a. In Enterprise Server, click Advanced in the Maintenance menu or on the Home page. A page with all advanced Maintenance features appears.
Step 1b. Click Health Check. The Health Check page appears.
Step 2. At the bottom of the page, click Clear All.
Step 3. Only select the Adobe AEM test.
Step 4. Click Test.
The test is executed and the result is displayed next to the test. It should display “OK”.
Note: If the test fails, an error is displayed together with instructions for solving it. Follow the instructions and then run the test once more.
19. Testing the upload to Adobe AEM
Step 1. In InDesign, check-in a layout to an Adobe AEM Publication Channel and to a Workflow Status for which the "Ready to be published" option is set.
Step 2. In Enterprise Server, verify on the Adobe AEM Maintenance page that a task has been created and is being queued or processed.
Step 3. In Adobe AEM, verify that the story appears in your Project.
20. (Optional) Logging the communication with Adobe AEM
Enterprise Server talks to the Adobe Publish Web services over HTTP. Log files can be created to inspect the data being sent and received. Requests and responses will be written to the server logging folder using the following name convention:
- <timestamp>_AdobeDps2_<service>_REST_Req.txt
- <timestamp>_AdobeDps2_<service>_REST_Resp.txt
IMPORTANT: Because of performance reasons, please make sure to disable this option when taking Enterprise into production.
To log the communication between Enterprise Server and Adobe AEM, perform the following steps:
Step 1. In the configserver.php file, locate the LOG_DPS_SERVICES option and set it to "true".
<Enterprise Server path>/config
// LOG_DPS_SERVICES:
//    Used for logging DPS Web services in the service log folder.
//    When enabled, DPS requests fired by Enterprise Server to Adobe
//    DPS Server and the corresponding responses are logged.
//    Adobe DPS is a so called REST server.
//    The REST services are logged in the service folder
//    (in OUTPUTDIRECTORY/soap) and have an AdobeDPS_ prefix
//    and a .txt file extension. By default, this log feature
//    is disabled. It can be temporarily enabled to
//    troubleshoot DPS traffic.
//
define ('LOG_DPS_SERVICES', true);
Step 2. Enable error logging for Enterprise Server through the configserver.php file and set and set the DEBUGLEVEL option to "DEBUG". (See Logging Enterprise Server 9 activity.)
Document history
- 10 November 2016: Added step to test Enterprise Server after installing the Enterprise Server plug-in.
Comment
Do you have corrections or additional information about this article? Leave a comment! Do you have a question about what is described in this article? Please contact Support.
0 comments
Please sign in to leave a comment.