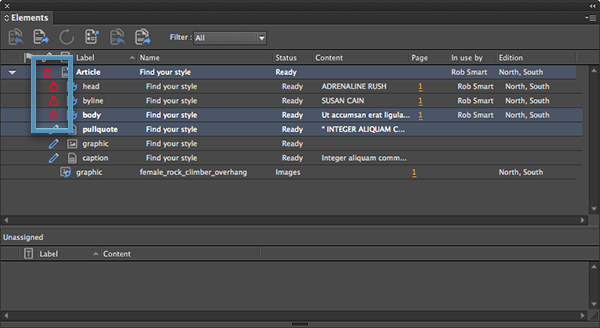
Users of Studio for InDesign and InCopy can receive and send updates about changes that were made to the layout or to the article that is placed on the layout:
- When the design of the layout is changed, the InCopy user needs to add more text or remove text.
- When the InCopy user adds more text or removes text, the layout needs to be adjusted.
- When the InCopy user places an image, the layout needs to be adjusted.
This article describes how this information is sent and how the article or layout can be updated.
The processes are described separately: for InDesign and for InCopy.
Receiving and sending update information in InDesign
In InDesign you can:
- Receive information from an InCopy user about the available content in an article
- Send out information to an InCopy user about how the article will fit on the layout
Receiving updates
When an InCopy user saves an article that is part of the layout that you are working on, a notification is shown in the following locations:
- On the layout, a yellow icon is shown on the frames of the article.
- In the Elements panel, an update icon is shown in front of the components.
- In the Links panel, a yellow icon is shown in front of the components.
Update the articles as follows:
- On the layout, double-click a yellow icon on a frame of the article. All frames of the article will be updated.
- With an article frame selected on the layout, do one of the following:
- In the Elements panel, click the Update Content button in front of a component.
- In the Links panel, double-click a yellow icon in front of a component.
- In the flyout menu of the Elements panel, use the update options.
- Click a yellow icon on a frame of the selected article
- Choose WoodWing Studio > Update All Content
- In the Elements panel, right-click the article and choose Update Content.
Sending updates
When working on a layout in InDesign, the size and shape of the frames that hold articles (also known as geometry information) can change regularly. It is important for copy editors to receive this information so that they can make sure that the exact number of lines and characters are available.
When a copy editor opens an article in InCopy, the article contains the latest geometry information. Once the article is open, information from InDesign about geometry changes is either sent automatically or can be sent manually.
Automatically
Each time the layout is saved, geometry information is sent to InCopy. When an InCopy user is working on an article that is placed on the layout, the Geometry Update icon in the Studio toolbar changes color: yellow when a low priority change is received, and red when a high priority change is received.
![]()
|
Notes:
|
Manually
Info: This feature requires Studio for InDesign and InCopy version 15.1.2 (for Adobe 2020) or any higher version of Studio for InDesign and InCopy. (See how to check which version of Studio for InDesign and InCopy is installed.)
|
Note: Manually sending out an update is only relevant when the article is actually being edited in InCopy. This is indicated by a lock icon in the Elements panel for the article.
|
Manually sending out a geometry update is always done for all articles placed on the layout. It is not possible to send out an update for selected articles only. Also, no message is shown on the system of the user to whom the update is sent.
Use one of the following methods:
- Choose WoodWing Studio > Send Geometry.
- In the buttons bar of the Elements panel, click the Send Geometry button.
![]()
- From the flyout menu of the Elements panel, choose Send Geometry.
Receiving layout information in InCopy
When working on an article that is placed on a layout, it could be that the InDesign user changes the way the article fits within the design of that layout (known as geometry information). Depending on the result, text may need to be added to the article or text may need to be removed.
When the geometry information changes, the Geometry Update button changes color: yellow for low priority changes, and red for high priority changes.
![]()
|
Notes:
|
Requesting geometry information manually
Do one of the following;
- Choose WoodWing Studio > Update Geometry
- In the Studio toolbar, click the Update Geometry button.
![]()
Figure: The Update Geometry icon in the Studio toolbar.

Comment
Do you have corrections or additional information about this article? Leave a comment! Do you have a question about what is described in this article? Please contact Support.
0 comments
Please sign in to leave a comment.