Working on a publication is team work and it is common practice for one team member to pass on a file to another team member for further editing. In a typical scenario, the routed file is not downloaded until the user who receives the file opens it for editing.
However, when large files such as InDesign layouts are passed on it can take quite a while for the file to be downloaded, especially with large file sizes in combination with low connection speeds. This means that the user will have to wait for the download to be completed before work on the file can begin.
To improve this process, a file can be automatically downloaded onto the system of the user who receives the file immediately after it is routed. The download process takes place in the background so the user can continue working with Studio while the file is being downloaded. When the user wants to work on the file it is immediately available because it is already downloaded and present on the system.
Automatically downloading a routed file is done by making use of the Smart Caching feature.
How it works
The working of Smart Caching in Studio is very straight forward and in fact, invisible: a file is routed to a user or user group1 and Smart Caching automatically downloads the file onto the system of the user who receives the file. As mentioned above, this all takes place in the background so the user will very likely not be aware that the download is in progress apart from seeing a message that a file has been routed.
The user will at some point open the file for editing from the Inbox and it will then open straight away because it is already downloaded.
If needed, the user can pause Smart Caching or completely disable it.
1 Only when the user group has no more than 7 users and when Smart Caching has been enabled for that group.
Configuration
Before Smart Caching can be used, Studio Server needs to be configured.
For more information, see Configuring Smart Caching for Studio.
Using Smart Caching
The Smart Caching feature is controlled by the Desktop application. It takes care of downloading a routed file in the background, thereby making it possible to continue to work with Studio.
As soon as the file is routed to you, a message is shown to inform you about this. The file appears in your Inbox and it is downloaded in the background.
|
Note: After a file has been downloaded, the original version could have been updated by other users multiple times. When this is the case, the file on your system is outdated and needs to be downloaded again. When a newer version is available, this version is downloaded when you check out the file. Checking out the file can in this case take a little longer compared to when you already have the latest version on your system. |
When you decide to work on the file while it and other files are still being downloaded, the file is moved to the top of the download queue to make sure that you can access the file as quickly as possible.
As mentioned, the use of Smart Caching is practically invisible because all actions take place in the background. However, you will be notified when first using Smart Caching and you will also be able to control some of its features, as explained below.
Requirements
To use Smart Caching, the Desktop application is needed.
It is assumed here that Smart Caching has been configured and is ready to use.
Note: The Desktop application only works when using Studio in Google Chrome, not in other Web browsers.
First use
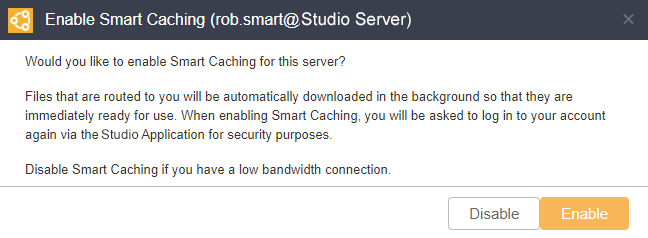
When first logging in to Studio after the Smart Caching feature is made available for you, the Desktop app will ask if you want to enable Smart Caching:

Step 1. Click Enable to enable Smart Caching.
|
Notes:
|
A Sign In window appears for connecting the Desktop app to Studio Server.

Step 2. Enter your user name and password and click Sign in.
Smart Caching is now ready for use.
Receiving routed files using Smart Caching
When a file is routed to you and Smart Caching is active, the file is automatically downloaded in the background.
While the download is taking place, take note of the following:
- The icon of the Desktop app changes into a spinner, indicating that a download is in progress.
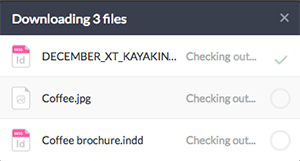
- To view any active downloads, open the Download Progress window by clicking the Desktop app icon and choosing Download Progress from the menu.
![]()

|
Notes:
|
Controlling the working of Smart Caching
Using the settings of the Desktop application, the following features of Smart Caching can be controlled:
- Downloads can be paused
- Smart Caching can be disabled
- Cached files can be cleared
- The settings for caching files can be configured
- The Smart Caching connection to Studio Server can be removed
|
Info: Use the filter to only show information for one feature: |
Pausing and resuming downloads
Downloads that are in progress can at any time be paused. This can be useful when temporarily working on a slow connection, or to free up the connection for other processes. To pause and later resume downloads, access the menu by clicking the Desktop app icon and choosing 'Pause Smart Caching' or 'Resume Smart Caching'.
![]()
Disabling Smart Caching
If needed, Smart Caching can be temporarily disabled and at a later stage enabled again.
Step 1. Access the Desktop app Smart Caching connections page of the Desktop app.
Step 1a. Click the Desktop app icon and choose Settings.
![]()
The Desktop app appears.
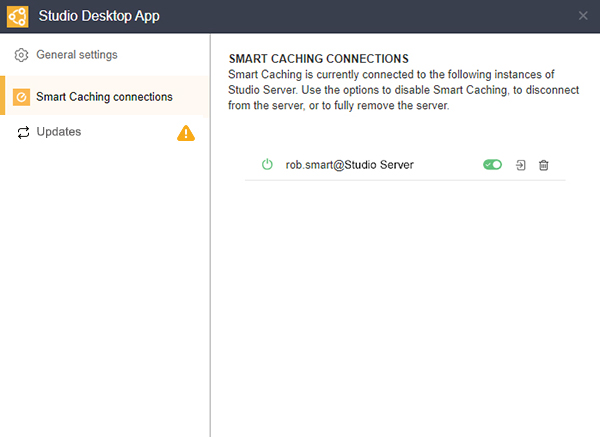
Step 1b. From the menu on the left, choose Smart Caching connections.
The window shows all instances of Studio Server to which a connection has been made for Smart Caching (by logging in when first using Smart Caching, see above).

Step 2. Locate the Studio Server instance that you are currently connected to.
Note: This will be the server with the same name as the one you chose when signing in to Studio.
Step 3. Click the switch to enable or disable the Smart Caching connection for that instance of Studio Server
Working with cached files
The files that are downloaded by the Desktop app are stored in the following location:
- For Windows: C:\Users\USER_FOLDER\AppData\Local\Content Station\cache
- For macOS: Users\USER_FOLDER\Library\Application Support\Content Station\cache
Through the General settings of the Desktop app, the following can be controlled:
- Cache size: The maximum disk space used for caching files.
- Cache period: The maximum number of days that files are kept in the cache.
- Clear cached files: Clears the files that are currently stored in the cache.

Figure: The General settings of the Desktop app.
Removing the Smart Caching connection for an instance of Studio Server
When Smart Caching was used for the first time, a connection to Studio Server needed to be made by logging in to the server (see above). If needed, this connection can be fully removed.
Step 1. Access the Desktop app Smart Caching connections page of the Desktop app.
Step 1a. Click the Desktop app icon and choose Settings.
![]()
The Desktop app appears.
Step 1b. From the menu on the left, choose Server connections.
All instances of Studio Server are shown to which a connection have been made for Smart Caching (by logging in when first using Smart Caching, see above).

Step 2. Locate the Studio Server instance that you are currently connected to.
Note: This will be the server with the same name as the one you chose when signing in to Studio.
Step 3. Do one of the following:
- Disconnect the server by clicking the Disconnect icon to disconnect Smart Caching from that server. Click it again to re-connect to the server again.
- Remove the server by clicking the Trash Can icon to fully remove the reference to that server. When logging in to that server the next time with Studio, you will be asked to connect Smart Caching by logging in again.
Comment
Do you have corrections or additional information about this article? Leave a comment! Do you have a question about what is described in this article? Please contact Support.
0 comments
Please sign in to leave a comment.