Enterprise Server contains various default metadata properties. Additional metadata properties can be created in the form of custom properties.
This article explains how this is done.
Note: Be aware that custom properties are not restored when restoring file versions.
Step 1. In Enterprise Server, access the Metadata Maintenance page.
Click Metadata in the Maintenance menu or on the Home page. The Metadata Maintenance page appears.

Step 2. Make sure that the Brand list and Type list both show All.
|
Notes:
Special case: Using custom properties with the same name across multiple Brands Scenario: a Brand is chosen from the list and a custom property is created with a specific name. Next, another Brand is chosen from the list and another custom property is created with the same name as the one created for the other Brand. This scenario is supported but only if the type of both properties is the same. A use case is when 2 lists need to be created but each list needs to hold different values. For example: you could create 2 different custom properties named 'Languages' and the list of one property could hold different languages than the list of the other property. Note though that it is recommended to use unique and descriptive names for each custom property; this will make it easier to manage them and will at the same time prevent possible system conflicts. |
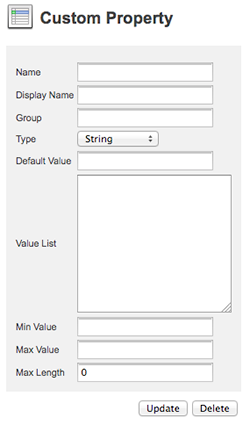
Step 3. Scroll to the bottom of the page and click Add Custom Property. The Custom property page appears.

Step 4. Enter the values of each field as needed:
- Name. Should start with a capital letter, not contain any spaces, and may not start with a number. Valid characters: a-z, A-Z, 0-9, or _.
-
-
-
- Display name. Name used for displaying the property in the client user interfaces.
-
-
- Group. When filled, the property will be shown in Workflow dialog boxes on a separate tab control. If left blank the property will be placed on the General tab together with all other properties.
- Type. Choose from the following:
- String. Any sequence of characters.
- Multistring. Used for keywords.
- Multiline. Input can be displayed on multiple lines.
- Boolean. True or False.
Tip: To set a boolean to True by default, set the Default value to 1 and add true and false to the value list (in that order and each on its own line).
- Integer. Whole numbers.
- Double. Decimal numbers, for example 1.56.
Note: The min, max or default values are used for determining the precision.
Example: To have a precision of 4 decimal values, enter 0.9999.
- Date. Date.
Note: The format to follow is that of the LANGPATDATE option as defined in the configserver.php file. See Controlling the way the date is displayed.
- Datetime. Date and time.
Note: The format to follow is that of the LANGPATAMPM option as defined in the configserver.php file. See Controlling the way the time is displayed.
- List. Drop-down list.
- Multilist. List box
- Default value. Default property value.
- Value list. List of values that a list or drop-down list should hold.
- Min value. The minimum value. Used for numeric values. The working of the value depends on the version of Enterprise Server used.
| Enterprise Server version | Comments |
|---|---|
|
0 (zero) is the limit. To set no minimum, leave the field empty. |
|
0 (zero) means that no minimum is set. |
- Max value. The maximum value. Used for numeric values. The working of the value depends on the version of Enterprise Server used.
| Enterprise Server version | Comments |
|---|---|
|
0 (zero) is the limit. To set no maximum, leave the field empty. |
|
0 (zero) means that no maximumis set. |
- Max length. The maximum length that the value can have. Used for strings.
Step 5. Click Update.
Step 6. Click the Left Arrow icon to return to the Metadata page.
After adding a custom property, you want to make it available to the end users. This is typically done by adding it to a Workflow dialog box.
Comment
Do you have corrections or additional information about this article? Leave a comment! Do you have a question about what is described in this article? Please contact Support.
0 comments
Please sign in to leave a comment.