The typical method of creating a new layout when using Studio for InDesign is to base it on a layout template. This template is set up by the system administrator and is usually already part of a Dossier containing other files that are related to the story. Using a template ensures that:
- The layout contains the correct components, fonts and styling, specifically set up for the Publication Channel in which it will be used.
- The layout will have the correct properties assigned such as Publication Channels, Workflow Statuses, and so on.
- You don't have to spend time searching for the correct files but can start working straight away.
Alternatively, you can create a layout from scratch or open a locally saved file and subsequently add it to Studio Server.
Step 1. Do one of the following:
- Double-click a layout template
- Create a new layout
- Open a layout that is saved locally
Step 2. Save the layout to Studio Server by using one of the following methods:
- From the File menu, choose:
- Save
- Save As
- From the WoodWing Studio menu, choose:
- Save Version...
- Save As...
- Check In...
- Use a keyboard shortcut for any of the above mentioned commands
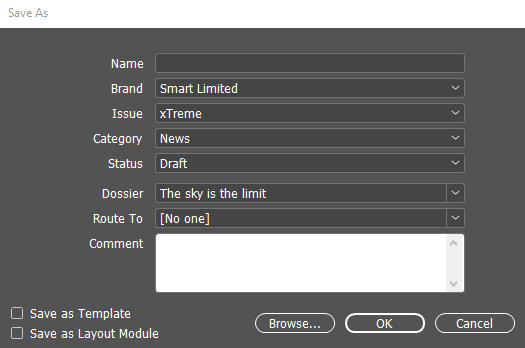
The Save As dialog box appears.

Step 3. In the Name box, enter a descriptive name.
Using duplicate file names in Studio Server
Step 4. (Optional) Change any of the properties of the layout.
Step 5. From the Dossier list, choose one of the following options:
- Choose the blank option to not add the layout to a Dossier
- Choose New Dossier to create a Dossier with the same name as the layout and automatically add the layout to the Dossier.
- Choose an existing Dossier to add the layout to it.
Step 6. (Optional) From the Route To list, choose a user or user group to whom the layout should be routed to.
Step 7. (Optional) In the Comment box, add a comment. When a user will next open the layout, the comment will be displayed on screen.
Step 8. (Optional) Save the layout as a template, Layout Module or Layout Module Template by selecting the options Save as Template and/or Save as Layout Module.
Step 9. Click OK.
The following actions take place:
- The layout is stored in Studio Server.
- The layout appears in the Studio panel (when the Document pane of the Studio panel displays the files of the location where the layout is stored in).
- When just saving the layout, the file is checked-out for you for further editing. For all other users the file is locked for editing.
- When checking-in the layout, it is closed and available for editing for all users.
Step 10. (Optional, only when saving a layout that was saved locally and which contains locally stored images). After saving a layout that was saved locally, any images that are placed on it also need to be uploaded to Studio Server. This is done by turning them into database images. For more information, see Working with images in Studio for InDesign.
Comment
Do you have corrections or additional information about this article? Leave a comment! Do you have a question about what is described in this article? Please contact Support.
0 comments
Please sign in to leave a comment.