Logging in to Enterprise using single sign-on (SSO) via Okta is one of the ways of logging in to Enterprise using SSO.
This article describes how to implement Okta in Enterprise to act as the identity provider.
Requirements
Using Okta in Enterprise 10 requires the following:
- Enterprise Server 10.7.0 or higher
- Content Station Aurora 11.43 or higher and its accompanying Desktop application
- Smart Connection 12.3.0 for Adobe CC 2017 or higher
- Smart Connection 13.1 for Adobe CC 2018 or higher
- Smart Connection 14.1 for Adobe CC 2019 or higher
Before you start
Before you start, make sure that:
- You have access to Okta and you have sufficient access rights to configure Okta.
- Okta is set up to your needs, for example by setting up additional security rules.
- The Enterprise Server environment in which Okta is implemented has a fully working Enterprise Server and fully working client applications.
|
Notes about setting up users and user groups in Enterprise Server:
|
Implementation
The implementation consists of setting up Okta, Enterprise Server, and the client applications. Finally, the implementation needs to be tested.
Note: The images and steps in this article are those from the Classic UI. When logged in to Okta with a developer account, the Admin UI is shown which differs in places from the Classic UI. It is advised to switch to the Classic UI to correctly follow the steps.
In Okta, Enterprise Server needs to be set up as an application and linked to users or user groups.
Step 1. In Okta, navigate to Applications and click Add Application.
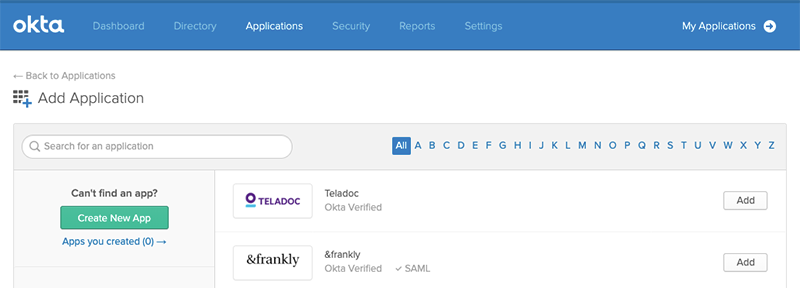
Step 2. Click Create New App and set the following options:
- Platform: Native app
- Sign on method: OpenID Connect
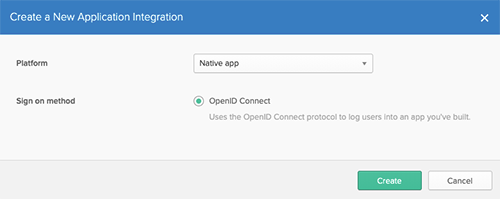
Step 3. Click Create.
The Create OpenID Connect Integration screen appears.
Step 4. Set the following options:
- Application name. A descriptive name for the app.
- Login redirect URIs. Enter the <base URL> + /idpcallback.php:
Note: The base URL is the exact URL for Enterprise Server as shown in the Web browser.
Example: https://my-enterprise-server.com/Enterprise/idpcallback.php
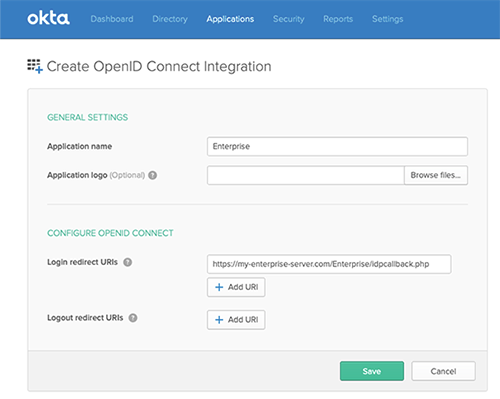
Step 5. Click Save.
You are returned to the previous screen.
Step 6. In the Client Credentials section, click Edit and do the following:
- Copy the Client ID and client secret to a text file. They are needed later when configuring Enterprise Server.
- Set the following option:
- Client authentication: 'Use Client Authentication'
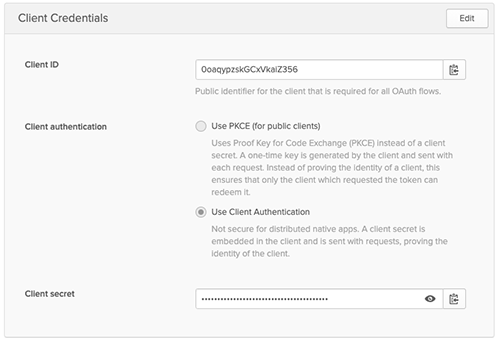
Step 7. Click Save.
Step 8. Scroll to the top of the page and click the Sign On tab.
Step 9. In the OpenID Connect ID section, click Edit and do the following:
- Copy the URL from the Issuer field to a text file. It is needed later when configuring Enterprise Server.
- Set the following option:
- Groups claim filter: Configure the filter to your needs.
|
Notes:
|
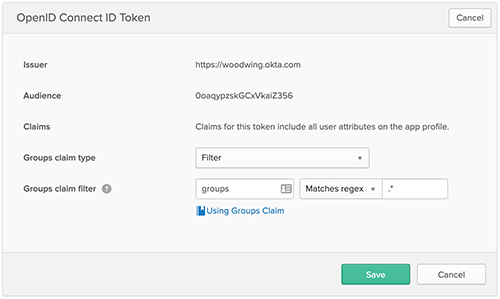
Step 10. Click Save.
Step 11. Scroll to the top of the page and click the Assignments tab.
Here, the applications need to be tied to users or user groups.
Step 12. Search for users or groups and assign them to the application.
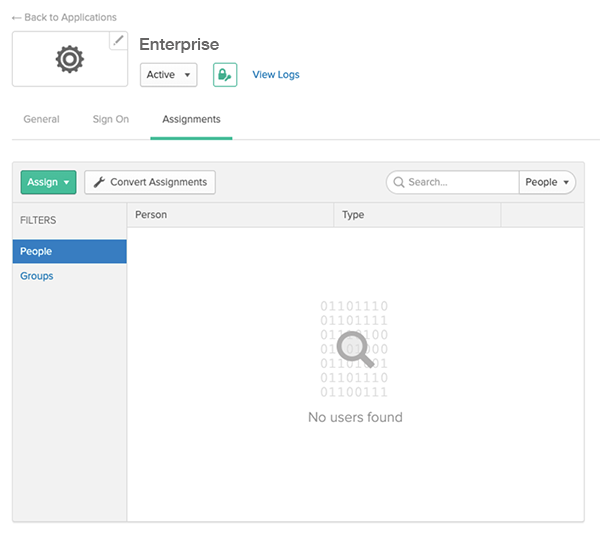
In Enterprise Server, a connection to the Enterprise application in Okta needs to be configured.
Add and configure the following settings in the config_overrule.php file:
|
define( 'OPENID_ISSUER_URL', '' ); define( 'OPENID_CLIENT_ID', '' ); define( 'OPENID_CLIENT_SECRET', '' ); |
- OPENID_ISSUER_URL. The main URL of your Okta account. Use the value that was copied in step 9 of setting up Okta.
Example: https://woodwing.okta.com
- OPENID_CLIENT_ID. The client ID as copied in step 6 of setting up Okta.
- OPENID_CLIENT_SECRET. The client secret as copied in step 6 of setting up Okta.
Set up the client applications as follows:
- Content Station Aurora
- License configuration. Content Station is available in two types, each with their own license: Content Station Print and Content Station Multichannel. When logging in using SSO, Content Station uses the first license type that is configured in the config.js file. When only one license type is used, make sure that it is listed at the top or listed as the only license. When both license types are used, set up 2 separate instances of Content Station, each with their own config.js configuration.
- Smart Connection
- No additional setup is required.
Test the implementation by logging in to Enterprise using the various applications:
- The Enterprise Server Maintenance pages
- Content Station Aurora
- Smart Connection for Adobe CC 2018 or higher
Test the scenario where the user is not yet logged in to Okta and where the user is already logged in to Okta. Follow the steps on screen.
Mapping SSO users with Enterprise Server user accounts
Mapping an Okta user with the properties for a user in Enterprise Server is done through the 'OPENID_FIELD_MAPPING' setting in the config_overrule.php file.
The following Enterprise properties can be mapped:
- Name
- FullName
- EmailAddress
- Language
- TrackChangesColor
- Organization
- Location
|
Notes:
|
Comment
Do you have corrections or additional information about this article? Leave a comment! Do you have a question about what is described in this article? Please contact Support.
0 comments
Please sign in to leave a comment.