When users want to use Content Station, Smart Connection, or any other application that is connects to Enterprise Server, they need to log in to Enterprise Server first. Each user therefore needs to have a user account set up in Enterprise.
Managing user accounts is done in Enterprise Server or in an identity provider as LDAP, Active Directory, or Okta.
Creating a user account
|
Notes:
|
Step 1. Access the Overview of Users page.
In the Maintenance menu or on the Home page, click Users.
A page showing all created user accounts appears.
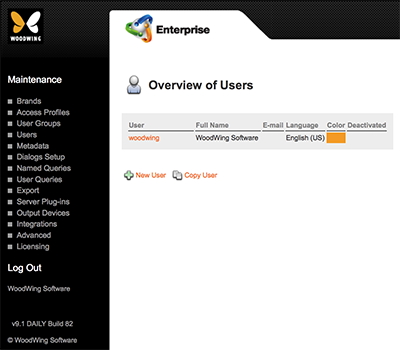
Figure: The Overview of Users page shows all created user accounts.
Note: When LDAP or Okta is integrated in Enterprise Server, an additional column named 'Assigned to User Groups' is shown.
Step 2. Click New User.
The User Maintenance page appears.
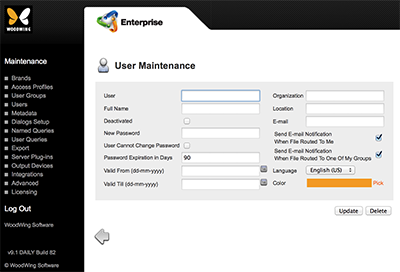
Figure: The User Maintenance page is used for setting up the user account.
Step 3. Fill out all details. As a minimum, the following fields need to be filled out:
- User
- Full Name
- New Password
|
Note: (For Enterprise Server 10.7 and higher) When an identity provider such as LDAP, Active Directory, or Okta is used, the values of the following fields are managed by the identity provider and are therefore disabled on the User Maintenance page:
|
- User. Short user name, normally used for logging in.
Note: The maximum number of characters that can be used depends on the limitations set by the database that is implemented.
- Full Name. Full name of the user.
|
Notes:
|
- Deactivated. Option to deactivate a user without removing the user from the system. This is very useful for temporary employees that are expected to return. See Deactivating user accounts versus removing user accounts.
- New Password. User's password (mandatory).
- User Cannot Change Password. Determines whether the user can change his/her password by using the client application interface.
- Password Expiration in Days. Determines how many days from now the current password will stay valid. (Default: 90 days.)
- Valid From. The date from which the user account is active. If left blank, the users account will be activated immediately. (Format: dd-mm-yyyy.)
- Valid Till. The last day that the user account is active. If left blank, the account will not be deactivated automatically. (Format: dd-mm-yyyy.)
- Organization. Name of the organization that the user is working for. Used for reference only.
- Location. Location of the organization that the user is working for. Used for reference only.
- E-mail. E-mail address of the user, used for e-mail notifications.
Note: You can overrule this e-mail address by configuring a custom address.
- Send E-mail Notification When File Routed To Me. Determines whether the user should receive e-mail notifications when a file is routed to the user.
- Send E-mail Notification When File Routed To One Of My Groups. Determines whether the user should receive e-mail notifications when a file is routed to a group that the user is a member of.
- Language. Language the user prefers to use in the interface. For more information, see Languages.
- Color. Color to distinguish the user from other users. Mainly used as the color for tracking changes and creating Sticky Notes in InDesign, InCopy, and Content Station. To change the default color, click the Pick button and select a color from the palette.
Step 4. Click Update.
The user is added to the system. Before the account can be used, it needs to be added to a user group. See Adding a user account to a user group.
Copying a user account
When you need to create a new user account with settings that are identical to an already existing account you can create a copy of that account to use as a starting point. The settings that are copied include certain fields as well as all user groups that the account belongs to.
- User Cannot Change Password Determines whether the user can change his/her password by using the client application interface.
- Password Expiration in Days Determines how many days from now the current password will stay valid. (Default: 90 days.)
- Valid From The date from which the user account is active. If left blank, the users account will be activated immediately. (Format: dd-mm-yyyy.)
- Valid Till The last day that the user account is active. If left blank, the account will not be deactivated automatically. (Format: dd-mm-yyyy.)
- Organization Name of the organization that the user is working for. Used for reference only.
- Location Location of the organization that the user is working for. Used for reference only.
- Send E-mail Notification When File Routed To Me Determines whether the user should receive e-mail notifications when a file is routed to the user.
- Send E-mail Notification When File Routed To One Of My Groups Determines whether the user should receive e-mail notifications when a file is routed to a group that the user is a member of.
- Language Language the user prefers to use in the interface. For more information, see Languages.
- Color Color to distinguish the user from other users. Mainly used as the color for tracking changes and creating Sticky Notes in InDesign, InCopy, and Content Station. To change the default color, click the Pick button and select a color from the palette.
Step 1. Access the Overview of Users page.
In the Maintenance menu or on the Home page, click Users. A page showing all created user accounts appears.
Step 2. Click Copy User at the bottom of the page.
The Copy User page appears.
Step 3. From the Source User list, choose the user from which the settings need to be copied.
Step 4. Fill out the remaining fields on the page.
Step 5. Click Copy User.
The user is added to the system. Before the account can be used, it needs to be added to a user group. See Adding a user account to a user group.
Updating a user account
Step 1. Access the Overview of Users page.
In the Maintenance menu or on the Home page, click Users. A page showing all created user accounts appears.
Step 2. Click on the name of the user in the User column.
The User Maintenance page for that user appears.
Step 3. Make the necessary changes.
Step 4. Click Update.
Adding a user account to a user group
Before a user account can be used, it needs to be added to a user group. This can be done in the following ways:
- From the user account
- From the user group account
Adding a user to a group from the user account
Step 1. Access the Overview of Users page.
In the Maintenance menu or on the Home page, click Users. A page showing all created user accounts appears.
Step 2. Click on the name of the user in the User column.
The User Maintenance page for that user appears.
Step 3. In the User Groups section, click Add.
A page appears with a list containing all groups to which the user does not yet belong.
Step 4. Select one or more user groups.
Step 5. Click Add.
The user is added to the user group(s) and the User Maintenance page appears again, with the added user groups included in the User Groups list.
Adding a user to a group from the user group account
Step 1. Access the Overview of User Groups page.
In the Maintenance menu or on the Home page, click Groups. A page showing all created user groups appears.
Step 2. Click on the name of the user group in the User Group column.
The User Group Maintenance page for that group appears.
Step 3. In the Users section, click Add User.
A page appears with a list containing all users which do not yet belong to the group.
Step 4. Select one or more users.
Step 5. Click Add.
The user is added to the user group and the User Group Maintenance page appears again, with the added user(s) included in the Users list.
Removing a user account from a user group
Removing a user account from a user group can be done in the following ways:
- From the user account
- From the user group account
Removing from the user account
Step 1. Access the Overview of Users page.
In the Maintenance menu or on the Home page, click Users. A page showing all created user accounts appears.
Step 2. Click on the name of the user in the User column.
The User Maintenance page for that user appears.
Step 3. In the User Groups section, click Delete for the user group from which the user needs to be removed.
A message appears asking you to confirm the action.
Step 5. Click OK.
The user is removed from the group and the list is updated to reflect this change.
Removing from the user group account
Step 1. Access the Overview of User Groups page.
In the Maintenance menu or on the Home page, click Groups. A page showing all created user groups appears.
Step 2. Click on the name of the user group in the User Group column.
The User Group Maintenance page for that group appears.
Step 3. In the Users section, click Delete for the user that needs to be removed from the group.
A message appears asking you to confirm the action.
Step 5. Click OK.
The user is removed from the group and the list is updated to reflect this change.
Removing a user account
Note: The following actions will completely remove a user account from the system. An alternative method of denying a user access from the system is to deactivate the account. See Deactivating user accounts versus removing user accounts.
Step 1. Access the Overview of Users page.
In the Maintenance menu or on the Home page, click Users. A page showing all created user accounts appears.
Step 2. Click on the name of the user in the User column.
The User Maintenance page for that user appears.
Step 3. Click Delete.
A message appears asking you to confirm the action.
Step 5. Click OK.
The user is removed from the system and the Overview of Users page appears again.
Comments
0 comments
Please sign in to leave a comment.