The functionality of publishing content to Drupal is provided through an Enterprise Server plug-in. This plug-in provides a Publish Form template with which a post can be published to Drupal.
This article describes how to integrate Drupal 7 in Enterprise to make it possible to publish from Enterprise to a Web environment based on Drupal 7.
|
Note: For other versions of Drupal, see: |
Info: Support for Drupal and the use of Publish Forms is not available in Enterprise Server 10.6 or higher.
Steps to perform
Steps need to be performed in Drupal and in Enterprise Server.
Steps in Drupal
Step 2. Installing Drupal modules
Step 3. Configuring Content Types
Step 5. Creating a Consumer Key and a Consumer Secret
Step 6. (Optional) Enabling Drupal to be embedded in a frame on another site
Steps in Enterprise Server
Step 7. Activating the Enterprise Server plug-in
Step 8. Creating a Drupal 7 Publication Channel
Step 9. Testing Enterprise Server
Step 10. Importing the Drupal content types and taxonomies
1. Setting up Drupal
Set up a default installation of Drupal by following the instructions as outlined on www.drupal.org:
2. Installing Drupal modules
Step 1. (Optional, only when a Drupal module is already installed as part of an integration with Enterprise Server 10.0.0) Uninstall the current WoodWing Enterprise module from Drupal.
Step 2. Download the following Drupal modules:
- Chaos tools suite (ctools). Download this from the Drupal Web site.
- OAuth. Download this from the Drupal Web site.
- WoodWing Enterprise. Download the file named Enterprise Drupal 7 Module from the software download page for your version of Enterprise Server.
Step 3. Unzip the downloaded files.
Step 4. Copy the folders to the following location:
<drupal directory>/sites/all/modules/
Note: If the directory is not available yet, create the directory.
Step 5. Enable the installed modules.
Note: The Drupal 7 Enterprise module will appear as "WoodWing Enterprise"
3. Configuring Content Types
The components of a Drupal post (a title, teaser, body text, images and so on) are configured in Drupal as fields in a content type. Enterprise can import these content types and convert them into Publish Form templates. The content type fields are used as custom properties in the Publish Form template.
Task: Create a content type in Drupal for each type of Drupal post and add the required fields.
In Drupal, access Structure > Content Types and click + Add content type.
Example: Content types that could be created are those for a news article, blog post, recipe, poll, and so on.
Note: Restrictions exist for the types of fields and their properties that can be imported by Enterprise. For more information, see Supported Drupal fields for use in Publish Form templates in Enterprise 10.
4. Configuring OAuth
OAuth provides a secure connection between Enterprise Server and Drupal.
Step 1. Configure OAuth by following these steps:
Step 2. Log in to Drupal as administrator.
Step 3. Navigate to Configuration > Web Services > OAuth.
Step 4. Click Add Context.
Step 5. Configure the settings as follows:
- Context title: Enterprise Server
- Signature Methods: only select "HMAC-SHA256"
Step 4e. Click Save.
5. Creating a Consumer Key and a Consumer Secret
Using OAuth requires setting up a Consumer Key and a Consumer Secret.
Step 1. Create these by following these steps:
Step 2. In the top menu bar, click People.
Step 3. Click Edit for the user account that is going to be used for publishing content.
Note: To create previews from Content Station the user must have an administrator role.
Step 4. Click OAuth Consumers > Add Consumer.
Step 5. Enter or choose the following settings:
- Consumer name: WoodWing Enterprise
- Callback URL: http://localhost
- Application context: Enterprise Server
Step 6. Click Save.
Step 7. Navigate back to OAuth Consumers.
Step 8. Click Edit for the WoodWing Enterprise consumer.
Step 9. Click Show Secret. The Consumer Key and Consumer Secret are shown. (These are needed later in step 7.)
6. (Optional) Enabling Drupal to be embedded in a frame on another site
When Content Station 9 Web is used in combination with Drupal 7.5 or higher, previewing the post from Content Station 9 Web only works when Drupal is allowed to be embedded in a frame on another site.
To make this work in Drupal 7.5 or higher, do the following:
Step 1. Open the following file in your Drupal installation:
/<web-server-root-folder/Drupal/sites/default/settings.php
Step 2. At the bottom of the file, add the following:
// Turn off the X-Frame-Options header entirely, to restore the previous
// behavior of allowing the site to be embedded in a frame on another site.
$conf['x_frame_options'] = '';
Step 3. Save the file.
7. Activating the Enterprise Server plug-in
The Drupal functionality in Enterprise needs to be enabled by enabling the "Drupal 7 - Publish Forms" Server plug-in.
Step 1. Enable the plug-in by following these steps:
Step 2. Log in to Enterprise Server.
Step 3. Click Server Plug-ins in the Maintenance menu or on the Home page. The Server Plug-ins page appears.
Step 4. Enable the plug-in named Drupal 7 - Publish Forms by clicking the Unplugged icon  . It changes to a Plugged In icon
  .
.
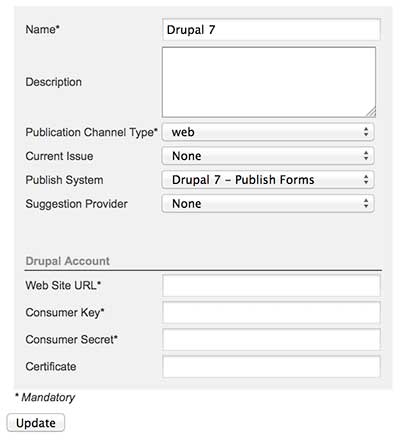
8. Creating a Drupal 7 Publication Channel
Publishing to your Drupal 7 Web site from Enterprise is done through a Publication Channel.
Step 1. In Enterprise Server, create a new Publication Channel for a Brand:
Step 2. In the Name field, enter a name.
Step 3. In the Description field, enter a description.
Step 4. From the Publication Channel Type list, choose Web.
Step 5. From the Publish System list, choose Drupal 7 — Publish Forms.
Step 6. (Optional, only when tags should be automatically suggested. See About adding tags to Web articles). From the Suggestion Provider list, choose the provider for suggesting tags.
Info: This feature requires Enterprise Server version 9.1 or higher.
Note: The default Suggestion Provider in Enterprise is the one from OpenCalais.
Step 7. Click Create. The Drupal Account options appear.

Step 8. Fill out the properties:
- Web Site URL: the URL of your Drupal site
Note: Make sure that the URL ends with a forward slash "/".
Example: http://127.0.0.1/drupal/
- Consumer Key: The consumer key as generated on Drupal in step 5.
- Consumer Secret: The consumer secret as generated on Drupal in step 5.
- Certificate: (Optional, required for HTTPS (SSL) connections only.) The full file path of the local CA certificate file (in PEM format). See the SSL SDK for how to generate certificates.
Step 9. Click Update.
Step 10. Create an Issue by clicking the Add Issue button and subsequently entering at least a name for the Issue.
Step 11. Click Update.
9. Testing Enterprise Server
Step 1. Test if the integration has been performed successfully by following these steps:
Step 2. Log in to Enterprise Server.
Step 3. In the Maintenance menu, click Advanced. A page showing links to advanced Enterprise options appears.
Step 4. Click Health Check. The Health Check page appears.
Step 5. Run the Publish to Drupal - Publish Forms test. The test result is displayed.
Step 6. (Optional, only if the test failed). Follow the instructions and run the test once more after making any changes to the Drupal configuration. Repeat this process until the test is performed successfully.
10. Importing the Drupal content types and taxonomies
The content types that were set up in Drupal need to be imported into Enterprise so that they can be used as Publish Form templates. Similarly, any taxonomies that are defined in Drupal can be imported for use as tags in a Publish Form.
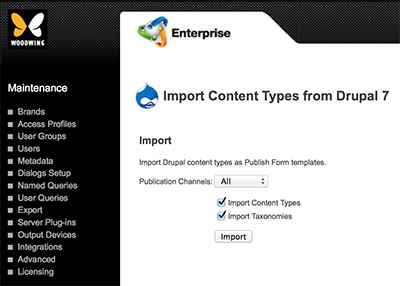
Step 1. Access the Drupal 7 Maintenance page in Enterprise Server.

- In Enterprise Server, click Integrations in the Maintenance menu or on the Home page. A page with all integrated services appears.
- Click Drupal 7. The "Import Content Types from Drupal" Maintenance page appears.
Step 2. (Optional and only available in Enterprise Server 9.3 or higher) From the Publication Channels list, choose the channel from which you want to import.
Step 3. Make sure that the check boxes for importing content types and taxonomies are both selected (only available in Enterprise Server 9.3 or higher).
Step 4. Click Import.
The import is performed and the result of the import action is displayed.
Comments
0 comments
Please sign in to leave a comment.