This is step 4 of setting up a fully working Brand in Enterprise Server 9 for everyday use in a standard workflow environment. (See a list of all steps)
Creating Workflow Statuses is done in the following locations:
- For periodic Brands (such as magazines and newspapers), Workflow Statuses are created on the Brand Maintenance page.
- For project-oriented Brands (typically used by book publishers and advertising agencies), Workflow Statuses are created on the Issue Maintenance page.
Step 1. Do one of the following:
- For periodic Brands: access the Brand Maintenance page for the Brand in which you want to add Workflow Statuses.
Step 1a. In the Maintenance menu or on the Home page, click Brands. The Brands page appears.
Step 1b. Click the name of the Brand. The Brand Maintenance page appears.
- For project-oriented Brands: access the Issue Maintenance page for the Issue in which you want to add Workflow Statuses.
Step 1a. In the Maintenance menu or on the Home page, click Brands. The Brands page appears.
Step 1b. Click the name of the Brand. The Brand Maintenance page appears.
Step 1c. Click the name of the Publication Channel in which the Issue is located. The Publication Channel Maintenance page appears.
Step 1d. For the Issue that needs to be edited, click the Edit button.
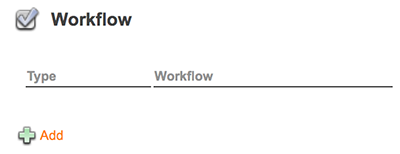
Step 2. Locate the Workflow options.

Since we are working with a newly created Brand/Issue, no Workflows exist yet.
Step 3. Click Add.
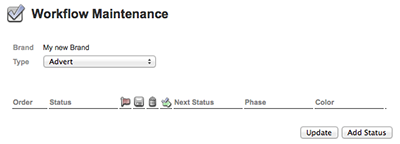
The Workflow Maintenance page appears.

Step 4. Add each Workflow Status as follows:
Step 4a. From the Type list, choose the file type for which a Workflow Status needs to be created.
Step 4b. Click Add Status.
Step 4c. Fill out the options to your needs.
Tip: In order to be able to select the Next Status, start with the very last status of the workflow (for instance Final Version) and work your way backwards. This way, the next status is always available to choose from and saves you from having to set this later.
- Order. Order in which the Status needs to appear in the Status list and thereby in the user interfaces of the client applications.
- Status. Name of the Status.
Note: The name of a Status that is set up for a Brand-overruling Issue cannot be the same as the Status of the same file type on Brand level.
-
 Output. Select this option when an action needs to be performed when the file reaches the Status.
 - For layout Statuses: a PDF (default), EPS, or high-res JPG will be created (depending on the server configuration).
- For article Statuses: an XML file of the composed text will be created (depending on the server configuration). For information about the file format in which the file is created, see The XSD article schema of Enterprise Server 10.
- For Task Statuses: any files that were added to the Task will be added to the Dossier containing this Task.
-
 Create Permanent Version. Select this option when a permanent version of the file needs to be created when the file reaches the Status. This version is never automatically removed, even when the maximum number of versions is reached. See Enterprise Server configuration: Saving Versions.
-
 Remove Intermediate Versions. Select this option when all older, non-permanent versions of the file need to be removed when the file reaches the Status. See Enterprise Server configuration: Saving Versions.
-
 Ready to be Published. Select this option to indicate that files assigned to the status are considered ready to be published. The Publish Manager in Content Station uses this status for filtering files. See The Publish Manager application.
-
 Skip InDesign Server Automation. (
Requires Enterprise 9.8.2 or higher. Only available for layouts and Layout Modules. Available for articles1, images1, layouts, Layout Modules, and spreadsheets1. Only visible when the Enterprise Server plug-in named InDesign Server Automation is enabled.) Select this option when the InDesign Server Automation feature should not be triggered for this Status.
1 Requires Enterprise Server 10.0.1 or higher.
- Next Status. Define the next Status after this Status. When a user chooses the 'Send File To' or 'Send File to Next' command, this is the status that the file will be set to.
- Phase. Currently not used by Enterprise Server.
- Color. The color associated with this Status. The color appears in various places, such as in the Publication Overview application in Content Station.
-
Deadline. (
Since Enterprise 9.2 this This option only appears when 'Activate Relative Deadlines' is selected on the Brand Maintenance page. For previous versions, the option is displayed by default.) Enter a relative deadline specific for this Status.
Step 4d. Click Update.
Tip: When adding multiple Statuses, click Add Status to make a new row of Status options appear. When all Statuses are added, click Update.
In the following video, 3 draft Workflow statuses are set up for a layout, as well as a 'Ready to be published' Status. Each Status has its own color and each is linked to the next Status in the sequence.
Step 5. Repeat the above steps to add more Workflow Statuses for the selected object type.
Step 6. When finished adding statuses for this object type, click the arrow at the bottom of the page to return to the Brand Maintenance page.
Step 7. (Optional) Repeat Steps 3 and 4 for all object types that are required in the Workflow.
Next step
Step 5. Further setting up deadlines
Reference Materials
Comment
Do you have corrections or additional information about this article? Leave a comment! Do you have a question about what is described in this article? Please contact Support.
0 comments
Please sign in to leave a comment.