This is step 7 of setting up a fully working Brand in Enterprise Server 9 for everyday use in a standard workflow environment. (See a list of all steps)
Within Enterprise, a distinction is made between 2 levels of administrator authorizations:
- Full admin rights. This gives access to all Maintenance applications in Enterprise Server for all Brands.
- Limited admin rights. This gives access to the Brand Maintenance page for only a specific Brand. All Maintenance applications for other Brands will not be available.
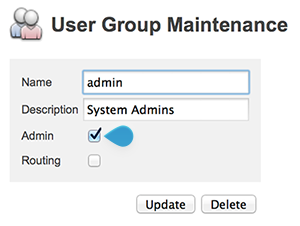
This difference is controlled by the 'Admin' option on the User Group Maintenance page.

Figure: The Admin option on the User Group Maintenance page.
When the option is selected, the group is treated as a group with full admin rights; when not selected, the group is treated as a group with limited admin rights.
Setting up user groups with full admin rights
Step 1. Make sure that a user account is available for each user who needs to be added to the Admin group. See Managing user accounts.
Step 2. Create a user group which should hold the users with admin rights. See Managing user accounts.
Step 3. In the user group, make sure that the option Admin is selected.
Step 4. Add users to the group. See Managing user accounts.
The process is now complete. The fact that the 'Admin' option is enabled automatically grants all users of that group full access to the Enterprise system. It is not necessary therefore to add the group to one of the Authorization sections of a Brand or Overruled Issue.
Setting up user groups with limited admin rights
Step 1. Make sure that a user account is available for each user who needs to be added to the Admin group. See Managing user accounts.
Step 2. Create a user group which should hold the users with admin rights. See Managing user accounts.
Step 3. In the user group, make sure that the option Admin is not selected.
Step 4. Access the Brand Maintenance page for the Brand to which the user group needs to be added.
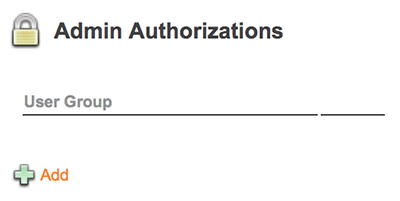
Step 5. Locate the Admin Authorizations section.

Step 6. Click Add.
The Grant Admin Rights page appears.
Step 7. From the User Group list, choose the user group that needs to be granted limited administrator access.
Step 8. Click Add.
The Brand Maintenance page appears again, with the group added to the Admin Authorizations list.
Next step
Step 8. Creating Routing Rules
Reference Materials
Comment
Do you have corrections or additional information about this article? Leave a comment! Do you have a question about what is described in this article? Please contact Support.
0 comments
Please sign in to leave a comment.