Info: This feature requires Content Station version 9.2 or higher and Enterprise Server 9.2 or higher.
When a Content Station user selects multiple files and accesses the Properties dialog box, by default only the Static properties that are allowed to be changed are displayed (such as Category and Workflow Status).
To also add Dynamic properties, XMP properties or custom properties to this dialog box, make sure that the property is added to the Dialog Setup in Enterprise Server and has the 'Multiple objects' option selected.

Figure: Selecting the 'Multiple objects' check box for a property on the Dialogs Setup page makes sure that the property appears in dialog boxes for multiple selected files.
To do this, follow these steps:
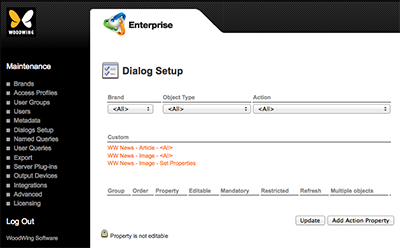
Step 1. In Enterprise Server, access the Dialog Setup Maintenance page.
In Enterprise Server, choose Dialogs Setup in the Maintenance menu on the left side of the screen or on the Home page.

Figure: The Dialog Setup Maintenance page
Step 2. (Optional) Filter the page by Brand, Object Type and/or Action.
Step 3. Click Add Action Property. Fields for adding a property appear.

Figure: The fields for adding a property.
Step 4. In the Order box, define the order in which the property should appear by entering a numeric value.
Note: The higher the number, the lower the property will be displayed.
Step 5. From the Property list, choose the property that you want to add to the dialog box.
Step 6. Select one or more of the following check boxes:
- Editable
- When selected, the user is allowed to edit the content of the item, for instance by editing the default value or by entering a new value.
- When not selected, the item appears unavailable and will not be editable by the user. This can be used for instance when a default value is given for a metadata item that should not be changed.
- Mandatory
- When selected, the user is required to enter a value for that item. If no value is entered and the user attempts to go to the next step of the process (for instance by clicking an OK button in the dialog box), the user is prompted that a value is required for that item.
- When not selected: no input by the user is required and the item can be left blank.
- Restricted
- When selected, only users that have the option Change Restricted Properties selected in their Access Profile are allowed to edit the item. For all other users, the item appears as unavailable.
- When not selected, the setting of the Change Restricted Properties option in the user’s Access Profile is not taken into account.
- Multiple objects ( Since Enterprise 9.2.0. Only when 'Send To' or 'Set Properties' has been selected from the Action list)
- When selected, the property appears in the dialog box for multiple selected files (Content Station 9.2.0 or higher only).
- When not selected, the property does not appear in the dialog box for multiple selected files.
Note: This option is not supported by Smart Connection.
Step 7. Do one of the following:
- To add the property without adding another one, click Update.
- To add the property and display a new set of property settings for adding another action property, click Add Action Property.
Related Information
About metadata in Enterprise Server
Related Tasks
Changing the properties of an object or file in Content Station 9
Adding a custom metadata property in Enterprise Server 9
Adding a property to a dialog box in Enterprise 9
Grouping metadata properties in a dialog box using Enterprise Server 9
Adding custom Enterprise metadata properties to the Solr search
Changing the display name of a metadata property in Enterprise Server 9
Making Enterprise Server metadata properties available for Smart Image
Reference Materials
Content Station 9 documentation
Enterprise Server 9 documentation
Overview of metadata properties used in Enterprise Server 9
How Adobe XML properties are mapped to Enterprise Server properties
Comment
Do you have corrections or additional information about this article? Leave a comment! Do you have a question about what is described in this article? Please contact Support.
0 comments
Please sign in to leave a comment.