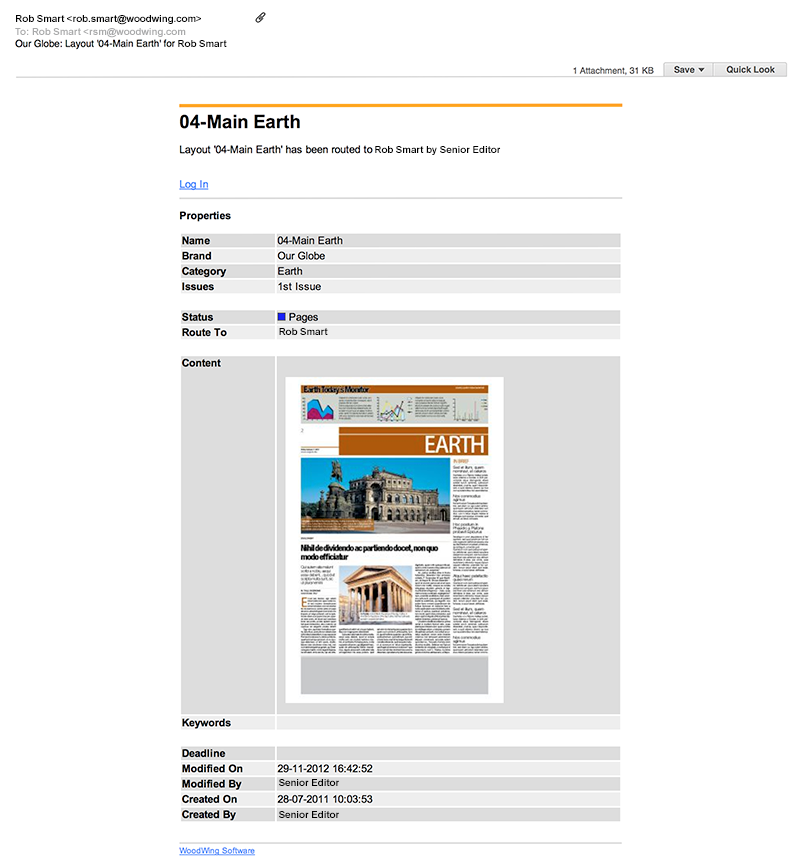
Enterprise Server can automatically send out an e-mail to a user when:
- Files are routed to a user or a group of users, as a notification to these users that new files are available in their inbox (only when the 'Send Email Notification' option is set for a user).
Such e-mails also include a hyperlink to log in to Content Station Web. After the user logs in, the routed file can be opened from the Inbox.
- Files are automatically and permanently removed from the Trash Can. (This is controlled by the Auto Purge option on the Brand Maintenance page.)

Figure: Example of a default email.
When needed, the look of the email or the default text can be changed.
Changing the e-mail subject
The default text of the e-mail subject is as follows:
<Publication name>: <object type> <file name> for <user name>
Example: xTreme: article 'Find your style' for Rob Smart
The publication name, object type, file name and user name are variables which are automatically loaded by the system.
The text of the e-mail subject is stored in each individual language file of Enterprise Server.
The files are stored in the following location:
<Enterprise Server path>/config/resources
| File name | Language |
|---|---|
| csCZ.xml | Czech |
| deDE.xml | German |
| enUS.xml | English |
| esES.xml | Spanish |
| fiFI.xml | Finnish |
| frFR.xml | French |
| itIT.xml | Italian |
| jaJP.xml | Japanese |
| koKR.xml | Korean |
| nlNL.xml | Dutch |
| plPL.xml | Polish |
| ptBR.xml | Brazilian Portuguese |
| ruRU.xml | Russian |
| zhCN.xml | Chinese (Simplified) |
| zhTW.xml | Chinese (Traditional) |
To change the text of the e-mail subject, follow these steps:
Step 1. Make a backup of the current file.
Step 2. Open the file in a text editor that supports UTF-8 encoding.
Step 3. Locate the key named EMAIL_SUBJECT.
<Term key="EMAIL_SUBJECT">%Publication%: %Type% '%Name%' for %RouteTo%</Term>
Step 4. Make the changes as desired.
Step 5. Save the file.
Changing the e-mail body content
The body content of the e-mail is fed by a HTML file.
A separate template can be created for each object type.
The following e-mail templates are available:
- autopurge_email.htm. Sent out after the Auto Purge action whereby files are automatically and permanently deleted from the Trash Can.
- email_Article.htm. Used for emails about objects of type “article”.
- email_Dossier.htm. Used for emails about objects of type “Dossier”.
- email.htm. (Default template) Used for emails about objects of any type or than “article”, “Dossier”, or “Task”.
- email_Task.htm. Used for emails about objects of type “Task”.
The files are stored in the following location:
<Enterprise Server path>/config/templates
To change the content of the e-mail, open the file in a HTML editor and make any of the changes as described below.
Changing the intro
The default text of the intro is as follows:
- When a single file is sent:
<Object type> '<File Name>' has been routed to <user name> by <user name>
Example: Article 'Find your style' has been routed to Rob Smart by Senior Editor
- When multiple files are sent:
The following documents have been routed to <user name> by <user name>
Example: The following documents have been routed to Rob Smart by Senior Editor
To change this text, modify the following keys in the same way as modifying the key for the e-mail subject (see above):
- EMAIL_INTRO. Used as the intro when a single file is sent.
<Term key="EMAIL_INTRO">%Type% '%Name%' has been routed to %RouteTo% by %Modifier%</Term>
- EMAIL_HEADER. Used as the intro when multiple files are sent:
<Term key="EMAIL_HEADER">The following documents have been routed to %1 by %2</Term>
Adding additional terms
Add terms from the language resource files by placing them between <!--RES: and --> tags.
|
Example: Here, the ACT_ROUTE_TO term is added:
|
Each added term will be replaced by the appropriate translation when the e-mail is generated.
Adding property items
Add values to the list of properties, such as default properties or custom properties by using the following format:
%propname%
The property will be replaced by its appropriate value when the e-mail is generated.
Note: Use mixed case property names except for custom properties; these need to be added in upper case, and to test after making changes.
Additional properties to use:
| Display name | Internal name | Description |
|---|---|---|
| High-res File | HighResFile | Relative file location (to HighResStore feature) of highres advert/image output. |
| preview | Downscaled preview for the object. | |
| Status Color | StateColor | Color of current status of the object. |
| thumb | Thumbnail for the object. |
Adding a Server location
Use the following tag to give users direct access to a location on the Server:
%server_inetroot%
The location is automatically turned into a hyperlink for the user to click.
|
Example: In the screenshot at the top of this article, the Log In link allows users to log in Content Station Web. It uses the following code:
|
Comment
Do you have corrections or additional information about this article? Leave a comment! Do you have a question about what is described in this article? Please contact Support.
0 comments
Please sign in to leave a comment.