It is recommended to regularly create a backup of the Elasticsearch data in Assets Server so that it can be restored when experiencing issues with the system.
This article describes how to restore backups and provides information about rescuing index entries in case these were lost during the restore process.
|
Notes:
|
Preparation
Step 1. Check if a backup repository exists and if it points to the correct location containing the snapshots:
curl -XGET 'http://localhost:9200/_snapshot/elvis-shared-data?pretty'
If configured, it will show the following response:
{
  "elvis-shared-data" : {
    "type" : "fs",
    "settings" : {
      "compress" : "true",
      "location" : "/path/to/elvis-shared-data/backups/esbackup"
    }
  }
}
When not configured, it will show the following:
{
  "error" : "RepositoryMissingException[[elvis-shared-data] missing]",
  "status" : 404
}
When faced with the second response or if first response does contain the correct path you can alter this repository or create a new repository as follows:
curl -XPUT 'http://localhost:9200/_snapshot/elvis-shared-data' -d '{
  "type": "fs",
    "settings": {
      "location" : "/path/to/elvis-shared-data/backups/esbackup"
  }
}'
It should respond with:
{"acknowledged":true}Step 2. Confirm that the repository is pointing to the correct folder by listing all snapshots:
curl -XGET 'localhost:9200/_snapshot/elvis-shared-data/_all?pretty=true'
The response will have several snapshots and will look as follows:
{
  "snapshots" : [ {
    "snapshot" : "2018-06-07t01_00_00.00.002z",
    "indices" : [ "stats-201610-r2", "various-r2", "settings-r3", "relation-r5", "stats-201609-r1", "stats-201801-r1", "users-r2", "stats-201710-r2", "stats-201705-r1", "stats-201709-r1", "stats-201707-r1", "enterprise-updates-r2", "processing-r3", "asset-r14", "stats-201706-r1", "version-r6", "elvis-system", "stats-201802-r1", "stats-201711-r1", "stats-201708-r2", "stats-201703-r1", "import-r3", "stats-201612-r1", "stats-201611-r2", "stats-201704-r1", "config-r1", "security-r3", "stats-201712-r1", "stats-201803-r1", "stats-201804-r1", "stats-201805-r1", "stats-201806-r1" ],
    "state" : "SUCCESS",
    "start_time" : "2018-06-07t01_00_00.00.125z",
    "start_time_in_millis" : 1528333200125,
    "end_time" : "2018-06-07t01_00_00.03.265z",
    "end_time_in_millis" : 1528333203265,
    "duration_in_millis" : 3140,
    "failures" : [ ],
    "shards" : {
      "total" : 53,
      "failed" : 0,
      "successful" : 53
    }
  } ]
}
Step 3. Find the snapshot that matches the date that you want to revert to.
Note: By default Assets Server creates snapshots during the night, so the date listed will likely be before the start of the work day.
Step 4. Copy the value from the "snapshot" property.
In the example above, this value is 2018-06-07t01_00_00.00.002z.
Restoring all indices
The steps below describe how to remove all existing data and how to put back the full data from a snapshot to the index.
This typically needs to be done when restoring data on a clean installation.
|
Important: Assets Server cannot and should not be used while a backup is being restored. Make sure that you:
|
The steps below describe how to put back the full data from the backup to the index.
Step 1. Remove all existing indices from the server by using the commands below.
Step 1a. Disable protection to make removal of the indices possible by using their alias:
curl -XPUT 'localhost:9200/_cluster/settings' -d '{
"transient" : {
"action.destructive_requires_name" : "false"
}
}'
Step 1b. Remove all existing data from the cluster; it will be rewritten from snapshot:
Important: The following command is destructive and cannot be reverted.
curl -XDELETE 'localhost:9200/_all'
Step 2. Restore the data:
curl -XPOST 'localhost:9200/_snapshot/elvis-shared-data/2018-06-07t01_00_00.00.002z/_restore' -d '{ "include_global_state": false }'
Step 3. Monitor the progress of the restoration:
curl localhost:9200/_cat/recovery?v
This will show a list of all shards in the system. It will have the following header:
index shard time type stage source_host target_host repository snapshot files files_percent bytes bytes_percent total_files total_bytes translog translog_percent total_translog
|
Notes:
|
Step 4. Restart the cluster:
Step 4a. Shut down all nodes in the cluster and make sure that they are all properly shut down.
Step 4b. Start all nodes again. The server will be restored and available for use.
Restoring one or more specific indices
The steps below describe how to put back one or more specific indices from the backup to the index.
This typically needs to be done when the index or its data has been compromised.
Important: Assets Server cannot and should not be used while a backup is being restored. Make sure that you:
- Limit the usage of the system
- Disable scheduled plug-ins
- Disconnect integrations that are calling the API
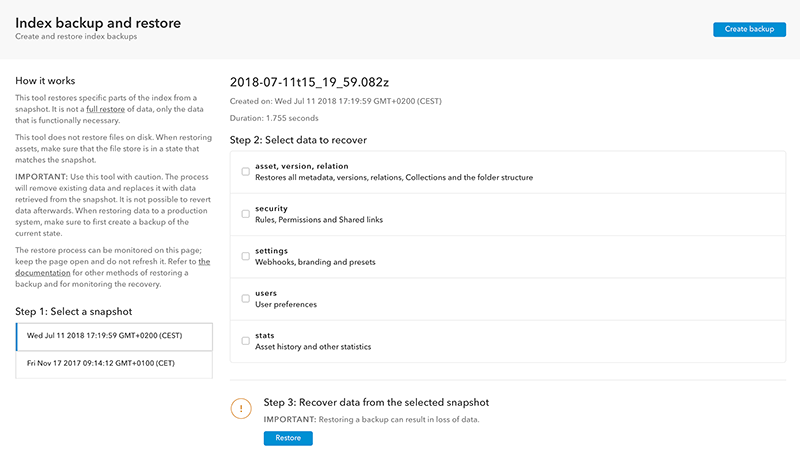
Restoring specific indices can be done by using the Management Console or by manually entering commands in a terminal.
Using the Management Console
Access the 'Index backup and restore' page in the Management Console and follow the instructions.
Using a terminal
Step 1. Make sure you have selected the correct snapshot and the indices that you want to restore including the -r1.
|
Example: If you want to restore assets, versions and relations, and we consider the previous output, the following info should be collected:
curl -XGET 'localhost:9200/_snapshot/elvis-shared-data/_all?pretty=true' |
Step 2. Remove the selected indices from the server by using the commands below.
Step 2a. Disable protection to make removal of the indices possible by using their alias:
curl -XPUT 'localhost:9200/_cluster/settings' -d '{
"transient" : {
"action.destructive_requires_name" : "false"
}
}'
Step 2b. Remove the specified indices, using their aliases. The postfix -r# is not included here.
The command below uses the example of removing an asset, version and relation. Make sure to use the correct names for your situation.
Important: The following command is destructive and cannot be reverted.
curl -XDELETE 'localhost:9200/asset,version,relation'
Step 3. Restore the data:
curl -XPOST 'localhost:9200/_snapshot/elvis-shared-data/2018-06-07t01_00_00.00.002z/_restore'  -d '{
"indices": "asset-r14,relation-r5,version-r6",
 "include_global_state": false
}'
Step 4. Monitor the progress of the restoration:
curl localhost:9200/_cat/recovery?v
This will show a list of all shards in the system. It will have the following header:
index shard time type stage source_host target_host repository snapshot files files_percent bytes bytes_percent total_files total_bytes translog translog_percent total_translog
|
Notes:
|
Step 5. Restart the cluster:
Step 5a. Shut down all nodes in the cluster and make sure that they are all properly shut down.
Step 5b. Start all nodes again. The server will be restored and available for use.
Rescuing lost index entries
After restoring a backed-up index, the assets in the file store and the references to them in the index might not be synchronized. This is especially the case when only a slightly older version of the index is restored instead of restoring a matching backup of the file store.
To validate if a repair is necessary and to optionally perform the repair, the File Store Rescue Tool can be used. For more information, see Rescuing lost index entries for files in the File Store folder of Assets Server.
Comments
0 comments
Please sign in to leave a comment.