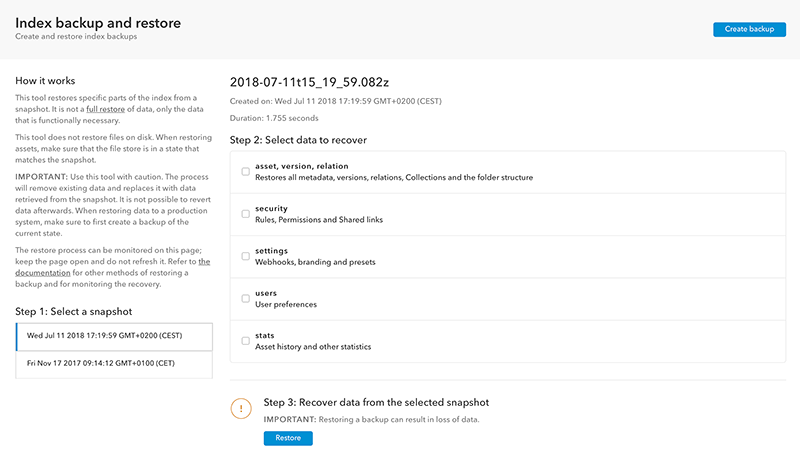
It is recommended to regularly create a backup of the Elasticsearch data in Assets Server so that it can be restored when experiencing issues with the system.
This article describes how to create backups and how to delete them.
|
Notes:
|
Automated backups
A default Assets Server installation automatically creates daily Elasticsearch backups at 1 o'clock at night.
To change the moment when automatic backups are created, do the following:
Step 1. Change the following option:
- File: cluster-config.properties.txt
- Option: elasticsearch.backup.cron
- Value: A cron-like expression as a list of 6 single space-separated fields representing second, minute, hour, day, month and weekday. Month and weekday names can be given as the first 3 letters of the English names. The expression is resolved against the server's local time zone. Leave the setting empty to disable automated backups.
- Example:
- Every day at 1 o'clock at night: 0 0 1 * * *
- Every hour at 10 minutes past the whole hour: 0 10 * * * *
elasticsearch.backup.cron=0 0 1 * * *
|
Notes:
|
Step 2. Restart Assets Server.
Automatically cleaning up backup files
Snapshots will be automatically removed after 90 days. Segments that are no longer referenced by any snapshot are removed at that point too.
The following can be controlled:
- The number of days after which a snapshot should be removed
Example: Delete a snapshot when it is older than 90 days.
- The maximum number of snapshots to keep
Example: Keep no more than 30 snapshots at all times. When a new snapshot is created by which this maximum number is exceeded, the oldest snapshot is removed.
You can use each option individually without using the other option but it is recommended to combine both options. When doing so, the condition of both options need to be met in order for a snapshot to be deleted, thereby preventing that snapshots are inadvertently deleted especially when a backup fails for some reason.
|
Example: The options are set as follows:
In this scenario, a snapshot will only be deleted when it is older than 90 days AND more than 30 snapshots exist. |
Controlling the number of days after which a snapshot should be removed
Step 1. Change the following option:
- File: cluster-config.properties.txt
- Option: elasticsearch.backup.rotateAgeInDays
- Value: A number in days. Snapshots older than this number of days will be removed.
- Example:
elasticsearch.backup.rotateAgeInDays=90
Note: To ignore this setting, set it to -1.
Step 2. Restart Assets Server.
Controlling the maximum number of snapshots to keep
Step 1. Change the following option:
- File: cluster-config.properties.txt
- Option: elasticsearch.backup.rotateMaxToKeep
- Value: Any number. When the number of available snapshots exceeds this number, the oldest snapshot is removed. Default value: the same number as specified in elasticsearch.backup.rotateAgeInDays.
- Example:
elasticsearch.backup.rotateMaxToKeep=30
Note: To ignore this setting, set it to -1.
Step 2. Restart Assets Server.
Creating a snapshot manually
Manually creating snapshots of the indices can be done by using the Elasticsearch API. The process involves setting up a repository and then manually creating the snapshot.
Step 1. Creating a snapshot repository
The repository is a folder that is shared between all nodes. It is used for storing all backup files: the indices together with additional information that is needed to restore the backups.
Best practice is to place the index snapshots within the Elvis Shared Data folder or Assets Server.
It is advised to use a path that is the same on all nodes by setting the elasticsearch.backup.location setting:
- File: cluster-config.properties.txt
- Option: elasticsearch.backup.location
- Value: A path to a folder that is shared between all nodes.
- Example: The default setting defines a 'backups' folder in the shared data location (Elvis Shared Data):
elasticsearch.backup.location=${sharedDataLocation}/backups
A backup of the shared data will contain both files and an index.
Use the following commands:
Note: Here, a folder named "hotDataBackup" is created within the Elvis Shared Data folder. Modify the path if you want to create a repository elsewhere.
curl -XPUT 'http://localhost:9200/_snapshot/elvis-shared-data' -d '{
"type": "fs",
"settings": {
"location": "/Library/Elvis Server/Elvis Shared Data/backups"
}
}'
This will create the folder that is specified as the snapshot location and Elasticsearch will return with an acknowledge response.
To review information about the created repository use the following command:
curl -XGET 'http://localhost:9200/_snapshot/elvis-shared-data?pretty'
Step 2. Creating a snapshot
Creating a snapshot can be done by using the Management Console or by manually entering a command in a terminal.
Using the Management Console
Step 1. Access the 'Index backup and restore' page in the Management Console.
Step 2. Click Create backup in the top right corner of the page and follow the instructions.

When the backup is created it will appear in the list that is part of step 1 'Select a snapshot'.
Using a terminal
Use a unique name for the snapshot so that it can be easily identified, for example by including a date-timestamp in the file name.
Use the following command:
Note: Modify the path and date-timestamp as needed.
curl -XPUT 'localhost:9200/_snapshot/elvis-shared-data/2016-06-29t07_07_20.578z?wait_for_completion=true'
To list all snapshots in the repository, use the following command:
curl -XGET 'localhost:9200/_snapshot/elvis-shared-data/_all?pretty=true'
Note: Files in the Elvis Hot Data folder (such as the activation_state file) are not backed up.
Deleting a snapshot
|
Important:
|
Step 1. Locate the snapshot to delete by listing all snapshots that are in the repository. Do this by using the following command:
curl -XGET 'localhost:9200/_snapshot/elvis-shared-data/_all?pretty=true'
Step 2. Delete the snapshot by using the following command:
Note: Modify the repository path as needed.
curl -XDELETE 'localhost:9200/_snapshot/elvis-shared-data/2016-06-29t07_07_20.578z'
Path references
The following is an overview of the path references
- Elasticsearch snapshot repository: localhost:9200/_snapshot/elvis-shared-data
- Elasticsearch backup location: <Elvis Shared Data>/backups/esbackup
- Elasticsearch snapshot name: 2016-06-29t07_07_20.578z
Additional information
For more information about Elasticsearch backup, additional settings and how to monitor processes see the Elasticsearch documentation.
Comments
0 comments
Please sign in to leave a comment.