Info: Performing the steps described in this article requires direct server access. Depending upon how your system is hosted and the level of access you have to that system, coordination may be required with your Partner or WoodWing Support team. For a full overview of the steps that need to be done by WoodWing and how to request them, see WoodWing Cloud - Change management.
Assets Server is shipped with over 400 different metadata fields. Each of these fields has default settings that define where in the interface they appear and by which name, how they are indexed, and much more.
Most of these fields are ready to be used as they are, while others may need to be modified depending on your needs and requirements.
Note: One typical reason for changing the settings of a default metadata field is to avoid having to create a custom metadata field. Compared to a default metadata field namely, a custom metadata field has some limitations. Instead of creating a custom metadata field you would simply rename a default field and make (minor) changes to its settings.
How the process works
The main concept is as follows:
- All standard metadata fields in Assets Server are stored within the system in a central file.
- Any changes to these standard fields as well as definitions of custom fields are made in a separate configuration file.
This way, the central file is always left intact, thereby making it possible to revert to a default configuration in case any configuration errors are made.
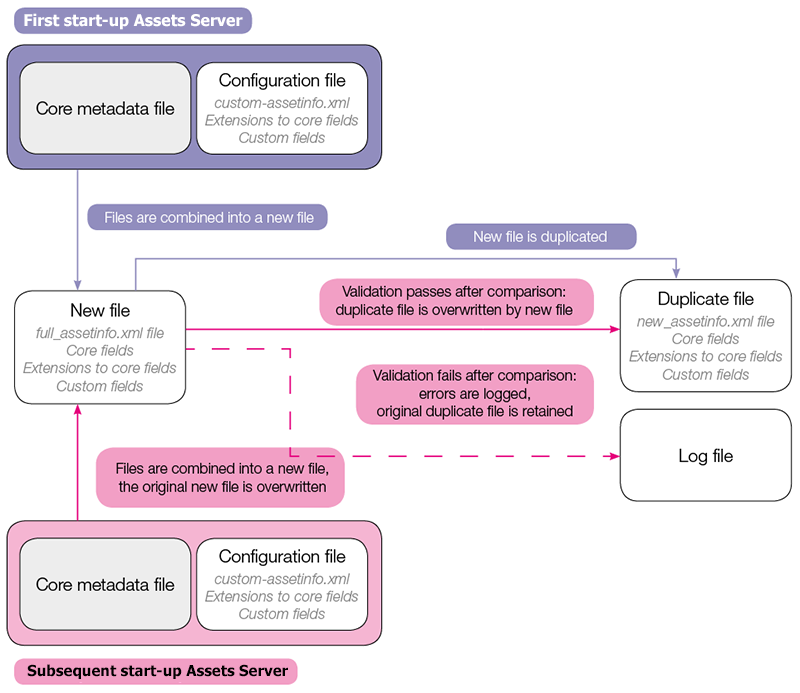
When Assets Server is started for the very first time, the central file and the configuration file are combined into a new file.
A duplicate of this file is made and this file is now seen as the 'base' file containing the correct settings.
When Assets Server is started a following time, the central file and the configuration file are again combined in a new file, thereby overwriting the original 'new' file.
This time the new file is compared against the duplicate file from the previous start-up so that any changes can be detected and validated.
When the validation fails, the original duplicate file is retained and errors are logged in the log file.
When the validation passes, the original duplicate file is overwritten to act as the new base file.
This process is shown in the following diagram:

Example configuration
In this example we will show how the configuration settings for the metadata field 'Status' can be changed.
Info: This example is also provided in the default configuration files of Assets Server.
Note: Some basic knowledge of XML is required.
Default settings
The default settings for all fields can be viewed in the full_assetinfo.xml file and they are defined between the <assetsInfo></assetsInfo> tags.
Caution: This file is for referencing settings only and should not be manually changed. Editing the options is done through the custom-assetinfo.xml file, as explained in the next section 'Extended settings'.
The location of this file is:
- macOS: /Library/Elvis Server/Elvis Hot Data/..
- Linux: /srv/elvis-server/elvis-hot-data/..
- Windows: C:\Elvis Hot Data\...
Note: This file is generated during the start-up of Assets Server and combines the settings of the core file with that of the configuration file. All settings of the core file will be listed first, followed by those of the configuration file.
Any changes to the default settings (as well as definitions for any custom metadata fields) are defined between the <assetsInfoExt></assetsInfoExt> tags. Note the addition of 'Ext' to these tags which indicates that the settings are an 'extension' of the default settings.
The default settings for the Status field can be found by searching for 'name="status" '.
We can tell that these are the default settings by the name of the element: 'field' instead of 'fieldExt':
<field name="status" group="General">
	<storage storeInMetadata="true"/>
		<compass index="tokenized" analyzer="pureLowerCase" store="yes" excludeFromAll="true"/>
		<data editable="true" datatype="text">
			<predefinedValues onlyFromList="false">
				<value>New</value>
				<value>Draft</value>
				<value>Production</value>
				<value>Review</value>
				<value>Correction</value>
				<value>Final</value>
			</predefinedValues>
		</data>
		<userInterface filterUI="checkBoxes" filterValuesSource="usedTerms"/>
		<description>Status of the file, can be used for workflow purposes.
		</description>
</field>
The default settings contains a list of predefined values from which the user can choose (New, Draft, Production, and so on). In this example we want to extend these settings by also showing an icon (known as a flag) in the thumbnail for the asset when a status is chosen.
Extended settings
The default settings of a metadata field are modified by 'extending' them in the custom-assetinfo.xml file as part of the <fieldExtensions> element.
Note: For information about modifying this file, see Changing the Assets Server configuration for a running cluster.
We do this by using the same XML structure but we now add 'Ext' to the field element to indicate that it is an extension to the default settings.
For more information, see The metadata structure of Assets Server.
Take note of the following restrictions:
| Setting | Comment |
|---|---|
| compass |
Can be changed. |
| datatype | Cannot be overridden. |
| multivalue | Cannot be overridden. |
<fieldExtensions>
<fieldExt name="status" group="General">
	<data>
		<predefinedValues onlyFromList="false">
			<value flagIcon="bullet_ball_glass_blue.png">New</value>
			<value flagIcon="bullet_ball_glass_blue.png">Draft</value>
			<value flagIcon="bullet_ball_glass_yellow.png">Production</value>
			<value flagIcon="bullet_ball_glass_grey.png">Review</value>
			<value flagIcon="bullet_ball_glass_red.png">Correction</value>
			<value flagIcon="bullet_ball_glass_green.png">Final</value>
		</predefinedValues>
	</data>
	<userInterface flagPosition="30"/>
</fieldExt>
</fieldExtensions>
Once we are finished modifying the file we need to save the file, restart the server and update the index.
When completed, we see that the extended settings now appear in the bottom half of the full_assetinfo.xml file, meaning that these settings will be used as an extension to the default settings that are defined higher up in the same file for this field.
Comments
0 comments
Please sign in to leave a comment.