In this article, the process of changing the format of a file is described.
Note: It is assumed here that you are logged in to Assets Server in InDesign and that you have a layout open on which a file is placed that is stored in Assets Server.
Changing the file format
It is very common that a file that is placed on an InDesign layout needs to be edited at various times during the production process.
While editing the file, you might decide to save it in a different format.
Example: An image in JPG format is opened in Photoshop and after editing the file it contains several layers. In order to preserve the layers, the file is saved in Photoshop format.
Step 1. Open the file for editing by (for example) right-clicking it on the layout and choosing Edit Original, or by using any of the other methods:
- With the Selection tool active, double-click the file on the layout while holding down the Option key (MacOS) or Alt key (Windows).
- Select the file on the layout and choose Edit > Edit Original.
- Access the Links panel (Window > Links), select the file in the panel and click the Edit Original button, choose Edit Original from the panel flyout menu, or right-click the file and choose Edit Original from the context menu.
The file opens in the application that has been set up as the default editor for that type of file on your system.
Example: A JPG image will be opened in Photoshop if your system has been configured in such a way that JPG files are always opened in this application.
Step 2. Edit the file in some way.
Step 3. Save the file under a different file format, for example by choosing File > Save As.
|
Notes: Make sure to save the file with the same name as the original file (excluding the extension) in the same folder as where the original image is saved on your system. This is normally a temporary location which should be automatically accessed when opening the Save window. If not, browse to one of the locations shown below. The name of the folder starts with the file name, followed by a dot and the database ID: <file_name_with_extension>.<Assets_ID>. Example: Parrots.jpg.35VC3odVaFA9edFZdnhHFk
|
Step 4. (Optional, but recommended) Close the file.
Step 5. Return to InDesign. A dialog box appears.
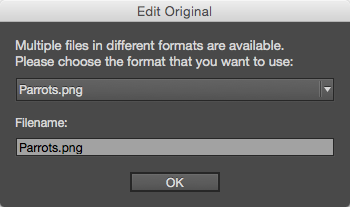
The list at the top contains all formats that are available for the edited file. The format that was edited last is selected by default.
Example: When a JPG file was saved as a PNG file, the PNG file will be listed first.
Step 6. (Optional) From the list, choose the file format that you want to use.
Step 7. (Optional) Change the name of the file in the Filename field.
Step 8. Click OK.
The following actions take place:
- The file is checked-in to Assets Server.
- The file on the layout is updated and re-linked (optionally to the file with the new name).
- All other files with the same name in the same folder as the chosen file will be removed when they are not in use anymore.
Comments
0 comments
Please sign in to leave a comment.