Studio for InDesign fully supports InDesign’s Book feature, making it possible to apply all options found in the Book panel to documents that are stored in Studio Server.
This article explains how this is done.
Why use InDesign books?
When creating a book, a common workflow is to create separate InDesign files for each chapter. The advantages of doing this are many:
- Different users can work on different chapters of the book at the same time.
- Instead of having one large file for the complete book, multiple files are created (each having a relatively low file size).
- Should a file become corrupted, this will only affect that particular file and not the whole book.
However, working with separate documents also results in losing some functionality that is essential to the creation of a book:
- Page numbering between documents is not sequential.
- A list of contents or an index cannot span across all documents.
- All documents need to be printed or exported to PDF separately.
InDesign’s book feature takes care of all these issues: once all documents are part of a book, they are essentially treated as one file, thereby making it possible to have sequential page numbering, to create a proper list of contents or an index, and to print or export to PDF all documents as one (or individually or by range).
The book feature even adds more functionality such as the ability to preflight or package documents or to synchronize various document properties based on a selected source document. The latter makes sure that all documents contain the same settings for styles, swatches, text variables, and more.
In addition, because the Studio for InDesign book acts as any other regular InDesign book, the book can be selected in both the Table of Contents dialog box as well as the Generate Index dialog box of InDesign, thereby making sure that these are based on all documents that are part of the selected book.
How it works
The workflow is as follows:
- A script is run that performs the following actions:
- All layouts that belong to the same Issue in Studio Server are opened (checked-out).
- A book is created and the layouts are added to it.
- The layouts are edited.
- A script is run that checks-in all layouts.
- When logging out of Studio Server, the created book file is deleted.
Note: It is not possible to manually add layouts from Studio Server to the book file.
Using scripts
The actions for working with books (checking-out the layouts, creating a book file, and checking-in the layouts), are performed by running one of two scripts:
- OpenIssueAsBook.jsx. This script is used for opening all layouts of an Issue, creating a book file, and loading all layouts from the Issue to it.
- SaveLayoutsOfBook.jsx. This script is used for checking-in the opened layouts from the Issue back to Studio Server.
These scripts are installed as part of installing Studio for InDesign.
They can be accessed as follows:
Step 1. Open the Scripts panel (Window > Utilities > Scripts).
Step 2. (Optional) Hide all unsupported files in the Scripts panel by selecting Display Unsupported Files from the flyout menu. This will display only those files in the panel that you can actually use.
Step 3. Click the expander in front of the folder named Application.
A folder named 'WoodWing Studio Book Support' appears.
Step 4. Click the expander in front of the folder.
Tip: Assign a keyboard shortcut to these scripts in case you use them regularly.

Creating a book
In this process, a book is created and all layouts that belong to a particular Issue are added to it.
Step 1. Verify that all layouts that you want to add to the book are checked-in.
Note: All layouts that belong to a particular Issue will be added to the Book panel. When any one of the layouts is not checked-in, the process will stop and any layouts that were opened will be automatically closed (via an Abort Check Out action).
Step 2. In the Script panel, double-click Studio Book Support > OpenIssueAsBook.jsx.
What happens next depends on whether or not documents that are stored in Studio Server are open.
Scenario 1: No layouts are open that are stored in Studio Server
A dialog box appears.
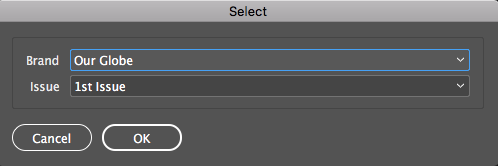
Step 3. Choose the Brand and the Issue and click OK.
The following actions take place:
- All layouts belonging to the Issue are opened (checked out).
- A book is created.
- All layouts are added to the book.
Troubleshooting: Not all layouts are added to the Book panel in Smart Connection
Step 4. (Optional) Remove any layouts that should not be part of the book, and reorder the layouts when necessary (see Layout ordering later in this article).
Scenario 2: A layout is open that is stored in Studio Server
A message appears asking if all documents belonging to the Issue that the currently active document is part of need to be opened as a book.
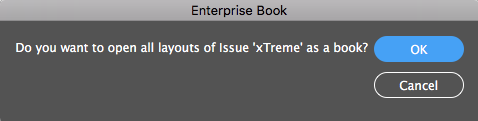
Step 3. Respond to the message as follows:
- Click OK if the displayed Issue is correct. The following actions take place:
- All layouts belonging to the Issue are opened (checked out).
- A book is created.
- All layouts are added to the book.
- Click Cancel if the displayed Issue is incorrect. The dialog from scenario 1 appears. Follow the steps as outlined in scenario 1.
Step 4. (Optional) Remove any layouts that should not be part of the book, and reorder the layouts when necessary (see Layout ordering later in this article).
Troubleshooting: not all layouts are added to the Book panel in Studio for InDesign
When running the OpenIssueAsBook.jsx file, you may find that not all layouts are added.
This can happen because the total number of layouts that are added to the Book panel is directly linked to a value that is configured in Studio Server.
Check with your system administrator for more details.
Layout ordering
The order in which the documents are imported into the book file is determined by the following criteria:
- Category order. This is a configuration setting of Studio Server. Make sure that each document belongs to the correct Category before creating a book.
- Page number. Documents are loaded in sequence based on their page number.
- Name. Layouts are ordered alphabetically. Using a solid naming convention makes sure that documents are always loaded in the correct order, especially when the page numbering has not been set yet.
Example: Add a prefix to each name that represents the chapter number.
Tip: If needed, adjust the ordering manually by dragging a layout to its correct position.
Using the book file
Once the book file is created, it can be used in various ways.
Saving a copy of the book
As mentioned, the created book file is not saved to Studio Server but is instead stored on the local system in a cache folder used by Studio for InDesign. Once the layouts have been saved back to Studio Server and you log out of Studio Server, the book file is automatically deleted from this location.
The next time the script for opening all layouts is run, a new book file is again created. This book file will once more have all layouts loaded that belong to the same Issue, and will have the default layout ordering applied.
If you have made any modifications to the added layouts (for example by removing layouts that should not be in the book or by manually adjusting the ordering), and you want to keep hold of these modifications, do the following:
Step 1. When the book is created for the first time, make the necessary modifications: delete layouts, reorder layouts, and so on.
Step 2. Save the book file to a different location by choosing Save Book As from the Book panel menu.
Step 3. When running the script for opening the layouts the next time, close the newly created book and use the one that you saved instead.
Using the book options
The power of book files lies in its synchronize and update options. Use these to synchronize styles or update page numbering throughout multiple layouts.
For more information, see Adobe Help.
Closing all layouts
A book typically consists of many layouts. Manually checking-in these layouts can be quite laborious. This process can be automated by running a script.
Step 1. In the Script panel, double-click Studio Book Support > SaveLayoutsOfBook.jsx.
Step 2. (Optional, only when multiple books are open) Choose the book for which the layouts need to be closed.
Step 3. Confirm that you want to close the layouts.
Comments
0 comments
Please sign in to leave a comment.