Publications such as newspapers and books contain many images or graphics with caption and credit information. These captions and credit details are typically placed below, above, or to the side of the image and need to be styled in a particular way.
Writing, positioning, and styling the caption and credit information manually for each image can be very time consuming and error prone. The Smart Image feature that is part of Studio for InDesign automates this process.
This article explains how to work with Smart Image in InDesign.
How it works
In short, Smart Image works as follows:
- One or more text frames are created and placed alongside the image in a predetermined position. This action can be done for new images that are placed on the layout or for images that have already been placed. The frames are filled with the caption and credit information that accompanies the file. You can choose to add only the caption information, only the credit information, or both, and to add the information in separate frames or combine them in a single frame. Predetermined text can be added before or after the credit or caption information.
- The text is styled with a predetermined style.
- When resizing or repositioning the image, the frames holding the caption and credit information automatically adjust.
- When replacing the image with another image, the caption and credit information can be updated with the information of the new image.
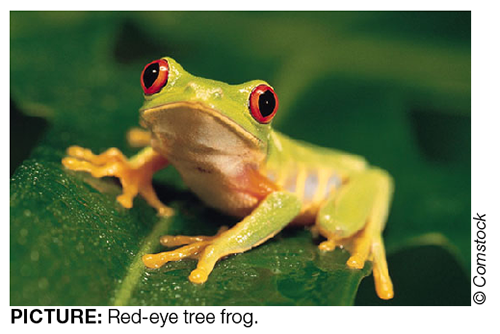
The following example shows an image with a caption placed below the image (aligned to the left) and credit information placed to the right (rotated vertically). Text has been added in front of the caption and credit information and styling has been applied. All of this took place when the image was placed on the layout.

In the following example, only caption information is shown positioned over the image itself.

Preparing the caption and credit information
The caption and credit information is automatically added by Smart Image and is taken from specific metadata fields of the image.
Which fields these are depends on where the image is stored.
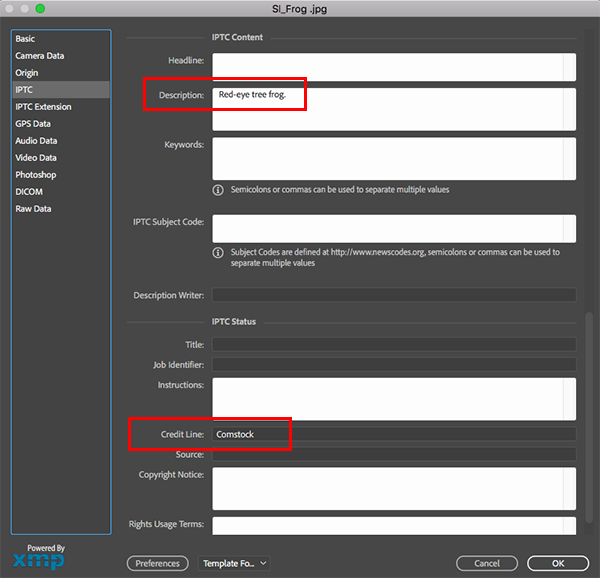
- For images that are not stored in Studio Server, the metadata that is embedded in the image is used:
- The caption information is taken from the 'Description' property.
- The credit information is taken from the 'Provider' or 'Credit' property.
Update these fields as needed.
Note: These fields can be viewed and edited using various applications such as Photoshop.

Figure: The caption and credit information in the metadata fields of the frog image shown above.
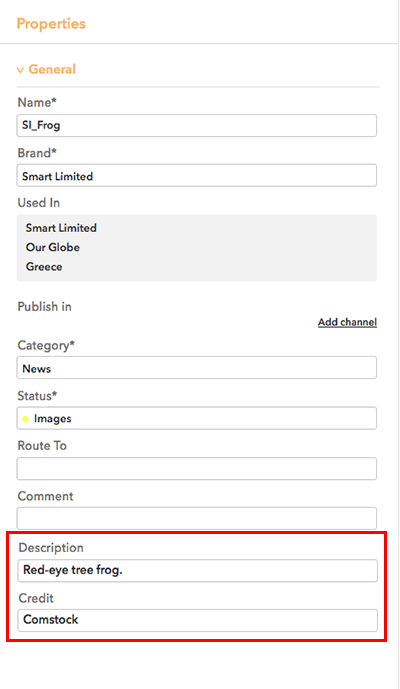
- For images that are stored in Studio Server, metadata properties of Studio Server are used:
- The caption information is taken from the 'Description' property.
- The credit information is taken from the 'Credit' property.
These fields will have been added to the Properties dialog box for images in Studio Server by the system administrator. Use that Properties dialog box to add or update the information.

Controlling the Smart Image features
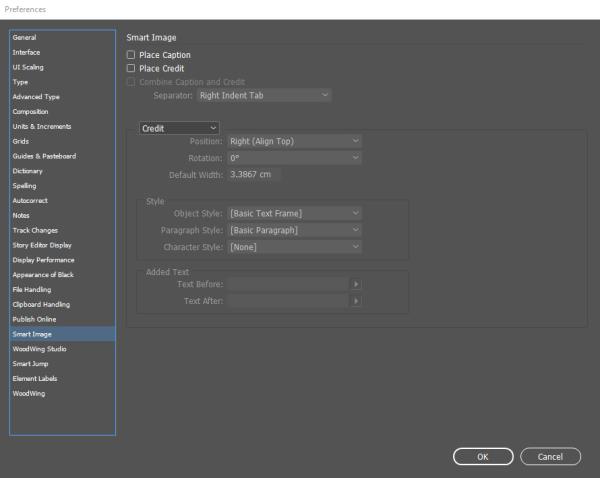
The Smart Image features are controlled in the Smart Image section of the InDesign preferences screen.
From it, you can control if only the caption or credit information should be placed, if they should be combined, or if they should not be placed at all.
When an option is enabled, additional options for configuring it become available.

Figure: The Smart Image preferences.
Enabling Smart Image
By default, the Smart Image functionality is disabled. Enable it as follows:
Step 1. In the Smart Image preferences, select the check box for Place Caption and / or Place Credit.
Step 2. (Optional) When both options are selected, choose Combine Caption and Credit if the information of both fields should be combined in one text frame.
Configuring Smart Image
The actual functionality of Smart Image is controlled through the options for placing and styling the information, and for adding additional text or separators. Set these options to your needs.
|
Notes:
|
| Option | Description |
|---|---|
| Separator |
When the caption and credit information is combined, controls how the information should be separated from each other. Tip: Separator characters can also function as useful 'range markers' if your templates use nested styles to differentiate caption and credit content. For example, if your design stipulates that the caption is separated from the credit by a Tab character, and that the credit should be set in a different font weight to the caption, set Tab as a separator to determine where the text should change weight. For more about nested styles, see InDesign Help. |
| Position |
Controls the position of the text frame holding the caption or credit information: to the left, below, or to the right of the image, and (for the credit information) aligned to the top, right, or bottom of the frame. Tip: When positioning caption and credit information in separate frames below an image, the credit will appear above the caption. To invert this, enable 'Combine Caption and Credit' and choose a paragraph return from the list of separators. Note: To position the frame over the image itself, enter a negative value in the Default Width field. |
| Rotation |
Controls the rotation of the text frame holding the credit information when placed to the left or right of the image: none, rotated 90 degrees clockwise (for text reading downwards), or rotated 90 degrees counter clockwise (for text reading upwards). |
| Default Width |
Controls the width of the text frame holding the caption or credit information when positioned to the left or right side of an image and when it has not been rotated.
|
| Object Style |
Controls the Object style that should be applied to the text frame holding the caption or credit information. |
| Paragraph Style |
Controls the Paragraph style that should be applied to the text frame holding the caption or credit information. Note: When 'Combine Caption and Credit' is selected and the 'Credit' options are shown, the Paragraph Style options are only available when 'Paragraph Return' is chosen as the separator. This is because for any other separator, the caption and credit information is displayed in the same paragraph which is styled using the 'Caption' options. |
| Character Style |
Controls the Character style that should be applied to the text frame holding the caption or credit information. |
| Text Before |
Controls the text that should be added before the caption of credit information. Examples: ©, 'Picture from: ', 'Figure: '. |
| Text After |
Controls the text that should be added after the caption of credit information. |
Tip: A great way to take advantage of InDesign’s text formatting capabilities in caption and credit information is by defining nested styles in your caption and / or credit paragraph styles, and to use these in conjunction with Smart Image’s text prefix and suffix features to provide “range markers” for style changes. You can also use nested styles in conjunction with the Separator character when combining caption and credit information.
Using Smart Image
When using Smart Image, caption and credit information can be:
- Added
- Updated
- Detached
Adding caption and credit information
When Smart Image is enabled, caption and / or credit information is added when doing the following:
- Placing a new image. Use the default InDesign methods for placing an image.
Note: It is not possible to add caption and / or credit information when placing an image directly in a text frame. To add an image with caption and / or credit information to a text frame, group them outside the frame first and paste the group frames inside the text frame.
- Updating a graphic frame. This can be a frame that already contains an image, an empty graphics frame (used in templates for example), or a frame to which only caption or only credit information is added. Select the frame, right-click it, and choose Smart Image > Add Caption and Credit., Smart Image > Add Caption, or Smart Image > Add Credit.
Updating caption and credit information
When the Smart Image preferences or the image metadata is changed after the caption and / or credit information is added for an image, the caption and / or credit information can be updated:
- To update the caption and credit information in one action: Select the graphics frame, right-click it, and choose Smart Image > Update Caption and Credit.
- To update the caption and credit information separately: Select the frame, right-click it, and choose Smart Image > Update Caption or Smart Image > Update Credit.
|
Note: The Update is action is not available for:
|
Detaching caption and credit information
When caption and / or credit information is added to a graphics frame, these frames stay linked to that graphics frame. This means that when the Smart Image preferences are changed or when the image is replaced, the caption and / or credit information is or can be updated.
In some scenarios, you may want to return this dynamic link and turn the created caption and / or credit information into static text:
- You want to write your own text or edit the existing text and do not want to risk it being overwritten when the caption or credit information is updated.
- You want to manually position the frame and do not want to risk it being re-positioned when the caption or credit information is updated.
To detach a frame, select it, right-click it, and choose Smart Image > Detach Caption or Smart Image > Detach Credit.
Comments
0 comments
Please sign in to leave a comment.