Using Smart Styles to format complete text frames or individual text selections automates the formatting process. Format the page item once and then use it repeatedly to simplify the workflow process for preparing formatted ads, articles or chapters of publications, or to standardize the look of corporate publications and internal documents. The uses are unlimited, and Smart Styles makes it simple.
For everyday use, a full understanding of the working of Smart Styles is not necessary. Just creating an example will usually do the job without any special tweaking. For those who want to create more elaborate formatting with paragraph sequences of repeated styles, an understanding of the recognition process used by Smart Styles is essential.
Note: For information about creating a text element, see Working with Smart Styles elements.
Using character styles
For each paragraph, Smart Styles will recognize a sequence of character styles at the start and the end of the paragraph.
You can define nested styles inside your paragraph and they will automatically become part of the Smart Styles element. Smart Styles also offers an alternative or addition to nested styles — character styles — that are even easier to set up. You format one example, drag it into the Library, and it is ready to apply wherever needed.
Smart Styles analyzes the formatting changes within a paragraph and identifies each delimiter that signals a change to the formatting.
A delimiter can either be:
- The last character of text formatted with a particular style.
- The first character of text formatted with a particular style.
- The character after the first or last space (for a two-character delimiter, useful for dashes). In general, all non-alphanumeric characters can be recognized as delimiters.
Some delimiters are preferred over others:
- Tab
- Line feed
- Comma
- Colon
- Dash (any type such as a dash, em dash, and so on)
For a complete list of preferred delimiters and their precedence, see Using delimiters in Smart Styles.
Understanding how delimiters work
Smart Styles determines the number of occurrences of a delimiter in styled text, allowing you to style the first or last words of a paragraph. If Smart Styles cannot determine which character serves as the delimiter in targeted text, it will use the number of styled characters in the Smart Styles element to determine how the style is applied. This allows you to style the first character of a paragraph or any other fixed number of characters.
Once Smart Styles has identified all delimiters, it analyzes which ones are at the start of the paragraph and which are at the end. If the delimiter is closer to the start of the paragraph than to the end, it is considered to be part of the start sequence. In all other cases, it is considered to be part of the end sequence.
Note: When applying a Smart Styles element, the targeted paragraph is searched for delimiters that match those set in the definition of the original element. If a delimiter cannot be found, Smart Styles will skip the remainder of the sequence.
Tip: When setting delimiters to use with a specific Smart Styles element, you can place the element that was used to create the definition onto the layout by dragging it from the Library while holding the Option key (MacOS) or Alt key (Windows). With the original element on the page, you can examine how delimiters work, and follow the same usage in the text to be formatted.
Three examples are given to demonstrate how this works.
In each example, hidden characters are displayed. To display hidden characters, choose Type > Show Hidden Characters.
Example 1
|
Figure: A Smart Styles element with two delimiters (a colon and a tab). In example 1, two delimiters are used. The first is a colon, and the second is a tab. The first delimiter is closer to the start of the paragraph, so it will be part of the start sequence. The tab is closer to the end and is therefore part of the end sequence. When this Smart Styles element is applied, the text up to the first colon will be styled bold, followed by roman text, and the text following the last tab will be styled italic. Without a delimiter to separate each character style sequence, Smart Styles cannot accurately recognize where to apply the correct formatting. Tip: When creating a Smart Styles element for the Library, you can control the relative position of a delimiter by entering additional dummy text either before or after it, to insure that it formats the way you intended. |

Example 2
|
Figure 2a. A Smart Styles element with two delimiters (a white figure space and a comma).
Figure 2b. Unformatted text
Figure 2c. Formatted text. In example 2, a “white figure space” has been inserted after the ARTIST text style to act as the delimiter. This allows you to use normal spaces inside the ARTIST’s name (first and last names) without disturbing the formatting style. The second delimiter is a comma. When this Smart Styles element is applied, all text before the first “white figure space” will be styled bold and red, followed by bold italic text. All text following the last comma will be styled in a smaller roman text. |


Example 3
|
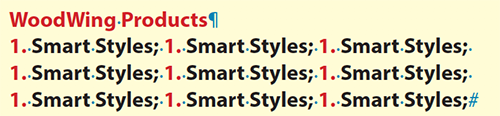
Example 3 illustrates how to correctly set up a Smart Styles element that will accurately recognize and apply character style sequences separated by delimiters. A semicolon (;) is used as the delimiter to separate the five numbered products. This delimiter is important to ensure that Smart Styles recognizes each character style sequence. To obtain correct results, the Smart Styles element must be created with a number of repeating character style sequences that is equal to or greater than the number of sequences in the target item.
Figure 3a. Unformatted text includes a listing of five numbered products with a semicolon used as a delimiter between each
Figure 3b. Smart Styles element incorrectly set up: it contains only three repeating character style sequences (red number and black product)
Figure 3c. When the incorrect Smart Styles element is applied to the unformatted text, only part of the text is formatted as expected.
Figure 3d. A Smart Styles element correctly set up with a greater number of repeating character style sequences than the target item.
Figure 3e. When the correct Smart Styles element is applied to the unformatted text, the results are correct. |


Paragraph formatting and sequences
Smart Styles recognizes sequences of paragraph styles, letting you maximize its use in formatting stories that contain repetitive paragraph styles within the body of text.
Follow the basic steps below to create a Smart Styles element that can be placed in the Library and applied to more complex text with repeating paragraph formats.
A Smart Styles sequence is defined by creating an example with dummy text that contains the desired formatting.
You can define sequences of paragraph formatting to be used by following this basic setup:
- Start Sequence: at the beginning of a story.
- In-between Sequence: as a repeating pattern of paragraphs in-between the start and end sequence.
- End Sequence: at the end of the story.
The start and end sequences can consist of one or multiple paragraph styles. The in-between sequence can consist of any number of repeating patterns of paragraph styles.
Recognizing paragraph sequences
A Smart Styles sequence is defined by inserting simple paragraphs containing dummy text with the desired style.
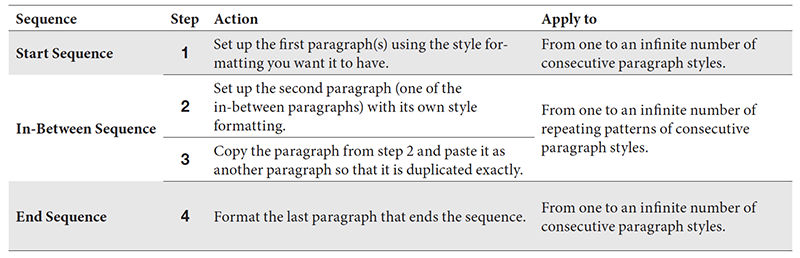
The following table shows how the concept works.
Example 4
|
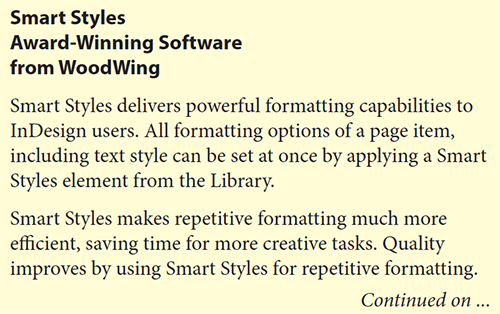
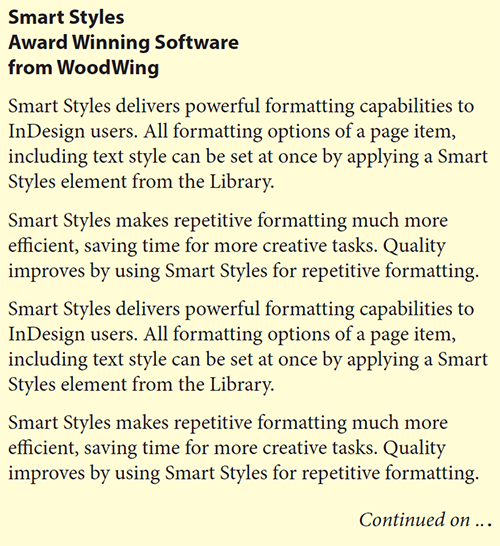
Example 4 shows a few of the possibilities for setting up a Smart Styles element to recognize paragraph sequences.
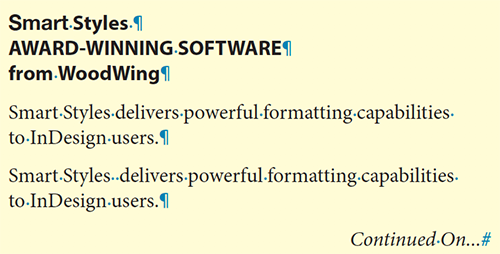
Figure 4a. Setup of a Smart Styles element.
Figure 4b. Unformatted, two-paragraph section of text.
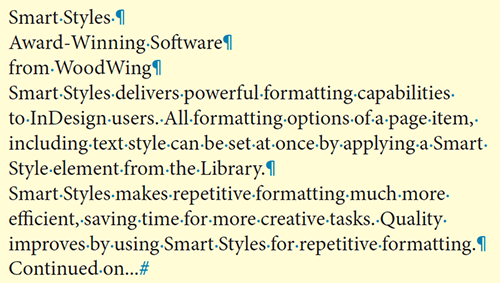
Figure 4c. After the Smart Styles element is applied to the two-paragraph section of text.
Figure 4d. After the Smart Styles element is applied to a four-paragraph section of text. In example 4, the Smart Styles element is made up of a start sequence that consists of three differently styled paragraphs (the headlines). The in-between sequence consists of two paragraphs with identical formatting. They have been copied and pasted to ensure that they are exactly the same. The end sequence consists of one line with entirely different formatting. This simple Smart Styles element setup can be applied to any length of copy that has three differently formatted paragraphs at the beginning, a differently formatted paragraph at the end, and any number of paragraphs with the same formatting in between. To create the Smart Styles element setup, the actual copy is used to format each paragraph until the desired formatting is achieved. The original heads are used in the setup to represent the start sequence, but just parts of each headline could have been used as well, as long as the individual paragraph breaks and formatting are represented for each style. Only one of the in-between paragraphs is used to create the setup. It is copied and pasted to ensure that the two paragraphs for the in-between styles are exactly the same. Note: In-between paragraphs are defined by using the same sequence of paragraph and character styles and their attributes, for two (or more) consecutive paragraphs. To be considered the same by Smart Styles, the paragraphs must be exactly the same. The best way to insure this is to style one paragraph and then to copy and paste it into position as the second paragraph. |
Example 5
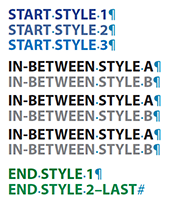
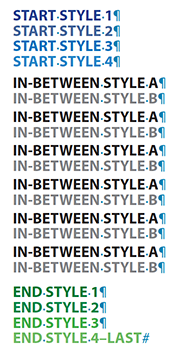
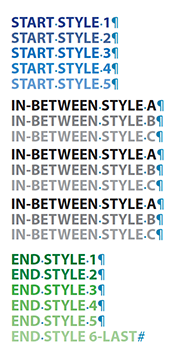
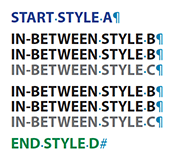
Example 5 shows four different setups that illustrate the principle of the Smart Styles sequence recognition system.
A Smart Styles sequence setup can have an unlimited number of paragraphs with different styles in both the start and end sequence.
|
Example 5a
|
|
Example 5b
|
|
Example 5c
|
|
Example 5d Smart Styles searches for the longest repeating sequence of paragraph styles for the in-between sequence. A text frame using the paragraph style sequence A-B-B-C-B-B-C-D will use B-B-C as the repeating sequence, not B.
|
Example 6
|
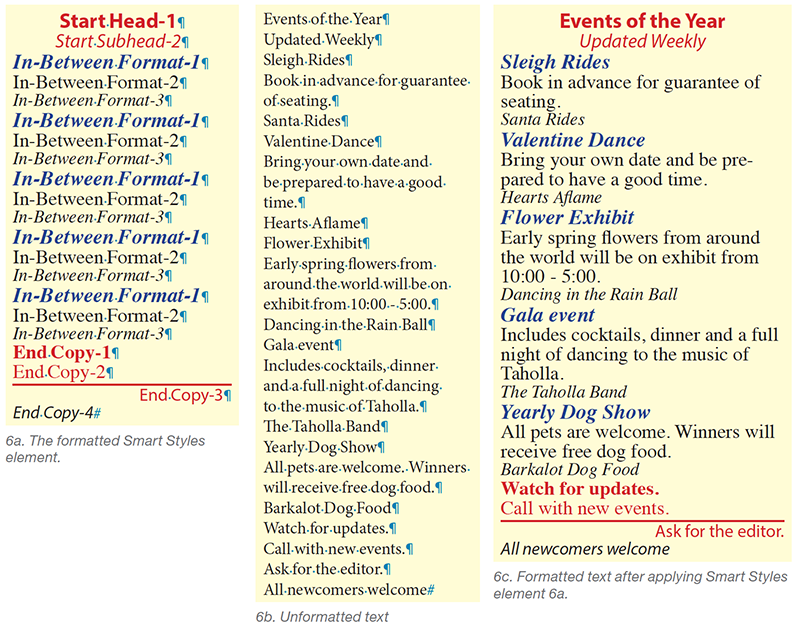
Example 6 illustrates how Smart Styles recognizes and applies patterns of repeated formatting to the in-between sequence. Example 6a shows the Smart Styles element setup for the Events calendar in Example 6c. It contains two paragraphs in the start sequence, five repeated patterns in the in-between sequence and four paragraphs in the end sequence.
|
Example 7
|
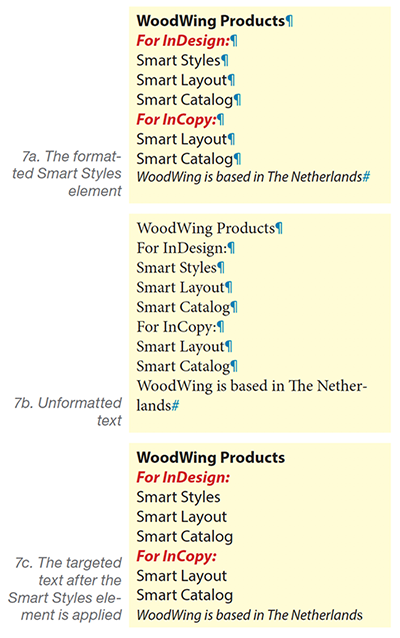
Examples 7a, 7b and 7c show the flow and results of applying a Smart Styles element to unformatted text that has exactly the same number of lines as the Smart Styles element. All changes in formatting are recognized and applied correctly.
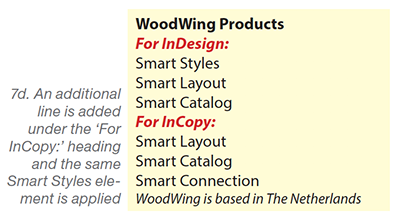
In Example 7d, an additional line of copy (Smart Connection) is added under the heading “For InCopy:” and the same Smart Styles element is applied. The formatting remains correct. This is because Smart Styles interprets the number of lines of copy beneath “For InCopy:” as being variable.
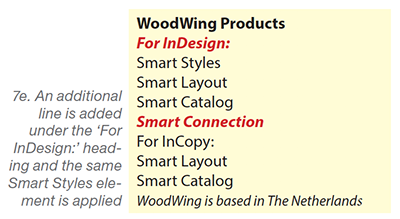
In Example 7e however, when an additional line of copy (Smart Connection) is added under the heading “For InDesign:” and the same Smart Styles element is applied, the formatting does not appear as originally intended since the added product is now styled in red.
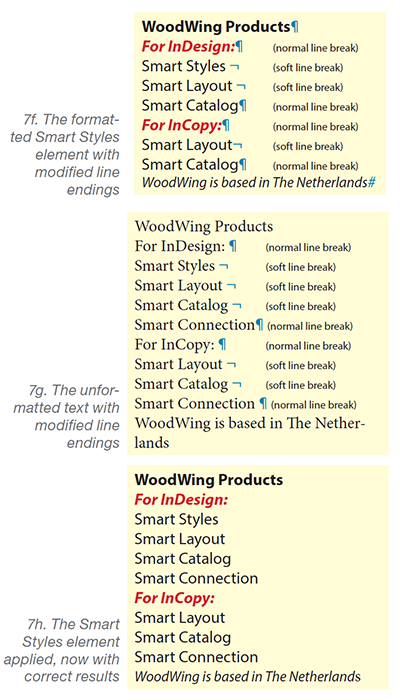
To correct this problem, the original Smart Styles element must be modified so that each part of the sequence that can be of variable length will be recognized by Smart Styles as one block in the sequence. This can be done by changing the end of the lines with a variable length from a normal line break to a soft line break (keyboard shortcut Shift-Enter). The same construction must be valid for both the Smart Styles element and the targeted text. By following this procedure, you can make several blocks with variable length that will be formatted correctly by Smart Styles.
|
Comments
0 comments
Please sign in to leave a comment.