Note: The File Transfer Server is supported by Content Station 8 or higher; it is not yet supported by Smart Connection.
The File Transfer Server separates files from operational data during an upload or download process. This results in a higher performance and lower memory footprint compared to the combined method used in Enterprise Server versions 7 and lower.
Client applications talk to the Server through Web services. During this process, workflow operation data is sent back and forth, but files are also uploaded and downloaded. The size of the files can be very big and can often contain binary data—unlike the operational data which is mostly very small in size and contains structured data.
How it used to be
Before Enterprise Server 8.0, only one method of transferring files to client applications existed, namely through a protocol named DIME. Files and workflow operation data traveled together in one large (DIME) package over the same HTTP connection. This method had a significant performance hit and left a memory footprint on both the client and the server. This caused significant delays in processing time, directly resulting in an increased waiting time for end users.
How it is now
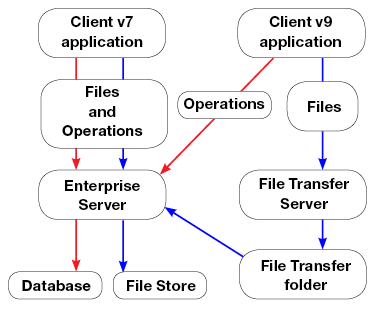
The additional File Transfer Server method which was introduced by Enterprise Server 8 separates the files from the workflow operational data and each flow has its own HTTP connection. Files are uploaded to (or downloaded from) the File Transfer Server and the workflow operational data is communicated directly to the Enterprise Server. When client and Server are talking Web services, there is no longer a need to work through a large DIME package to understand what the other side is talking about. This makes the File Transfer Server method much faster than the DIME method, together with a much lower memory footprint which avoids memory swapping.

Figure: Workflow of uploading a file using a version 7 client application (file travels together with request) and a version 9 client application (file and request travel separately)
Wether the MIME method or the File Transfer Server method is used is determined by the client application.
Example: Smart Connection 8 is still using DIME while Content Station 9 is already using the File Transfer Server. Because of the performance reasons mentioned, all client applications are encouraged to use the File Transfer Server during the Enterprise 10 time line.
Schematic overview
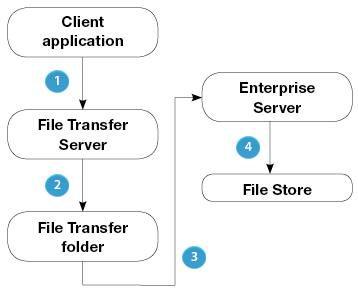
The following figure shows a simplified overview of a client application uploading a file to Enterprise Server using the File Transfer Server:

Figure: A simplified overview of the transfer process when a file is uploaded through the File Transfer Server.
1. The client application uploads the file to the File Transfer Server. 2. The File Transfer Server puts the file in the File Transfer Folder. 3. Enterprise Server retrieves the file. 4. Enterprise Server puts the file in the File Store.
The File Transfer Server
Enterprise Server can play the role of an Application Server but also the role of a File Transfer Server. Physically they are the same: they originate from the same package and they are installed in the same way. Logically, once installed, they can change role any time just by configuration. Enterprise Server can even play both roles at the same time (this is the way in which Enterprise Server is configured by default).
Even when the File Transfer Server runs within Enterprise Server on the same machine and Web location, its performance is much higher compared to the DIME file transfer method used in previous versions.
Should there be a need to further increase performance (for instance for large systems with many Server machines where load balancing is important) the File Transfer Server can be moved to its own machine.
It is possible to run multiple Enterprise Servers and multiple File Transfer Servers, all working together serving a group of client machines.
Note: The File Transfer Server must be seen as a communication line; features like image processing are therefore not handled by the Transfer Server.
Defining the File Transfer Server location
Defining the location of the File Transfer Server is done through the following options:
Tip: (For Enterprise Server 10.1 or higher only) Easily manage and configure settings of all configuration files by adding them to a single configuration file.
- File: configserver.php file
- Name of option: HTTP_FILE_TRANSFER_REMOTE_URL
- Possible values: URL to the File Transfer Server, as seen from the point of view of the client machine.
- Default setting: SERVERURL_ROOT.INETROOT.’/transferindex.php’
- Example:
define( 'HTTP_FILE_TRANSFER_REMOTE_URL', SERVERURL_ROOT.INETROOT.'/transferindex.php' );
- File: configserver.php file
- Name of option: HTTP_FILE_TRANSFER_LOCAL_URL
- Possible values: URL to the File Transfer Server, as seen from the point of view of the server machine.
- Default setting: LOCALURL_ROOT.INETROOT.’/transferindex.php’
- Example:
define( 'HTTP_FILE_TRANSFER_LOCAL_URL', LOCALURL_ROOT.INETROOT.'/transferindex.php' );
(Optional) Enabling DELETE and PUT protocols
The Transfer Server is used by clients to upload files to or to download files from Enterprise Server by using the HTTP(S) protocol.
The HTTP protocol requires different methods for these upload and download actions.
Example: Uploads should be implemented by using the PUT method.
When the client has downloaded a file from the Transfer Server, it can request the Transfer Server to the delete the file when the download was successful. This has to be done with the DELETE method.
Typically, the GET and POST methods are enabled by default on a Web server for the HTTP protocol, but the DELETE and PUT methods sometimes have to be enabled manually.
The following instructions show how this is done on Apache and on IIS.
Check the httpd.conf file (or any .htaccess files) and check for any Limit or LimitExcept configurations.
You might also want to allow explicit access to the index file as follows:
<Location "/<your server URL>/transferindex.php">
   <Limit GET POST PUT DELETE>
      Allow from all
   </Limit>
</Location>Removing WebDAV
Step 1. Check if WebDAV is enabled in Modules by navigating to IIS Manager > Default Web Site > Modules.
Step 2. When WebDAV is enabled, remove it and restart IIS.
Checking the allowed HTTP verbs
Step 1. Open the IIS Manager.
Step 2. Select the first entry just below Sites.
Step 3. Select Request Filtering.
Step 4. Open the HTTP Verbs tab.
Step 5. Check if GET,POST,PUT,DELETE are allowed.
Checking the Request Restrictions
Note: This applies to systems on which PHP is installed by PHP Manager.
Step 1. Open the IIS Manager.
Step 2. Select the root of your Enterprise Server environment.
Step 3. Open the PHP Manager.
Step 4. Click on the link of the Handler mapping (for example: 'Local').
Step 5. Select the PHP version you are using and click its Edit... button.
The Edit Module Mapping dialog appears.
Step 6. Select Request Restrictions... .
The Request Restrictions dialog appears.
Step 7. Select the Verbs tab and make sure that All verbs is selected or add GET,POST,PUT,DELETE explicitly.
The File Transfer folder
Regardless of the deployment you find most suitable, make sure that the File Transfer Folder is located on the same disk as the File Store folder. This significantly improves performance because files are then moved between both folders instead of being copied (and deleted) which is much slower.
Note: For each File Transfer Server, only one File Transfer Folder can be set up. It is therefore not possible to work with dedicated File Transfer Folders for specific File Transfer Servers.
Defining the File Transfer Server location
Defining the location of the File Transfer Folder is done through the following option:
Tip: (For Enterprise Server 10.1 or higher only) Easily manage and configure settings of all configuration files by adding them to a single configuration file.
- File: configserver.php file
- Name of option: FILE_TRANSFER_LOCAL_PATH
- Possible values: Path to the transfer folder accessible from the Transfer Server.
- Default setting: WOODWINGSYSTEMDIRECTORY.’/TransferServerCache’
- Example:
define( 'FILE_TRANSFER_LOCAL_PATH', WOODWINGSYSTEMDIRECTORY.'/TransferServerCache' );
Deployment
For a full description of the various ways of deploying the File Transfer Server, see Enterprise Server deployment.
Note: It is recommended to choose a setup whereby the File Transfer folder is located on the same (logical) volume as where the File Store is located (as defined by the ATTACHMENTDIRECTORY setting in the config.php file). This is the case for a default installation where the FILE_TRANSFER_LOCAL_PATH setting points to a subdirectory of the ATTACHMENTDIRECTORY.
Comments
0 comments
Please sign in to leave a comment.