Info: This feature is not available in Enterprise Server 10.6.0 or higher.
The functionality of publishing content to WordPress is provided through an Enterprise Server plug-in. This plug-in provides a Publish Form template with which a post can be published to WordPress.
This article describes how to integrate WordPress in Enterprise to make it possible to publish from Enterprise to WordPress.
Steps to perform
Steps need to be performed in WordPress and in Enterprise Server.
Steps in WordPress
1. Setting up a WordPress Web site
2. Installing the WoodWing Enterprise plug-in in WordPress
3. Installing the NextGEN Gallery plug-in in WordPress
4. Configuring the NextGEN Gallery
5. Creating a default user in WordPress
6. Setting up authors in WordPress
7. Setting up Categories in WordPress
8. Setting up tags in WordPress
Steps in Enterprise Server
9. Installing the WordPress Server plug-in in Enterprise Server
10. Configuring the WordPress Server plug-in in Enterprise Server
11. Setting up authors in Enterprise Server
12. Importing Publish Form templates, users, categories and tags in Enterprise Server
13. Setting the Enterprise Suggestion Entity for tags in Enterprise Server
14. Setting up a Publication Channel in Enterprise Server
1. Setting up a WordPress Web site
It is assumed here that a WordPress Web site is already fully set up and running.
Tip: To install a WordPress Web site, download the latest WordPress release and follow the instructions about installing WordPress.
Minimum version
Enterprise supports WordPress version 3.7 and higher. If you already have a WordPress Web site, please check its version.
2. Installing the WoodWing Enterprise plug-in in WordPress
The WoodWing Enterprise plug-in allows WordPress to communicate with Enterprise Server.
Step 1. Download the Enterprise WordPress Integration Module from the software download page.
Step 2. Unzip the downloaded file. A folder named 'ww_enterprise' is created.
Step 3. Place the ww_enterprise folder into the following location of your WordPress Web site:
wp-content/plugins
Step 4. Access your WordPress Dashboard.

Step 5. In the menu bar on the left of the screen, click Plugins. The Plugins page appears.
Step 6. Locate the plug-in named WoodWing Enterprise.
Step 7. Activate that plug-in.

Figure: The activated WoodWing Enterprise plug-in.
3. Installing the NextGEN Gallery plug-in in WordPress
The Publish Form for publishing content to WordPress contains a Gallery field with which multiple images can be uploaded for use as a gallery such as a slide show. This requires the NextGEN Gallery plug-in to be installed.
Note: Installing the NextGEN Gallery plug-in is optional. When the plug-in is not installed, the Gallery field will not be included in the Publish Form.
Step 1. Access your WordPress Dashboard.
Step 2. In the menu bar on the left of the screen, click Plugins. The Plugins page appears.
Step 3. At the top of the page, click Add New.
Step 4. Search for the plug-in named NextGEN Gallery.
Step 5. In the Search results, click Install Now for the NextGEN Gallery plug-in.
Step 6. Follow the steps on screen.
Note: For details about manually installing this plug-in, see the NextGEN Gallery documentation.
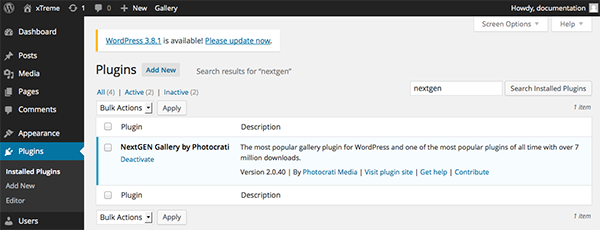
Figure: The installed and activated NextGEN Gallery plug-in
4. Configuring the NextGEN Gallery
The use of thumbnail links is not supported and therefore this functionality needs to be disabled.
Step 1. Access your WordPress Dashboard.
Step 2. In the menu bar on the left of the screen, click Gallery followed by Gallery Settings. The Gallery Settings page appears.
Step 3. Click NextGEN Basic Slideshow. The slideshow settings appear.
Step 4. For the Show thumbnail link option, choose No.

Figure: The Show thumbnail link option in the NextGEN settings
5. Creating a default user in WordPress
In order for Enterprise Server to access WordPress and to publish from WordPress, a default user needs to be created.
Step 1. Access your WordPress Dashboard and click Users followed by Add New. The Add New User page appears.
Step 2. Create a new user while taking note of the following:
- Use a name that does not exist as a user in Enterprise Server.
- Use a descriptive name.
Note: When a user publishes a post from Content Station, Enterprise Server tries to use the name of that user as the author of the post. However, this works only when the user name in Enterprise corresponds to a name in WordPress, the user has the correct WordPress role assigned, and the user names from WordPress are mapped to the names in Enterprise Server. If this is not the case, the name of the default user is used instead. Make sure therefore that the name is descriptive.
- From the Role list, choose Administrator.
Step 3. Click Add New User.
The user is added.
6. Setting up authors in WordPress
When a user publishes a post to WordPress from Content Station, Enterprise Server will try to use the name of this user as the WordPress author. For this to work, the following requirements need to be met:
- The user must exist in Enterprise Server and in WordPress
- The user must have one of the following WordPress roles:
- Administrator
- Editor
- Author
- The user name used by WordPress has to be mapped to the user name used by Enterprise Server
Note: If none of these conditions are met, the name of the default user (see step 5. Creating a default user in WordPress) is used.
Step 1. Make sure that each user who is allowed to publish posts to WordPress from Enterprise exists in WordPress.
Step 2. Make sure that the user has one of the following roles:
- Administrator
- Editor
- Author
Step 3. Verify that the way the user name is written in WordPress is identical to the way it is written in Enterprise Server so that a proper mapping can be made (the actual mapping is done in step 12. Importing Publish Form templates, users, categories and tags in Enterprise Server).
Note: The mapping is not case-sensitive.
Example: Mapping 'WoodWing User' to 'woodwing user' will be successful, but mapping 'R. Smart' to 'Rob Smart' will not.
7. Setting up Categories in WordPress
Every post in WordPress is filed under one or more Categories, allowing you make the post part of groups and subgroups (for more information, see the WordPress documentation).
To make the WordPress Categories available to the Content Station user, the Categories need to be imported into Enterprise (this is done in step 12. Importing Publish Form templates, users, categories and tags in Enterprise Server)
Step 1. Access your WordPress Dashboard and click Posts followed by Categories. The Categories page appears.
Step 2.Create as many Categories as needed.
Note: The name of the Category should not start with a dash (-) or a space.

Figure: The Categories page in WordPress.
Note: Categories that are created after the integration is completed can be imported at any time by using the WordPress Maintenance page.
8. Setting up tags in WordPress
When publishing an article to the Web, it is common to include tags (keywords) so that users can use these as a search tool for locating other articles with similar content. (For more information, see the WordPress documentation).
To make the WordPress tags available to the Content Station user, the tags need to be imported into Enterprise (this is done in step 12. Importing Publish Form templates, users, categories and tags in Enterprise Server)
Step 1. Access your WordPress Dashboard and click Posts followed by Tags. The Tags page appears.
Step 2.Create as many tags as needed.
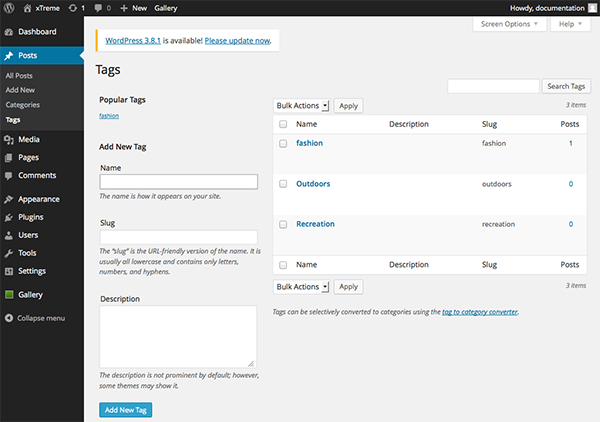
Figure: The Tags page in WordPress.
Note: Tags that are created after the integration is completed can be imported at any time by using the WordPress Maintenance page.
9. Installing the WordPress Server plug-in in Enterprise Server
The WordPress Server plug-in allows Enterprise Server to communicate with WordPress. It also provides a Publish Form template that is used for creating the Publish Form which the Content Station user uses to write the WordPress post.
Step 1. Download the file named Enterprise WordPress Integration plug-in from the software download page.
Step 2. Unzip the downloaded file. A folder named 'WordPress' is created.
Step 3. Place the folder in the following location:
<your Enterprise Server installation>/config/plugins
Step 4. In Enterprise Server, click Server Plug-ins in the Maintenance menu or on the Home page.
The Server Plug-ins page appears and any installed plug-ins will be automatically registered.
Note: Because the plug-ins are registered while the page is opened, the process of opening the page can take a few moments.
Step 5. Make sure that the plug-in named WordPress Publishing Connector is enabled (as indicated by the green icon in front of the name). If needed, resolve any conflicts.

10. Configuring the WordPress Server plug-in in Enterprise Server
The installed WordPress Server plug-in needs to be configured with the details of the WordPress Web sites.
Step 1. Open the following file:
<Enterprise Server path>/config/plugins/WordPress/config.php
Tip: (For Enterprise Server 10.1 or higher only) Easily manage and configure settings of all configuration files by adding them to a single configuration file.
Step 2. Add each site using the following array structure:
$sites['unique_name'] = array(
	'url' => 'WordPress_url',
	'username' => 'WordPress_username',
	'password' => 'WordPress_password',
'certificate' => '{Wordpress_certificate}',- Unique name. This is the logical name of the WordPress site and must be unique within the array. The number of characters used should be no more than 10 characters (excluding dashes '-').
- url. The URL of the Web site. Must not end with a forward slash '/'.
- username. The name of the user that was set up under 5. Creating a default user in WordPress. This user needs to have administrator rights.
- password. The password for the user that was set up under 5. Creating a default user in WordPress.
- certificate. (Optional, required for HTTPS (SSL) connections only. Requires Enterprise Server 10.0.3 or higher, or Enterprise Server 10.1.1 or higher. ) The full file path of the local CA certificate file (in PEM format).
|
Example of defining a single site: Example of defining multiple sites: |
Step 3. Save the file.
11. Setting up authors in Enterprise Server
When a user publishes a post to WordPress from Content Station, Enterprise Server will try to use the name of this user as the WordPress author. For this to work, the following requirements need to be met:
- The user must exist in Enterprise Server and in WordPress
- The user must have one of the following WordPress roles:
- Administrator
- Editor
- Author
- The user name used by WordPress has to be mapped to the user name used by Enterprise Server
Note: If none of these conditions are met, the name of the default user (see step 5. Creating a default user in WordPress) is used.
Step 1. Access the User Maintenance page for the user.
In the Maintenance menu or on the Home page, click Users.
A page showing all created user accounts appears.
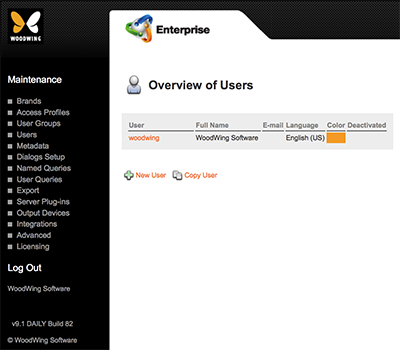
Figure: The Overview of Users page shows all created user accounts.
Step 2. Click the name of a user who is allowed to publish posts to WordPress.
The User Maintenance page appears.
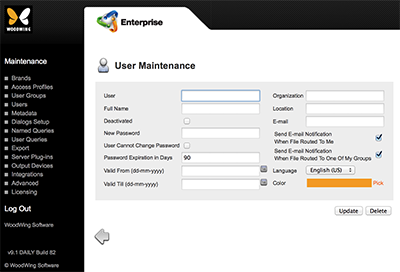
Step 3. Verify that the way the user name is written in Enterprise Server is identical to the way it is written in WordPress so that a proper mapping can be made (the actual mapping is done in step 11 see 12. Importing Publish Form templates, users, categories and tags in Enterprise Server).
Note: The mapping is not case-sensitive.
Example: Mapping 'WoodWing User' to 'woodwing user' will be successful, but mapping 'R. Smart' to 'Rob Smart' will not.
12. Importing Publish Form templates, users, categories and tags in Enterprise Server
Publishing to WordPress is done in Content Station through the use of a Publish Form. This Publish Form is based on a Publish Form template which is defined in the WordPress Server plug-in. Importing the data from the Server plug-in creates the Publish Form template in Enterprise Server.
Enterprise Server can publish posts by using the name of a WordPress user. For this to work, the names of the WordPress users need to be mapped to the names of the Enterprise Server users.
Any categories that are defined on the WordPress Web site can be made available as an option to choose from a list in the Publish Form. These categories therefore need to be imported into Enterprise Server.
Any tags that are defined on the WordPress Web site can be included in the auto-complete feature of Enterprise, allowing the user to add tags much more quickly because only part of the word needs to be entered. These tags therefore need to be imported into Enterprise Server.
Step 1. Access the WordPress Maintenance page in Enterprise Server.
Step 1a. In Enterprise Server, click Integrations in the Maintenance menu or on the Home page. A page with all integrated services appears.
Step 1b. Click WordPress. The WordPress Maintenance page appears.
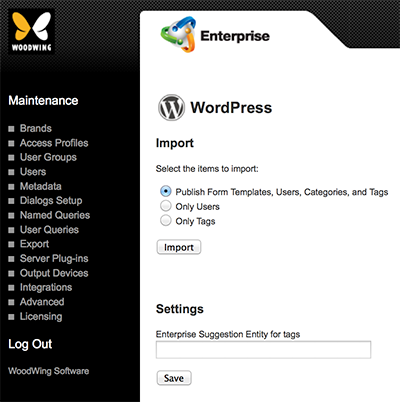
Figure: The WordPress Maintenance page.
Because this is the first import action, the Publish Form templates, users, categories and tags all need to be imported.
Step 1c. Verify that the option Publish Form templates, users, categories and tags is selected.
Step 1d. Click Import.
The items are imported and the result of the import action is displayed.
13. Setting the Enterprise Suggestion Entity for tags in Enterprise Server
The Publish Form for creating a WordPress post contains a field in which tags can be added. When a Suggestion Provider is installed such as the one from OpenCalais, tags can be automatically suggested.
In order for the Suggestion Provider to know which tags to suggest, the Publish Form field needs to be linked to a tag entity.
Step 1. Access the WordPress Maintenance page in Enterprise Server.
Step 1a. In Enterprise Server, click Integrations in the Maintenance menu or on the Home page. A page with all integrated services appears.
Step 1b. Click WordPress. The WordPress Maintenance page appears.

Figure: The WordPress Maintenance page.
Step 2. In the Enterprise Suggestion Entity for tags field, enter the entity for the types of tags that need to be suggested by the Suggestion Provider.
Example: When using OpenCalais, a good entity to use would be SocialTags.
Anniversary
City
Company
Continent
Country
Editor
EmailAddress
EntertainmentAwardEvent
Facility
FaxNumber
Holiday
IndustryTerm
Journalist
MarketIndex
MedicalCondition
MedicalTreatment
Movie
MusicAlbum
MusicGroup
NaturalFeature
OperatingSystem
Organization
Person
PharmaceuticalDrug
PhoneNumber
PoliticalEvent
Product
ProgrammingLanguage
ProvinceOrState
PublishedMedium
RadioProgram
RadioStation
Region
SocialTags
SportsEvent
SportsGame
SportsLeague
TVShow
TVStation
Technology
URL
Step 3. Click Save.
14. Setting up a Publication Channel in Enterprise Server
In Enterprise, publishing content to WordPress is done through a Publication Channel.
Step 1. In Enterprise Server, create a new Publication Channel for a Brand:
Step 1a. In the Name field, enter a name.
Step 1b. (Optional) In the Description field, enter a description.
Step 1c. From the Publication Channel Type list, choose Web.
Step 1d. From the Publish System list, choose WordPress Publishing Connector.
Step 1e. (Optional, only when tags should be automatically suggested. See About adding tags to Web articles). From the Suggestion Provider list, choose the provider for suggesting tags.
Note: The default Suggestion Provider in Enterprise is the one from OpenCalais but needs to have been installed in order to appear in the list.
Step 2. Click Create.
The WordPress Site and Issues sections appear.
Step 3. From the Website list in the WordPress Site section, choose the WordPress site to which the content is going to be published.
Step 4. Click Update.
Step 5. Create an Issue by clicking the Add Issue button and subsequently entering at least a name for the Issue.

Figure: A Publication Channel set up for publishing to WordPress.
15. Testing Enterprise Server
Step 1. In Enterprise Server, access the Health Check page.
Step 1a. In Enterprise Server, click Advanced in the Maintenance menu or on the Home page. A page with all advanced Maintenance features appears.
Step 1b. Click Health Check. The Health Check page appears.
Step 2. At the bottom of the page, click Clear All.
Step 3. Only select the Publish To WordPress test.
Step 4. Click Test.
The test is executed and the result is displayed next to the test. It should display “OK”.
Note: If the test fails, an error is displayed together with instructions for solving it. Follow the instructions and then run the test once more.
This completes the process of integrating WordPress in Enterprise Server.
About publishing to WordPress
Publishing posts to WordPress is done from Content Station. For more information, see Publishing to WordPress.
Optional integration steps
Integrating Elvis 4 or Elvis 5 in WordPress
When publishing from Enterprise to WordPress and your assets are (partly) stored in Elvis 4 or Elvis 5, you can add a button to the toolbar of the WordPress editor that allows you to easily add assets from Elvis to your WordPress post or page.
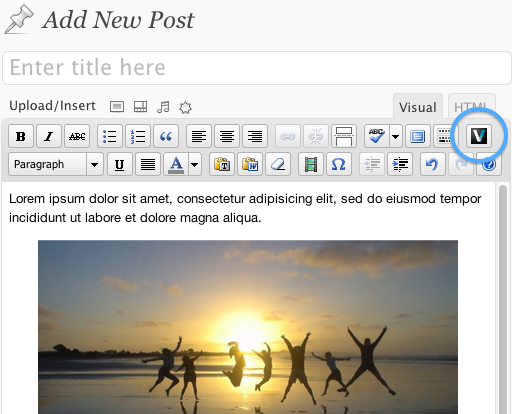
Figure: By adding an Elvis button to the toolbar of the WordPress editor, you can easily include images from Elvis in your WordPress post or page.
To add the button, the Elvis plug-in for WordPress needs to be installed. Instructions on how to do this can be found in the Elvis documentation.
Document history
- 25 February 2019: Added information about support for Enterprise Server 10.6.0 and higher.
Comment
Do you have corrections or additional information about this article? Leave a comment! Do you have a question about what is described in this article? Please contact Support.
0 comments
Please sign in to leave a comment.