In today's modern digital world, more and more employees work from a location that is remote from where Assets Server is installed: people are working from home, companies have offices in multiple locations and staff is employed from anywhere around the world.
Each of these employees connects to Assets Server over the Internet and because of the way the Internet works, this connection is routed over multiple servers in multiple parts of the world. The further away from the Assets Server installation therefore, the longer the route and the slower the connection is.
Amazon CloudFront resolves this problem by providing a direct connection between two Amazon points: one that is close to Assets Server to connect to and one that is close to the user to connect to. This results in the shortest possible route and thereby in higher connection speeds compared to regular Internet connections.

Figure: Comparison between a typical Internet connection running via multiple servers versus a direct connection offered by Amazon CloudFront.
Amazon local caching
Amazon CloudFront can make use of local caching at each Amazon connection point (known as 'Edge locations'). However, Assets Server does not make use of these cached files; all files are obtained directly from the server.
Test results
The following scenarios were tested using the following setup:
- Location of the server: AWS Singapore (ap-southeast-1) region
- Location of the user: Amsterdam, the Netherlands
- Connection speed: a 60/20 Mbit consumer Internet connection
Scenario 1 - file check-out
In this scenario, a Photoshop file of 254Mb was checked-out.
The results were as follows:
| Without CloudFront | With CloudFront |
|---|---|
| 2 minutes 49 seconds | 54 seconds |
Scenario 2 - uploading and downloading files
Using a variety of files, the following performance increase was observed:
| Uploading | Downloading |
|---|---|
| 325% performance increase1 | 190% performance increase1 |
1 The connection was capped to 50Mbit; the improvement could potentially be higher.
Benefits
Some of the benefits of connecting to Assets Server through CloudFront include:
- Faster interaction with the complete system
- Reduced waiting times for end users
- Option to take full advantage of a global workforce for producing content
- Sharing files (more) easily within a global team
CloudFront limits
Please be aware that certain limitations exist on CloudFront, such as a maximum file size for each request. For more information, see the 'Limits' article on Amazon.com.
When not to use CloudFront
Not all locations will see a performance improvement when using CloudFront. Typically, the speed improvement will be most noticeable for those users that are furthest away.
If the distance to connect to Assets Server is roughly the same as the distance to connect to the Amazon data center, you might be better off connecting without CloudFront (also because all traffic over CloudFront is measured and billed, see 'Costs' below).
Compatibility
Because the performance improvement is provided by making use of a different connection, no software changes in Assets Server are involved. This means that using CloudFront is fully compatible with all versions of Assets Server and its client applications.
Costs
Amazon CloudFront is a service that needs to be paid for. The costs depend on the amount of data traffic and the location of your server and workforce.
For a detailed calculation of the monthly costs use the Amazon cost calculator.
Requirements
It is assumed here that the following is in place:
- A running instance of Assets Server (preferably hosted on Amazon AWS)
- A Load Balancer that is accessible over the Internet and by CloudFront1
- An Amazon account (this can be created for free on aws.amazon.com)
1 Either allow public access to your Load Balancer in the Security Group (HTTPS, 0.0.0.0/0), or see the note under Additional configuration about restricting the Security Group of the ELB to only be accessible from CloudFront.
Setup and implementation
The implementation involves performing the following steps:
- Setting up an Amazon CloudFront instance in which the instance of Assets Server that CloudFront should communicate with is defined.
- Making sure that users log in to Assets Server through CloudFront.
Each is explained in detail below.
1. Setting up CloudFront
Step 1. Log in to your Amazon AWS account (create one if you do not have one).
Step 2. Open the CloudFront page.
Step 3. Click Create Distribution.
The Select delivery method page appears.
Step 4. In the Web section, click Get Started.
The Create Distribution page appears.
Step 5. Configure the following settings:
Note: The settings in bold are crucial to making this feature work correctly.
The following screenshot shows an example setup:
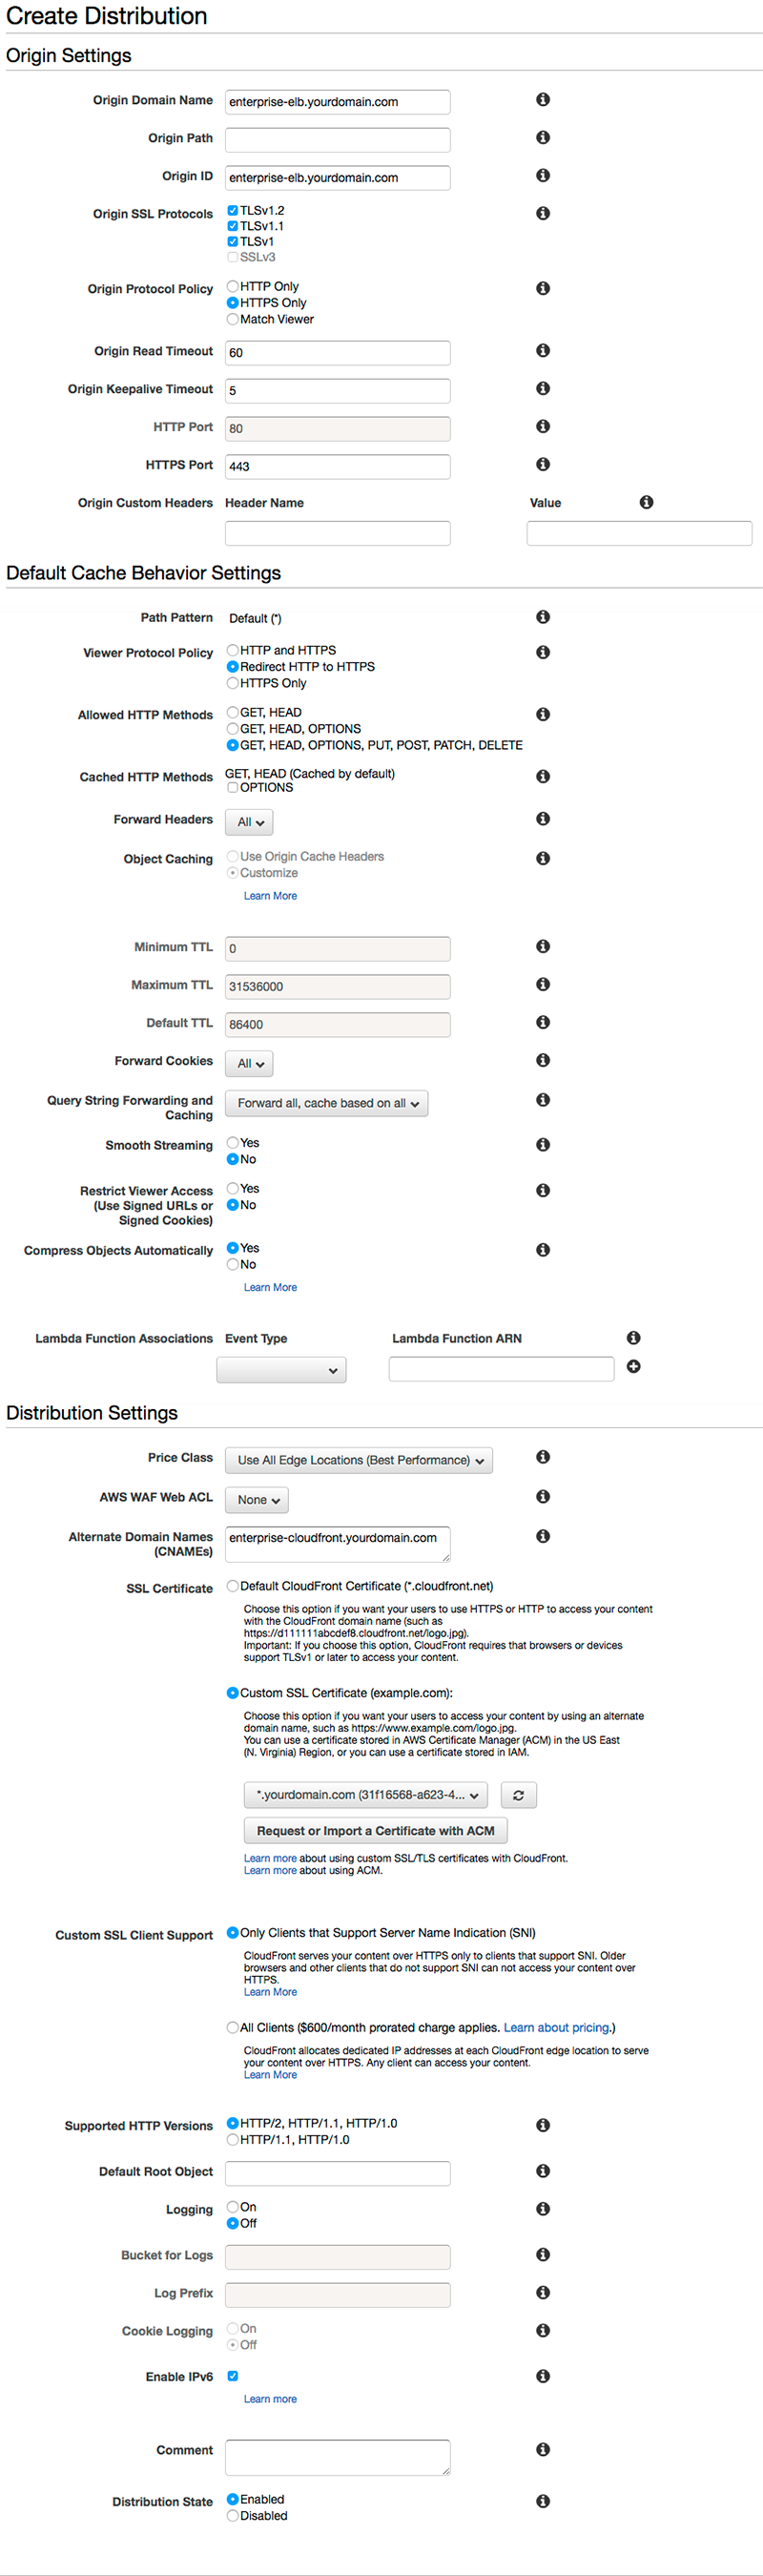
| Origin Domain Name |
The domain name of the Assets Server instance. Example: If your current URL for connecting to Assets Server is: |
| Origin ID | An optional description for this distribution. |
| Origin SSL Protocols | (If applicable) Choose the SSL protocols supported by the server instance. |
| Origin Protocol Policy | Choose whether to connect from CloudFront to the server instance over HTTP only, HTTPS only, or by letting the end user decide. |
| Viewer Protocol Policy | Select the SSL mode to use. |
| Allowed HTTP Methods | Select GET, HEAD, OPTIONS, PUT, POST, PATCH, DELETE. |
| Forward Headers | Select All. |
| Forward Cookies | Select All. |
| Query String Forwarding and Caching | Select Forward all, cache based on all. |
| Compress Objects Automatically | (Optional) Set to Yes for smaller file transfers. |
| Price Class | Depends on your usage (we chose to Use All Edge Locations) |
| Alternate Domain Names (CNAMEs) |
To hide the default CloudFront URL, enter the CNAME when linking a DNS CNAME to the distribution. Example: If your current DNS entry for Assets Server through CloudFront is: https://assets-cloudfront.yourdomain.com/ then enter: assets-cloudfront.yourdomain.com |
Step 6. Click Create Distribution.
the distribution is created. The status for it will appear as 'In Progress' and is ready when the status appears as 'Deployed'.
Note: Setting up the distribution or making changes to it takes can take more than half an hour.
2. Letting users connect through CloudFront
For those users who need to connect through CloudFront, make sure that they do so via the new URL.
This can be easily done by changing the DNS record for your server to the CloudFront distribution; this way users do not have to change the URLs they use.
|
Example: Assuming your existing Assets Server setup is accessed through the following server URL: https://assets-elb.yourdomain.com/ the new URL to be used through CloudFront will be: https://assets-cloudfront.yourdomain.com/ |
Additional configuration
Please take note of the following information for configuring the environment.
Amazon configuration
- Elastic Load Balancing (ELB). It is possible to restrict the Security Group of the ELB to only be accessible from CloudFront. Although this is not easy to achieve, it is possible. For more information see the Cloudfront Security Group blogpost on 24hoursmedia.com.
- Using an Amazon Web Application Firewall (WAF). The use of AWS WAF to secure both ends of the connection (origin and end user) has not been tested by us.
Assets Server configuration
- When using Assets Agent for opening files for editing using Assets, Assets Server needs to be configured. See Installing Assets Agent.
Comments
0 comments
Please sign in to leave a comment.