Excel files that are stored in Studio Server can be placed on a layout while maintaining a link to that file. When changes are made in the spreadsheet, the placed file can be updated accordingly.
This article describes all aspects of working with Excel files that are stored in Studio Server:
- Uploading an Excel file
- Creating a link to the Excel File
- Placing an Excel file
- Editing the Excel file
- Updating the placed Excel file
- Breaking the link with the Excel file
- Converting the placed Excel file into a Studio article
- Troubleshooting
Uploading an Excel file
Uploading an Excel file to Studio Server can only be done by using Studio, not by using InDesign. Make sure therefore to upload the Excel file first so that it is available in Studio for InDesign for placing on the layout.
Creating a link to the Excel File
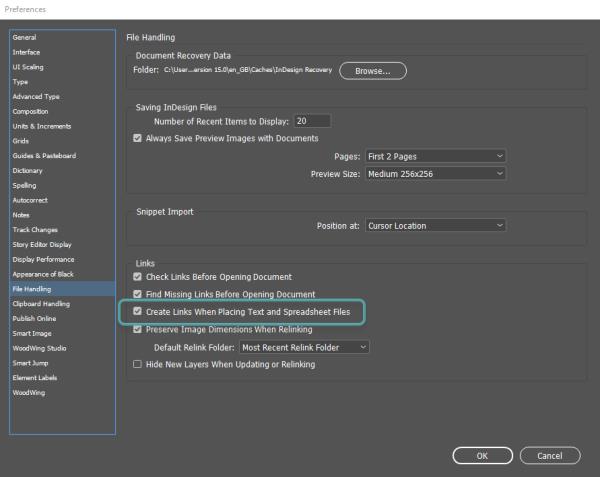
To make sure that a link exists between InDesign and the Excel file, select the following preference:
Preferences > File Handling > Create Links When Placing Text and Spreadsheet Files

Placing an Excel file
Excel files can be placed as a new frame or in existing frames:
- Placing a single Excel file in a new frame
- Replacing the content of an existing frame
- Placing multiple Excel files
- Placing Excel files using the Content Placer tool
|
Info: Use the filter to only show information for one method: |
Placing a single Excel file in a new frame
Use one of the following methods:
Method #1: dragging
Drag the Excel file onto the layout from one of the following locations:
- The Studio panel
- The Dossier panel
- Studio
A new frame is automatically created.
Method #2: using the place gun
Note: When using this method, make sure that no frames are selected on the layout otherwise the content of the frame will be replaced by the Excel file.
In the Studio panel or the Dossier panel, do one of the following:
- Double-click the Excel file
- Right-click the Excel file and choose 'Place'
The Excel file is loaded into the place cursor (also known as the place gun). You can now place the Excel file by drawing a new frame on the layout or by clicking anywhere on the layout.
Replacing the content of an existing frame
Note: Replacing the full content of an article component with that of an Excel file will result in a placed article that is not linked to the Excel file.
Step 1. (Optional, only when the frame is checked-in.) Check-out the frame in which the Excel file is to be placed.
Step 2. Select the frame.
Step 3. Use one of the following methods:
- Drag the Excel file onto the frame from one of the following locations:
- The Studio panel
- The Dossier panel
- Studio
- Double-click the Excel file in the Studio panel or the Dossier panel.
- Right-click the Excel file in the Studio panel or the Dossier panel and choose Place.
Troubleshooting
The Excel file is loaded into the place cursor and not in the frame, or the Excel file is placed in a new frame.
This happens when the frame that you are targeting is checked-in and therefore locked for editing. Check-out the frame first.
When multiple frames are selected, the Excel file is only placed into the frame on which the file is dropped
This is intended behavior.
Placing multiple Excel files
Multiple Excel files can be placed by loading them into the so-called 'place cursor' of InDesign (also known as the 'place gun').
Once loaded, you can place each Excel file one-by-one or in groups until no more Excel files are available in the place cursor.
Note: For more information about placing multiple Excel files using the InDesign place cursor, see Adobe InDesign Help Placing multiple graphics.
Step 1. Make sure that no frames are selected on the layout.
Step 2. Select multiple Excel files in one of the following locations:
- The Studio panel
- The Dossier panel
- Studio
Step 3. Do one of the following:
- Drag the selected Excel files onto the layout.
- Double-click one of the selected Excel files in the Studio panel or the Dossier panel.
- Right-click one of the selected Excel files in the Studio panel or the Dossier panel and choose Place.
The files are loaded into the place cursor.
Step 4. Place each Excel file on the layout by doing one of the following:
- Click anywhere on the layout to place the Excel file in its full width and height
- Draw a frame to place the Excel file in it
- Click on an existing frame to place the Excel file in that frame
Placing Excel files using the Content Placer tool
Placed Excel files that are stored in Studio Server can be collected by using InDesign's Content Collector tool and subsequently placed using the Content Placer tool.
Note: For more information about these tools, see Adobe InDesign Help Linked Content.
When making use of the Content Placer tool to place Excel files that are stored in Studio Server, take note of the following;
- When the collected item is linked to the Excel file in Studio Server, regardless whether the “Create Link” option is used or not, the placed item will always be linked to the Excel file.
- When the collected item is a placed Excel file that is not linked to an Excel file in Studio Server, placing it will behave like collecting and placing a regular text frame: there will be no link to an Excel file in Studio Server.
Troubleshooting: when placing the file, no link to the Excel file is created
Make sure that the option Create Links When Placing Text and Spreadsheet Files is selected in the preferences.
Conditions after placing
Placed Excel files that are stored in Studio Server have a chain icon in the top left corner of the frame to distinguish them from placed Excel files that are saved locally.
![]()
Editing the Excel file
Editing the content of a placed Excel file that is linked to Studio Server can be done in the following ways:
- By editing the content in Excel (recommended)
- By editing the content in InDesign
Editing the content in Excel (recommended)
The recommended method of updating the content is to do this in Excel itself.
Step 1. Select a placed Excel file on the layout or in the Links panel.
Step 2. Do one of the following:
- In the Links panel, click the Edit Original button
- Choose Edit > Edit Original
|
Troubleshooting: the Edit Original command is not available (grayed out) Make sure that the option Create Links When Placing Text and Spreadsheet Files is selected in the preferences. |
Step 3. Make any changes to the content of the file, save it and close the file.
Step 4. Return to InDesign.
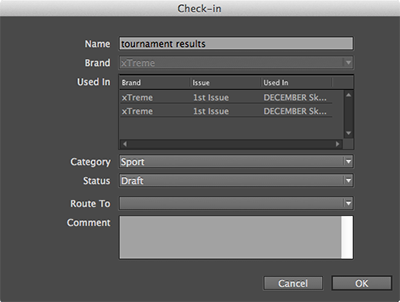
The Check-in dialog box appears. (Note that you might have to wait a few seconds.)

Step 5. Fill out the fields as required and click OK.
Editing the content in InDesign
Although possible, modifying the content this way is not recommended and should only be seen as a quick fix in the final phase of the production process.
Please note the following:
- Any made changes cannot be saved back to the original Excel file. They are saved within the layout though.
- Any manually made changes will be lost the next time the layout is opened (but only when the content of the Excel file has been modified), or when the Update Link option in the Links panel is used for the file.
Updating the placed Excel file
When the original Excel file has been modified, the placed version is either updated automatically or can be updated manually.
Automatic updating
Updating the placed content of a modified Excel file takes place when the layout is checked-out (but only when the content of the Excel file has been modified).
Manual updating
Note: When updating the content manually, any local changes that have been made to the placed Excel file will be lost.
As soon as the content of the original file is modified (for example by another user) and saved, the following is shown:
- Links panel: a modified icon (
 ) is displayed for the file.
 - Elements panel: an update icon (
 ) is displayed in the State column for the file.
To update the file, do one of the following:
- In the Links panel, double-click the Modified icon (
 ).
). - In the Elements panel, click the Update icon (
 ).
). - In the Elements panel, right-click the file and choose Update Content
- Choose WoodWing Studio > Update Content
About Updating and Applied Styles
When an Excel file is placed and local styling is applied (such as applying strokes, fills, paragraph styles and so on), this styling might be lost as soon as the placed file is updated.
Whether or not styling is lost depends on how the file was placed (as controlled through the Import options):
- Formatted table: all styling will be lost, including table styles.
- Unformatted table: all styling will be lost, except any applied table styles and cell styles.
|
Tip: Use WoodWing's Smart Styles to quickly and easily apply styling to objects including tables. See this demo video: |
Breaking the link with the Excel file
To break the link between an Excel file and its placed version on the layout, do one of the following:
- Turn the frame in which the Excel file is placed into an article stored in Studio Server
- In the Links panel, right-click the file and choose Unlink
Converting the placed Excel file into an article stored in Studio Server
Any placed Excel file can be turned into an article stored in Studio Server by turning the frame into an article. (See Creating articles using Studio for InDesign .)
Note: When this is done, the table will be turned into a regular article and the link to the original spreadsheet is removed.
Troubleshooting
After placing the Excel file, no linked file is created even though the correct preference is set
When the “Create Links When Placing Text and Spreadsheet File” preference is set, a link to the Excel file in Studio Server is not created in the following scenarios:
- Placing the Excel file on a checked-out article component (either the frame or text selected in that frame) by doing one of the following:
- Dragging the Excel file from the panel or Studio.
- Right-clicking the Excel file and choosing 'Place' from the context menu.
- Dragging the Excel file from the panel or Studio with text selected in a checked-out article.
- Placing the cursor somewhere in the text frame, right-clicking the Excel file and choosing Place from the context menu.
In any of these scenarios, the content of the Excel file is made part of the article and no link to the Excel file in Studio Server is created.
When turning a locally saved Excel file into an article, the link to the Excel file is lost
Converting a placed Excel file (stored locally) from the layout to a file stored in Studio Server is not supported. The file can be saved as an article stored in Studio Server, but when doing so the link to the Excel file will be lost.
Comment
Do you have corrections or additional information about this article? Leave a comment! Do you have a question about what is described in this article? Please contact Support.
0 comments
Please sign in to leave a comment.