In Studio for InDesign, articles consist of components. Each component holds specific content such as a headline, an intro, body text, a graphic, and so on.
To indicate the content that a component holds or should hold, it is labeled using an Element Label. This way, users or automation processes know which content to add to a component and how to style that component.
In this article, working with Element Labels in Studio for InDesign is explained.
How it works
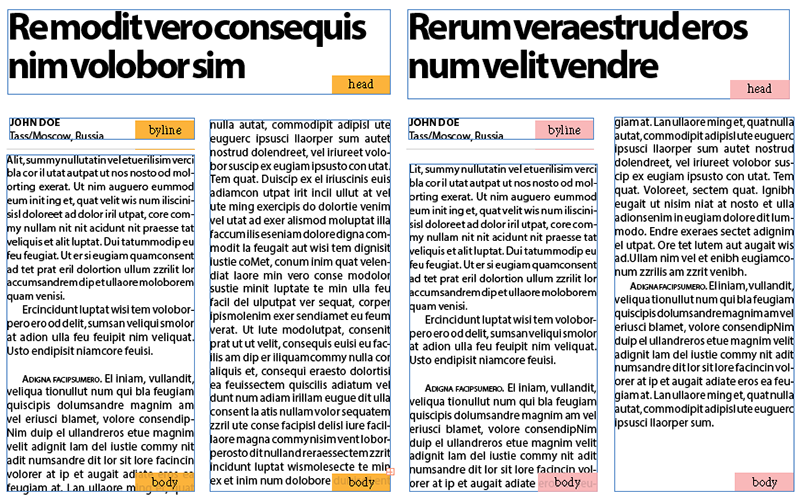
In short, a label is assigned to each frame of an article on the layout. This is initially done automatically — based on preferences — when a frame is created or placed, but can at any time be done manually as well.

Figure: Article components with Element Labels assigned.
The tools
Working with Element Labels in InDesign is done by using the following tools:
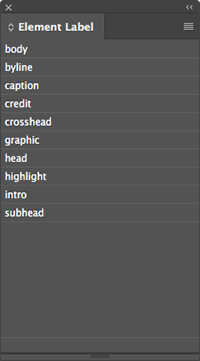
- The Element Label panel, used for manually assigning a label and for identifying which label is assigned to a frame. It can be accessed through Window > Element Labels.
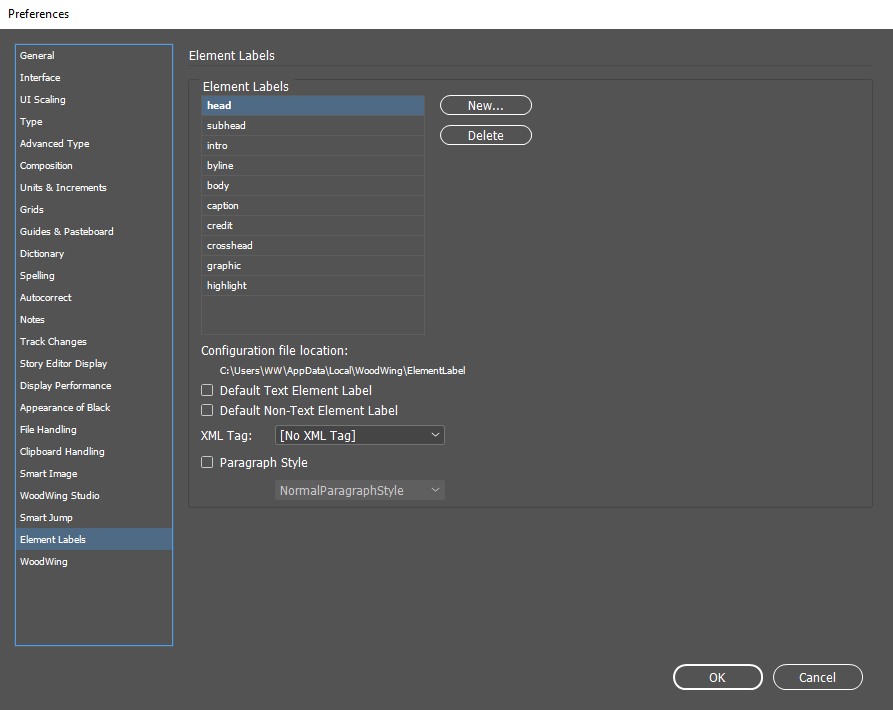
- The Element Label preferences, used for controlling the default label that is assigned when a frame is created or placed. They can be accessed through Preferences > Element Labels.
- Frame labels, used for visualizing which label is assigned to a frame. A label is shown in the bottom right corner of a frame.
|
Notes:
|

Figure: The Element Label panel

Figure: The Element Label preferences.
Verifying which label is assigned
To verify which label is assigned to a frame, do one of the following:
- Display the frame labels by viewing the layout in Normal mode with Extras > Show Element Labels active.
- Select a frame or place the text cursor in a frame and do one of the following:
- View the Element Label panel. The assigned label is highlighted.
- View the Elements panel and verify the Label column for the article.
- View the Studio panel or the Dossier panel, expand an article and verify the Name column.
- Select a frame, right-click it and in the context menu verify the Element Label sub-menu.
Verifying the location of the configuration file
|
Info: This feature requires the following versions of Studio for InDesign:
|
Any changes that are made to the default list of Element Labels are stored in a configuration file named ElementTags.xml.
The location of this file is shown below the list of Element labels in InDesign Preferences > Element Labels.
Knowing this location is needed when sharing created labels with other users (see Distributing labels later in this article).
Assigning a label
Assigning a label can be done automatically or manually.
Automatically
A default Element Label is automatically assigned to the frame when:
- A new text frame or image frame is created
- An article, image or Layout Module is placed on the layout
The following table shows the default labels that are used:
| Layout item | Default label |
|---|---|
| Article | Body |
|
Non-text (Layout Modules and images) |
Graphic |
| Unassigned | Graphic |
Setting the default labels is done through Preferences > Element Labels.
Step 1. (Optional) Create a new label.
Step 2. In the list, select the label that you want to use as a default.
Step 3. Select one of the following check boxes:
- Default Text Element Label (applied to all text frames)
- Default Non-Text Element Label (applied to all Layout Module frames and image frames)
Manually
Step 1. Select the target frames by doing one of the following:
- On the layout, select a frame or place the text cursor in a frame.
- In the Elements panel, select one or more articles, article components, Layout Modules, or images.
Step 2. Assign the label by doing one of the following:
- In the Element Label panel, select a label.
- On the layout, right-click a selected frame and choose a label from the Element Label menu.
|
Notes:
|
Adding or removing labels
Creating a new label or removing an existing one is done in Preferences > Element Labels.
Distributing labels
The same labels are used by all members of the team who work on articles and layouts for a publication. It is important therefore that each member of the team has access to the same list of labels.
This can be done by distributing the ElementTags.xml file from the system on which the list is stored.
Step 1. Set up a list on one of the systems with Studio for InDesign installed.
Step 2. Distribute the ElementTags.xml file to the other systems. The location of the file is as follows:
- For Studio for InDesign 17 for Adobe 2022 or any higher version of Studio for InDesign and InCopy for any higher version of Adobe, and for Studio for InDesign 16.3.1 for Adobe 2021 or any version of version 16 higher than 16.3.1:
- Windows: C:\Users\<username>\AppData\Local\WoodWing\ElementLabel
- macOS: Users:<User_Name>:Library:Application Support:WoodWing:ElementLabel
Note: The location of this file can also bee seen in InDesign Preferences > Element Labels.
- For Studio for InDesign 16.3.0:
- <InDesign application folder>\Plug-Ins\WoodWing\
Note: This file does not exist until a new label is created.
Applying paragraph styles to components
When assigning an Element Label to a text frame on a layout, a paragraph style can be automatically applied to that text frame.
Step 1. Open Preferences > Element Labels.
Step 2. Choose a label from the list.
Step 3. Select the check box Paragraph Style and choose a style from the list.
Note: The list shows all paragraph styles that are present in the layout.
When next creating a labeled text frame, the paragraph style will be automatically applied to that frame.
Element Labels and XML tags
Element labels can be automatically assigned to XML tags through the Map Element Labels to Tags command — found in the flyout menu of InDesign’s Structure Pane.
Note: The Structure Pane can be accessed through View > Structure > Show Structure.
Step 1. Open a layout that contains XML tags. Alternatively, create XML tags manually using the InDesign Tags panel. (For more information about XML Tags, see the InDesign documentation.)
Step 2. Open Preferences > Element Labels.
The XML tags that are present in the document are now also available in the XML Tag list.
Step 3. Choose a label from the list and subsequently choose the XML tag from the XML Tag list with which the label needs to correspond.
Step 4. In your layout, assign labels to text frames, Layout Module frames and/or image frames by using the Element Label panel.
Tip: To automatically have the correct XML tag assigned to each labeled object, choose the command Map Element Labels to Tags from the flyout menu of InDesign’s Structure Pane.
Comments
0 comments
Please sign in to leave a comment.