In a 'digital first' workflow in Studio, stories are first published to one or more digital output channels such as a Web CMS.
This is done by creating and publishing a Digital article using the Digital editor.
Next, these stories might be re-used in a print publication such as tomorrow's newspaper or next month's magazine.
To re-use a Digital article in a print workflow, a print variant of the Digital article needs to be created which is optimized for a print environment and placed on a layout.
This article describes the concept of this process.
Why a variant is needed
To understand why a print variant of the Digital article is needed, we need to look at the structure of both articles and the way that an article is used in a digital publication compared to how it is used in a print publication.
Structure
It is important to realize that both the Digital article and the Print article contain structure in the form of 'components'. Each component contains some kind of content such as text (header, intro, footer), media (image, slide show, or video) and so on.
When comparing the types of components that are used in a Digital article with the components that are used in a Print article, we see similarities as well as differences.
Some typical components for each type of article are the following:
| Digital article: | Print article: |
|---|---|
|
|
As can be seen, some components are used in both structures, such as 'Intro' and 'Body'. Other components only exist in one structure such as 'Video' or 'Slide show' in a Digital article, while others are named differently in each structure but are essentially the same such as 'Image' versus 'Graphic'.
Using an article for digital versus for print
Another reason why a print variant is needed is to do with the differences between a digital environment and a print environment. Because of this, the content of the print variant can be distinctly different than its digital counterpart.
These differences can be mainly found in the following areas:
- Available space. In a digital output, space is practically limitless: an article can be as long as needed or can be made up of as many pages as needed. A print publication is very much limited to the physical boundaries of a page as well the number of available pages in the publication.
This means that in the print variant of the Digital article, text needs to be adjusted so that it fits the frame and the page it is in. Think of a long headline that needs to be shortened to fit the width of the available space on the page.
- Writing style. In a digital output, the writing style can be very different from that in a print publication. This is especially true for titles and headlines which for digital output are very much aimed at achieving a high ranking in search engine results by using specific terms and wording.
This means that in the print variant of the Digital article, specific text such as headers and references to other articles need to be adjusted.
- Images and captions. Because of the limitless availability of space, a digital publication can contain multiple images or even slide shows in which each image can have its own caption. As with text, print publications are very much limited in the number of images that can be used because of the lack of space.
This means that in the print variant of the Digital article, images may have to be left out and/or a single caption has to be used for a combination of images.
How a print variant is created
The process of creating a print variant consists of the following actions:
- A print variant is created in the form of a Print article
- The Print article is subsequently placed on a layout (either a new layout or an existing layout)
Both steps are performed in one action.
To make this happen, the system needs to determine the following:
For creating the Print article:
- Which content of the Digital article should be used in the Print article
- Where in the structure of the Print article this content should be added
- How this content should be styled
For placing the article:
- Where on the layout the Print article should be placed
- Which components of the Print article should be placed
- In which order the components of the Print article should be placed
- What to do with any components that are not placed
- How the content of the placed components should be styled
Determining the structure, content and styling of the Print article
The first part of the process is to create the Print article with its components, content and styling.
This is done based on an article template and a Conversion Rule that is set up in Studio Server.
Article template
Creating a new article in Studio is always done based on an article template. The same is true for creating a Print article.
Within the context of creating a print variant, a dedicated article template is set up. It is used for the following:
- To base the creation of the Print article on
- To make a list of paragraph styles available in the Conversion Rule (see below)
Conversion Rules
A Conversion Rule is a list in which each Digital article component is mapped with a Print article component, a paragraph style name, and one or more character style names (for styling text in bold and/or italic). These style names are derived from an article template.
This tells the system that the content of the Digital article component should be added to the mapped Print article component, that a paragraph style with the chosen name should be applied to that content and that any text in bold and/or italic should be styled using a specific character style.
Note: It is of course also possible to not map a Digital article component with a Print article component. In that case, the Digital article component will not be used when the Print article is created.
Each component mapping can also be given a ranking so that a component with a higher ranking will always be placed before a component with a lower ranking. This makes it possible to organize the components in the Print article in a different order than the order used in the Digital article.
Multiple Rules can be set up, each with a different mapping.
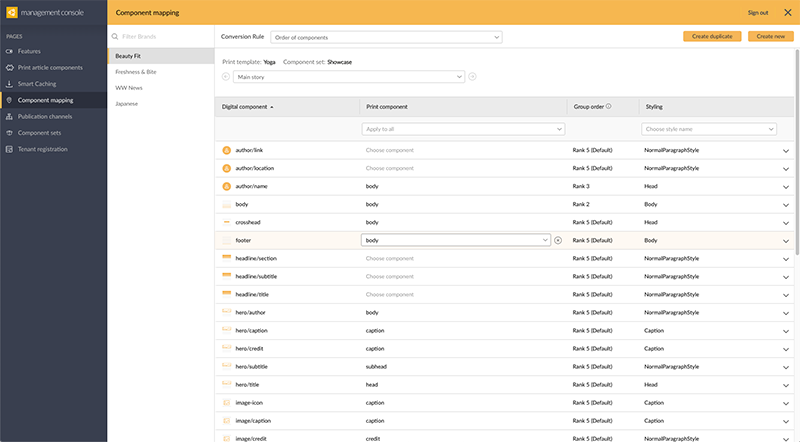
Figure: An example of a Conversion Rule in which Digital article components are each mapped with a Print article component and a style. A ranking has been assigned to control the order in which the components are placed.
Multiple Digital article components can be mapped to the same Print article component.
Example: You can map 'Intro' with 'Body' and also map 'Body' with 'Body'.
In such cases, the content of these components is either combined into one single component in the Print article or as separate components. This is controlled through the option 'Allow more than once' for the mapped Print article component (see: Adding article components to an existing Print article in Studio - configuration):
- When the option is disabled (default setting), the content is combined
- When the option is enabled, a separate component is created for each Digital article component
Container components are processed separately from the components of the main story, meaning that frames will be generated that are separate from the frames of the main story. This makes it possible to use Containers as a side story or breakout story. By default the same mapping as for the main story is used, but a dedicated mapping for Container components can also be set up.
For more information about setting up Conversion Rules, see Creating a print variant of a Digital article in Studio - configuration.
Creating the Print article
The process of creating a Print article is as follows:
- The Print article is created based on the article template.
- The components of the Digital article are processed from top to bottom while applying the rules that are defined in the Conversion Rule. For each mapping in the Conversion Rule, a component is created in the Print article, the content of the Digital article component is added to it and a style is applied.
|
Example 1: Assume that we have a Digital article with the following components:
Assume that a Conversion Rule is used that only contains the following mapping:
Note that the 'Title' component of the Digital article is mapped with the 'Title' component of the Print article and that the 'Intro' and 'Body' components of the Digital article are mapped with the 'Body' component of the Print article. Assume that for all of the Print article components, the option 'Allow more than once' is disabled. The Print article that is then created will contain the following components:
|
|
Example 2: Assume that we have a Digital article with the following components:
Assume that a Conversion Rule is used with the following mapping:
Here, all Digital article components are mapped to a body component, but the ranking order dictates in which order they are placed. Based on the above rule, the order of the components in the Print article will be as follows:
Note that the title has been placed first and the author placed last. The order of the body, subtitle, and body components is kept the same as in the Digital article because the subtitle and body component have the same ranking. |
Determining where to place the Print article and which components to place
Placing an article on a layout using Studio is done by adding it to a placeholder that has been set up on the layout. This placeholder is a selection of multiple frames (typically empty) that represent the location, geometry and components of an article.
When an actual article is added to it, each component of the placeholder article is filled with the content of the corresponding component of the article that is added.
Such place holders are defined by setting up an InDesign Article containing multiple frames and by applying a paragraph style and an Element Label to each frame, such as 'head', 'intro' or 'body'.
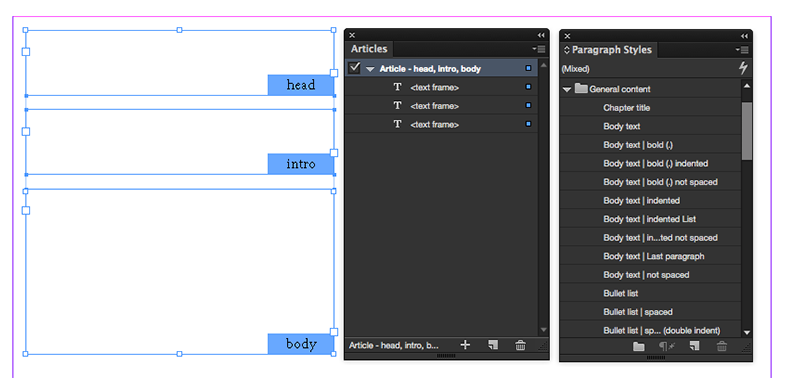
Figure: An InDesign Article set up on a layout.
What to do with any components that are not placed
It is very common for an article that is placed to contain more components than the InDesign Article that it is placed on. Because these components cannot be matched, they are not made part of the placed article.
However, these components can still be useful for the designer of the layout to use in some way. When a Print article is added to a new layout therefore, these components are by default placed on the pasteboard; when the Print article is added to an existing layout, they are discarded. If needed, the working of this default functionality can be configured.
Styling the content of the placed components
When the components of the Print article are added to the InDesign Article, a situation exists where both articles contain styling:
- The InDesign Article contains style names and style definitions that are set up in the layout that it is placed on.
- The Print Article contains style names and definitions taken from an article template.
When the Print article is placed on the layout, the following will happen with the styling:
- When the style name in the Print article does not exist in the layout, that style with its definition is added to the layout and applied to the content.
- When in the layout a style already exists with the same name as the name in the Print article, the text is styled using the definition of the style in the layout.
This could lead to potential differences: if Style A is set up in the article template with text colored in green, but Style A is also set up in the layout but now with text colored in orange, the text will be styled in orange.
In practice
The following is a short summary of what happens when a user creates a print variant of a Digital article in Studio.
Creating a print variant can be done in different ways, depending on the following scenarios:
- The layout on which to place the article already exists. This workflow is typically started in the Publication Overview application. The Digital article is dragged onto a suitable position on the layout (represented by an InDesign Article) and placed in that position. During this process, a Print article is created, based on an article template and a chosen Conversion Rule. The components that are placed are determined by the components of the InDesign Article. Any components that are not placed are by default discarded but Studio can also be configured that they are added to the pasteboard of the layout.
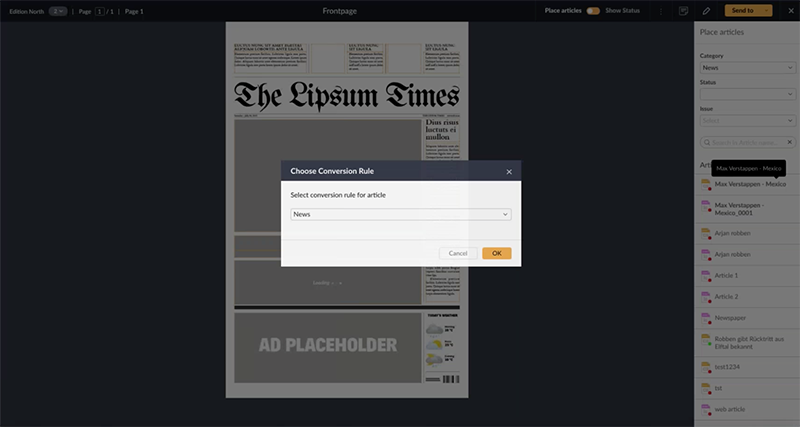
Figure: Creating a print variant of a Digital article by dragging a Digital article on an existing layout. The user has to choose a Conversion Rule.
- The layout on which to place the article does not yet exist. During this process, the following is created:
- A layout, based on a layout template that is chosen by the user.
- A Print article, based on an article template and a chosen Conversion Rule.
The Print article is also automatically placed on the layout, based on a location on the layout that is chosen by the user (represented by the InDesign Article). The components that are placed are determined by the components of the InDesign Article. Any components that are not placed are by default added to the pasteboard of the layout, but Studio can also be configured that they are discarded.
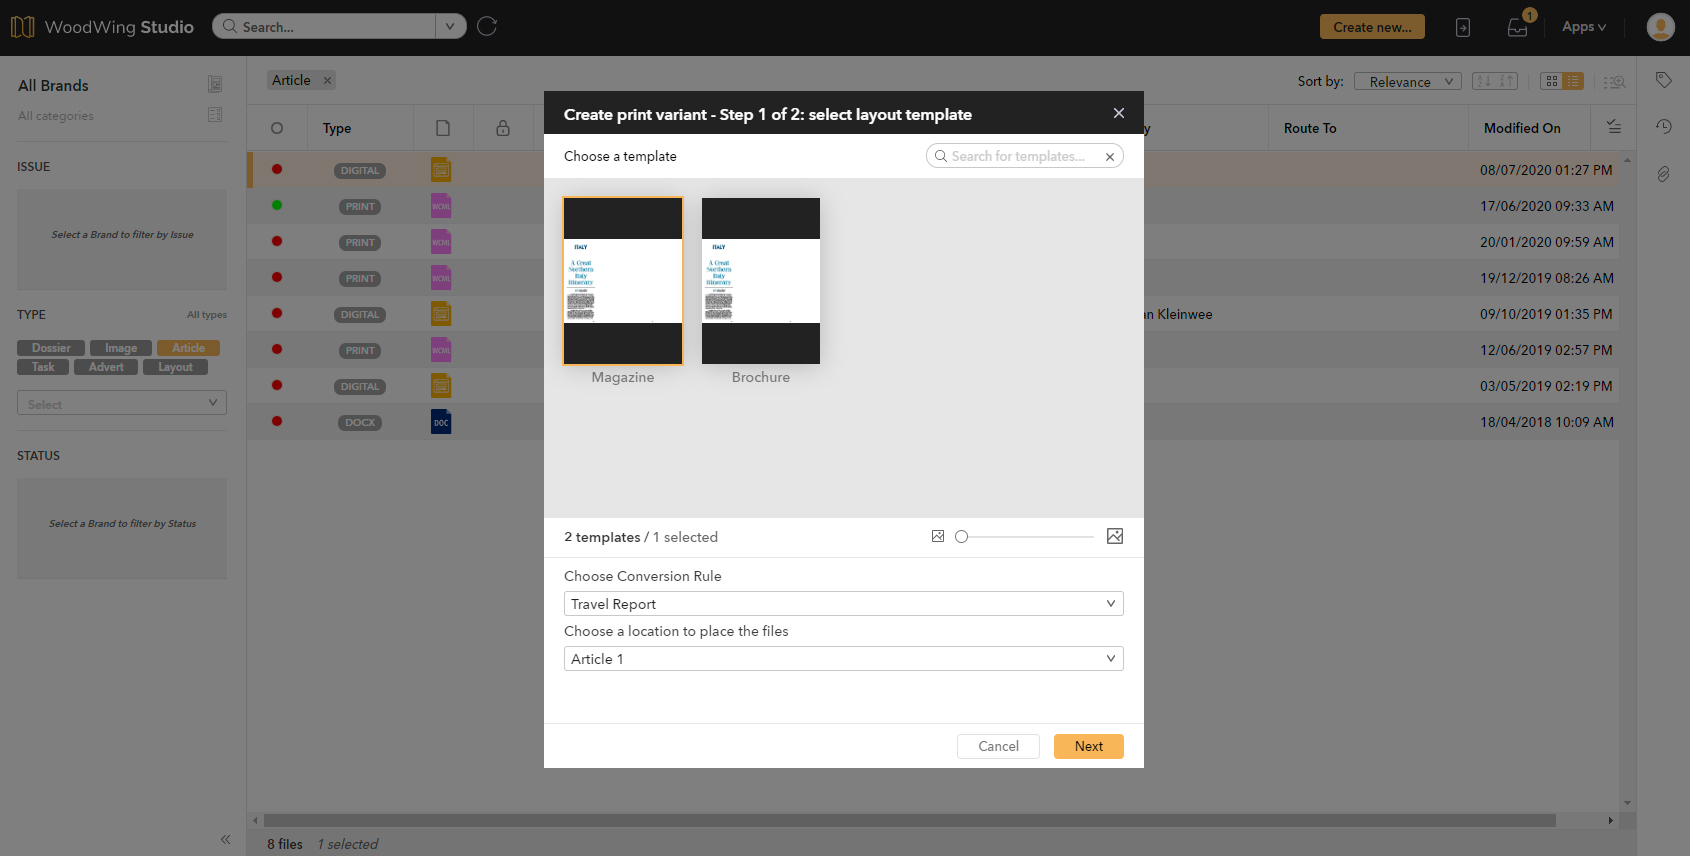
Figure: Creating a print variant of a Digital article when the layout on which to place it does not yet exist. The user chooses a layout template, a Conversion Rule and a location on the layout in which to place the article.
For detailed information about these processes, see Creating a print variant of a Digital article in Studio.
For information about how to set up the system to make this work, see Creating a print variant of a Digital article in Studio - configuration.
Comments
0 comments
Please sign in to leave a comment.