In a 'digital first' workflow in Studio, a story is first published to a digital publication channel and later re-used in a print publication.
Because an article for digital output has different requirements than an article for print output (in terms of structure and the content it contains), a variation of the Digital article needs to be created for use in the print workflow.
To make this process work, configuration steps are needed in Studio Server.
Before you start
To fully understand the process and why the described configuration steps need to be performed, please first read Creating a print variant of a Digital article in Studio - the concept.
Requirements
This feature requires the InDesign Server Automation Server plug-in. It is assumed here that it is in place and fully working.
Configuration steps
During the process of creating a print variant of a Digital article, a Print article is created and placed on a layout.
This requires the following configuration tasks:
- Setting up one or more layout templates, containing one or more InDesign Articles and various paragraph styles.
- Setting up one or more Component Sets, containing the components of the Digital article for mapping to the components of the Print article.
- Setting up one or more article templates, containing the components of the Print article for mapping to the components of the Digital article. They also contain the paragraph styles for styling the text.
- Defining the default order of the components in the Print article.
- Setting up one or more Conversion Rules, each defining the Digital article components from which content should be used in the Print Article, how this content should be styled, and if the default ordering of components should be overruled.
Determining if components that are not placed should be added to the pasteboard or should be discarded.
Optional configuration steps include:
- Automatically changing metadata when creating a print variant (see the step later in this article). When a print variant is created, it is possible to automatically change specific metadata fields of the Digital article and/or the created Print article. This makes it possible to change the name, set the status, set the author, add a comment, and so on.
Creating layout templates
Using InDesign with Studio for InDesign installed, create one or more layout templates and save them to the Brand in which the Print article is going to be created.
Make sure that the layout template contains the following:
- An InDesign Article for each location in which it should be possible to place an article. Do this by following the Adobe instructions for creating an InDesign Article.
Take note of the following:
- This InDesign Article should contain a text frame for each component that the Print article should have.
- Apply Element Labels to each frame that correspond to the component names of the Print article. When the article is placed, content of the Digital article components will be placed in the Print article components based on their mapping in the Conversion Rule (see below).
- Users will choose the article from a list of locations on the layout in which to place the article so make sure to use a descriptive name for the InDesign Article.
- Paragraph styles for each type of article component. When setting up a Conversion Rule (see below), a paragraph style is associated with a specific mapping between a component of the Digital article and the corresponding component of the Print article. This paragraph style is used for styling the content of the component. Make sure that sufficient paragraph styles are available for styling the content of the article.
|
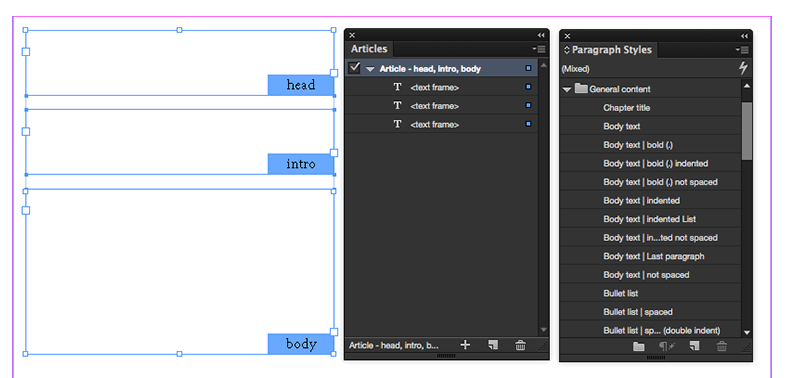
Example: Here, a simple InDesign Article has been created containing 3 components: 'head', 'intro' and 'body'. The article has been named 'Article - head, intro, body' for easy reference and multiple paragraph styles have been set up.
|
Creating an article template
Create one or more article templates on which the Print article should be based. Do this in the Brand in which print variants are going to be used.
This can typically be done in a layout containing the paragraph styling that you want the Print article to have by converting a single text frame to an article template.
Defining the default order of Print article components
When a Print article is created from a Digital article, its components are created in the order as defined on the Management console > Print article components page.
|
Example: A Digital article contains the following components.
The order is defined in the Management Console as follows:
The order in the Print article will be as follows:
|
Define the default order in which components should be created.
Step 1. Access the Print article components page:
Step 1a. In Studio Server, click Integrations followed by Studio.
The Management Console appears.
Step 1b. In the menu on the left, choose Print article components.
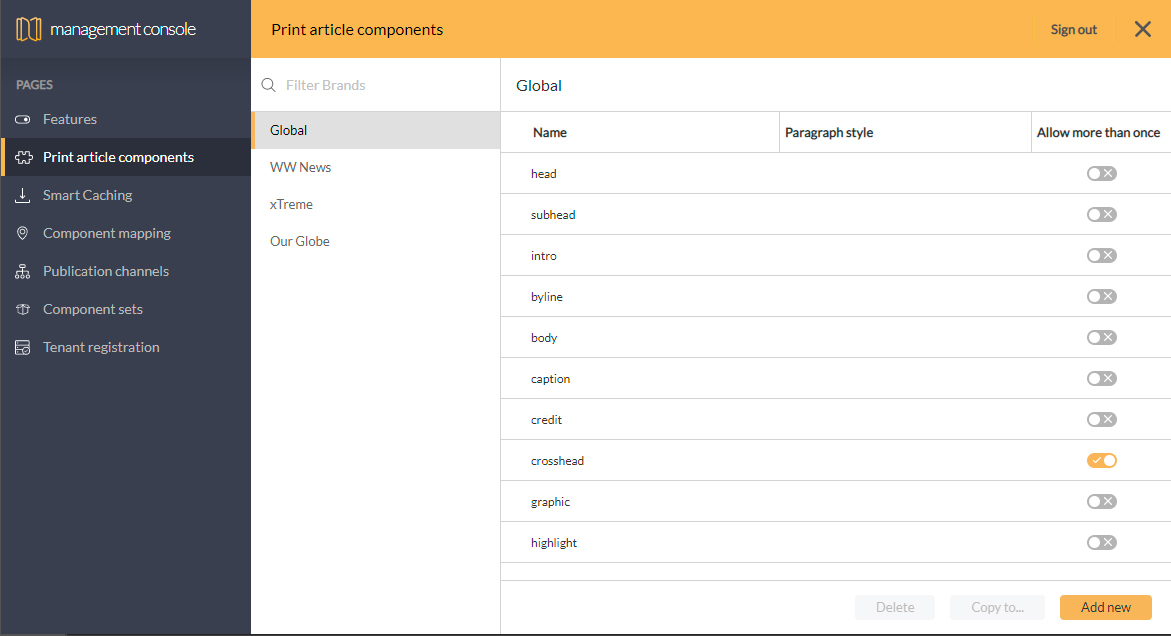
Figure: The Print article components page.
Step 2. Do one of the following:
- Adjust the order for the Global Brand. This affects the ordering of all Brands.
- Adjust the order for a specific Brand. This overrules the ordering defined in the Global Brand for that Brand only.
|
Notes:
|
Setting up Conversion Rules
Set up one or more Conversion Rules for each type of InDesign Article that was defined above.
|
Example: An InDesign Article has been set up containing the components 'Head', 'Subtitle' and 'Body'. Conversion Rule A is set up with the following mapping:
Conversion Rule B is set up with a different mapping:
The same InDesign Article can now be used for placing different Digital articles with different structures. Similar variants can be created using the same component mapping but using different styling. |
Ranking components per group
The order in which component types appear is initially determined by the default ordering (see Defining the order of components in a Print article).
However, further ordering might be required when multiple components within the same group of component types exist.
Example: The components of a Hero component 'title', 'subtitle' and 'author' might all be converted to a 'body' component. In the Print article the 'author' component might need to be placed first instead of last as is the case in a Digital article.
Controlling component ordering within the same group of component types is done by giving a component a ranking.
A component with a higher ranking will always be placed before a component with a lower ranking.
By default, all components have the same ranking, meaning that the default order is used. When a component needs to be placed higher or lower, its ranking can be adjusted.
|
Example : A Digital article exists containing the following components:
A Conversion Rule is used with the following mapping:
Here, all Digital article components are mapped to a body component, but the ranking order dictates in which order they are placed. Based on the above rule, the order of the components in the Print article will be as follows:
Note that the title has been placed first and the author placed last. The order of the body, subtitle, and body components is kept the same as the default ordering because the subtitle and body component have the same ranking. |
Behavior when multiple Digital components are mapped to the same Print component
It is possible to map multiple Digital components to the same Print component. When doing so, one of the following can take place:
- The content of all Digital components that are mapped to the Print component are combined into a single Print component. This is the default behavior.
Example: A story contains the Digital components 'title' and 'subtitle'. Both are mapped to the Print component 'body'. When the Print article is created, the content of both components is combined into one 'body' component.
- A separate Print component is created for each Digital component. This behavior occurs when the option 'Allow more than once' is enabled for the Print component.
Example: A story contains 3 Digital 'quote' components. All are mapped to the Print component 'quote' for which the option 'Allow more than once' is enabled. When the Print article is created, a component for each of the 3 quotes is created.
Behavior for Container components
By default, components that are part of a Container will have the same mapping applied as the main story. If needed, dedicated mapping can be set up for each type of Container (the default Container component and optionally custom Container components as defined in a Component Set).
When multiple components of a Container are mapped to the same Print component, they will inherit the same behavior as for the main story (see above).
In the scenario where for the main story individual components are created while you want to have them combined for Container components, enable the option 'Combine components'.
This makes it possible to apply a specific style to a type of Container component. Styling the content of a container differently from the main story is typically done when the container is used as a side story or breakout story.
|
Example: A story contains a Container with components 'title' and 'subtitle'. They are mapped to the Print component 'body' for which the option 'Allow more than once' is enabled. When the option 'Combine components' is not enabled, two 'body' components are created (the same behavior as for the main story). When the option 'Combine components' is enabled, the content of both components are combined into one 'body' component (the opposite behavior as for the main story). |
Note: A container within a container will inherit the rules that are set up for the container of which it is part.
Step 1. Access the Component Mapping page of the Studio Management Console:
Step 1a. In Studio Server, click Integrations followed by Studio.
The Management Console appears.
Step 1b. In the menu on the left, choose Component Mapping.
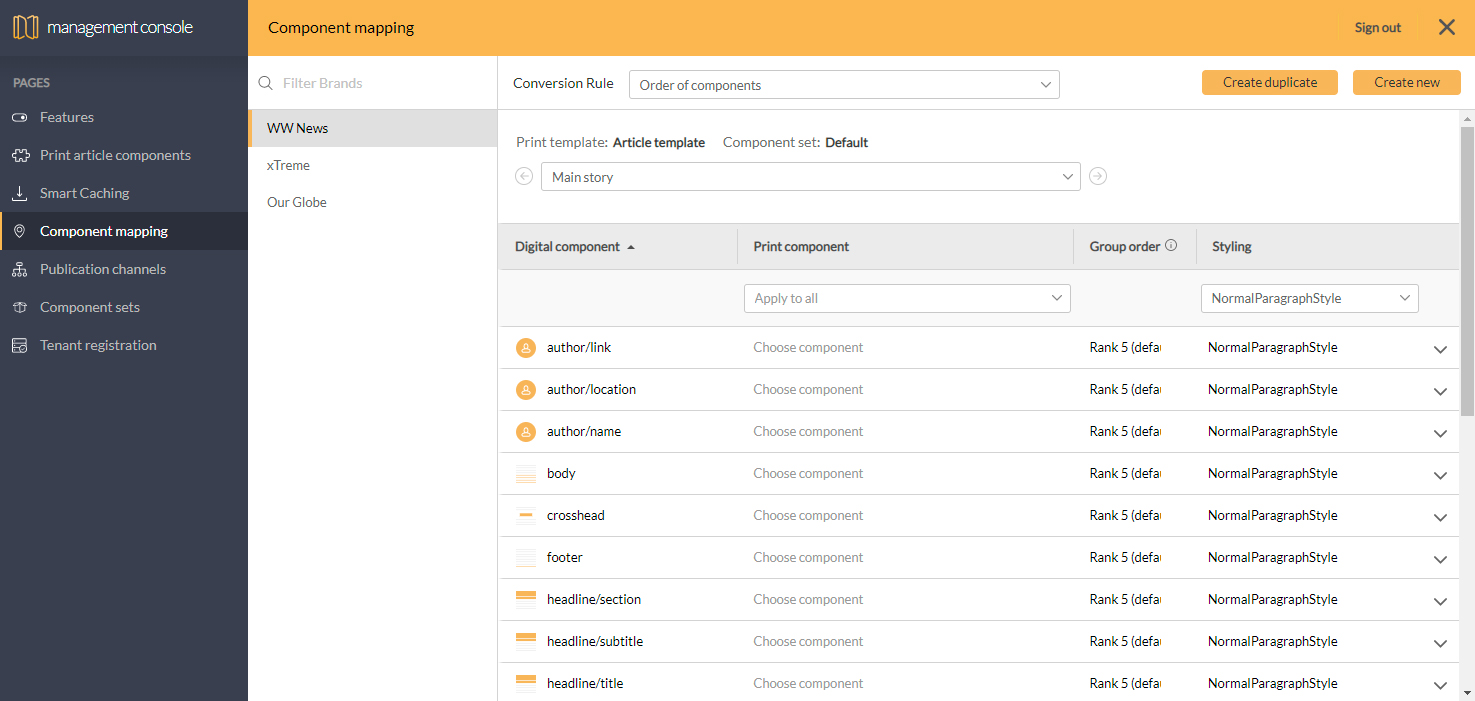
Figure: The Component Mapping page.
Step 2. Create a Conversion Rule by doing one of the following:
- Create a new rule from scratch by clicking Create new.
- Base the new rule on an existing rule by clicking Create duplicate.
A dialog appears.
For creating a new rule:
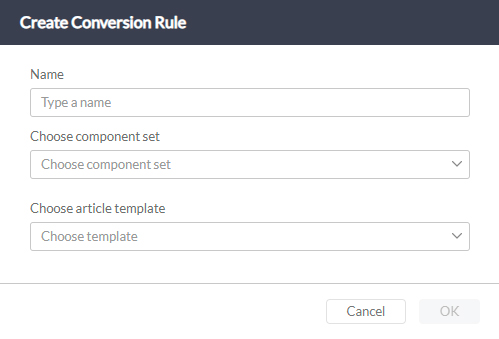
For duplicating a rule:

Step 3. Create the rule.
- For a new rule: Enter a name, choose a Component Set, and an article template.
Note: The Component Set provides the list of Digital article components which will be mapped to the Print article components. The article template provides the list of Print article components and the paragraph styles that will be mapped to the Digital article components.
- For duplicating a rule: Enter a name, select a Brand and choose an article template.
Note: The article template provides the list of Print article components and the paragraph styles that will be mapped to the Digital article components.
Step 4. Click OK.
The created Rule appears, showing the name at the top of the page and all available components on the page itself.
Component mapping can be set up for the following parts of a story:
- The main story itself
- Any defined Container type
Step 5. From the list below the Conversion Rule name, choose the part of the story that you want to configure: the main story or a type of container.
Note: If no specific mapping is set up for containers they will use the same styling as the main story.
Step 6. Map each Digital component with a Print component where needed, set its ranking, and choose the name of the paragraph style that should be applied.
Tip: To map a specific Print component or a specific styling to all components, choose an option from the 'Apply to all' lists.
Note: Conversion Rules are static, meaning that when the name of a paragraph style or component is changed, the Conversion Rule needs to be manually updated; this is not done automatically.
Step 7. (Optional) Add advanced options by clicking the Expand icon for the component.
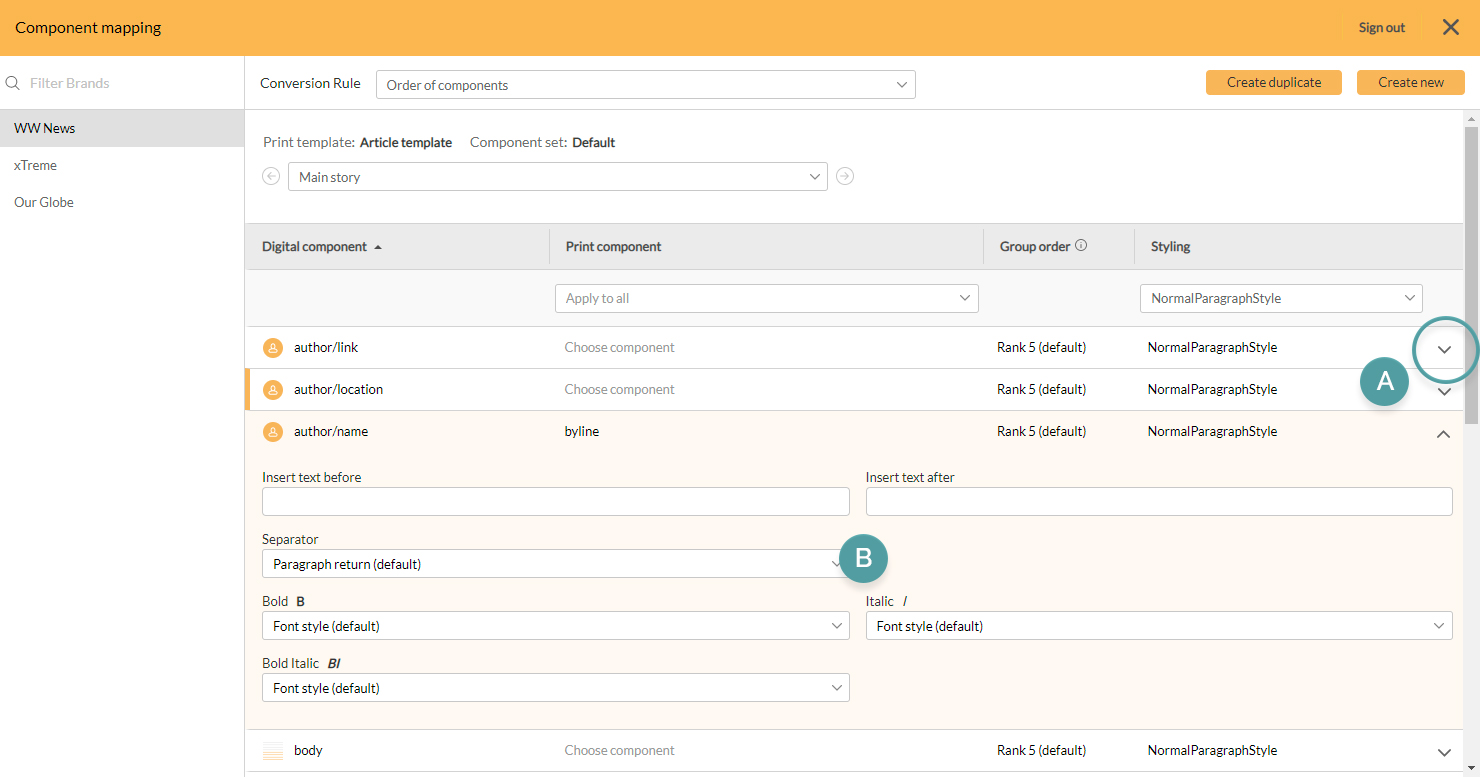
Figure: Clicking the Expand/Collapse icon (A) will show/hide the Advanced options (B).
Set any of the following options:
- Insert text before / Insert text after. Type the text that should be added before or after the text that is in the component when the component is placed on the layout.
Use this to automatically add often occurring text. This way, users do not have to add this themselves, thereby making this process more efficient and less error prone.
|
Examples: The 'author/name' component can be used as a byline with additional text:
Or:
|
- Separator. Choose a separator to use for separating multiple Digital components when they are combined into the same Print component.
Note: Components of the same type are combined when the option Allow more than once for that component is disabled.
Options to choose from include a paragraph return and various types of spaces such as em space, thin space, figure space, and so on.
|
Example: The 'author/name' and 'author/location' components can be used as a byline with additional text (assumed here is that byline components are combined when placed):
Result: From our correspondent Rob Smart Amsterdam |
- Bold, italic, bold/italic. When text in the component is styled as bold, italic or bold/italic, specify which character style should be used to style this text when the component is placed.
|
Notes:
|
Tip: Use this feature creatively by specifying styles other than just bold, italic or bold/italic to further emphasize the text, for example by (also) specifying underline, text color, text size, and so on.
Handling unplaced components
When a Print article contains more components than the InDesign Article on which it is placed, any components that cannot be matched are handled as follows:
- When the article is added to an existing layout, the components are discarded
- When the article is added to a new layout, the components are placed on the pasteboard of the layout
This behavior can be configured with the following options in the config.php file of the Studio plug-in:
<Studio Server path>/config/plugins/ContentStation
Info: Performing the described step requires direct server access. Depending upon how your system is hosted and the level of access you have to that system, coordination may be required with your Partner or WoodWing Support team. For a full overview of the steps that need to be done by WoodWing and how to request them, see WoodWing Cloud - Change management.
When the Print article is added to a new layout:
if( !defined( 'CS_PLACE_ON_PASTEBOARD_FOR_NEW_LAYOUTS' ) ) {
	define( 'CS_PLACE_ON_PASTEBOARD_FOR_NEW_LAYOUTS', true );
When the Print article is added to an existing layout:
if( !defined( 'CS_PLACE_ON_PASTEBOARD_FOR_EXISTING_LAYOUTS' ) ) {
	define( 'CS_PLACE_ON_PASTEBOARD_FOR_EXISTING_LAYOUTS', false );
(Optional) Automatically changing metadata when creating a print variant
Info: Performing the described step requires direct server access. Depending upon how your system is hosted and the level of access you have to that system, coordination may be required with your Partner or WoodWing Support team. For a full overview of the steps that need to be done by WoodWing and how to request them, see WoodWing Cloud - Change management.
When a print variant is created, it is possible to automatically change specific metadata fields of the Digital article and/or the created Print article. This makes it possible to change the name, set the status, set the author, add a comment, and so on.
Configuration is done in the configuration file of the Studio Server plug-in and can be made specific to certain Brands only.
Note: Integrators can override this default behavior using a custom Studio Server plug-in.
Step 1. Open the config.php file of the Studio plug-in:
<Studio Server path>/config/plugins/ContentStation
Step 2. Modify the following options as described in the comments of the file:
- CS_SOURCE_METADATA_OVERRIDE. Use this option to change the metadata of the Digital article.
- CS_VARIANT_METADATA_OVERRIDE. Use this option to change the metadata of the print variant.
Step 3. Save the file.
Step 4. Test the configuration by creating a print variant and checking that the metadata is changed as expected.
Comment
Do you have corrections or additional information about this article? Leave a comment! Do you have a question about what is described in this article? Please contact Support.
0 comments
Please sign in to leave a comment.