Enterprise Server can be configured to send out an e-mail to a user or user group each time a file is routed to them. Receiving such e-mails makes users more aware that files that they should work on have been routed to them.
Note: Routing files is done by changing the Route To property of the file. Files that are routed to a user appear in the Inbox of the user (available in Smart Connection and Content Station). For more information, see Sending a file to another user or user group using Content Station 9 and Sending a file to another user or user group using Smart Connection 9.
Enabling e-mail notifications is a 3-step process:
Step 1. Setting the basic e-mail configuration options.
The following settings should be configured in the E-mail Notification section of the configserver.php file:
Tip: (For Enterprise Server 10.1 or higher only) Easily manage and configure settings of all configuration files by adding them to a single configuration file.
<Enterprise Server path>/config
            // ----------------------------------------------------------------------
// E-mail notification
// ----------------------------------------------------------------------
// EMAIL_SMTP:
//    SMTP server to send e-mail. For example: 'smtp.mydomain.com'.
//    Default value: ''.
//
define ('EMAIL_SMTP', '');

// EMAIL_SMTP_USER:
//    Log-in user name for your SMTP server. Leave empty when log-in is
//    not required. Default value: ''.
//
define ('EMAIL_SMTP_USER', '');

// EMAIL_SMTP_USER:
//    Log-in user password for your SMTP server. Leave empty when log-in
//    is not required. Default value: ''.
//
define ('EMAIL_SMTP_PASS', '');

// EMAIL_PORT:
//    SMTP server port. Allows overruling the SMTP server port.
//    Default value: 25.
//
define ('EMAIL_PORT', 25);

// EMAIL_SSL:
//    Whether or not to use a secure connection to the email server.
//    Use 'ssl' or 'tls' SSL types for secure connections.
//    Leave empty '' for no security. Default value: ''.
//
define ('EMAIL_SSL', '');

// EMAIL_SENDER_ADDRESS:
//    E-mail address to use as the sender of the e-mail.
//    When left empty, the e-mail address defined on the User Maintenance
//    page of the user who sent the e-mail is used instead.
//    Default value: ''.
//
define ('EMAIL_SENDER_ADDRESS', '');

// EMAIL_SENDER_NAME:
//    User name to use for the sender of the e-mail.
//    When left empty, the name defined on the User Maintenance page of
//    the user who sent the e-mail is used instead.
//    Default value: ''.
//
define ('EMAIL_SENDER_NAME', '');
Step 2. Enabling the e-mail notification option per Brand.
E-mail notification can be configured per Brand. This is done through the Brand Maintenance page by selecting the E-mail Notifications option. See Brand settings.
Step 3. Enabling per user if notifications should be sent.
Note: The options for sending e-mail notifications are enabled by default. Perform the following steps only when the notification needs to be disabled for a user or a group that the user belongs to.
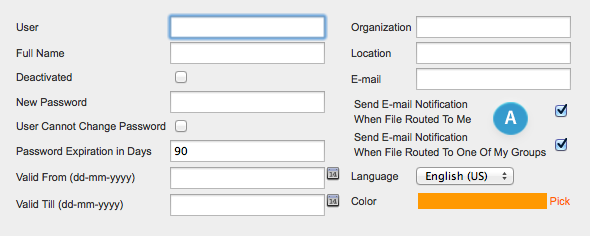
On the User Maintenance page of a user, set the following options to your needs:
- Send E-mail Notification When File Routed To Me
- Send E-mail Notification When File Routed To One of My Groups
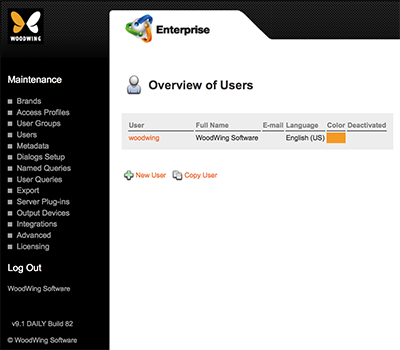
Step 3a. Access the Overview of Users page.
In the Maintenance menu or on the Home page, click Users.
- A page showing all created user accounts appears.

Figure: The Overview of Users page shows all created user accounts.
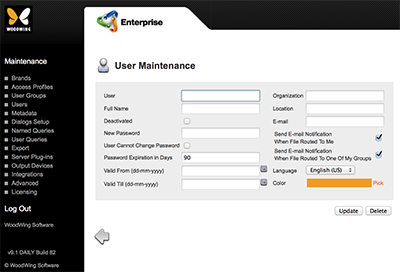
- Click the name of the user that needs to be modified.
The User Maintenance page appears.

Figure: The User Maintenance page is used for setting up the user account.
Step 3. Deselect the respective check box of the feature that needs to be disabled.

Figure: The e-mail notification options (A) on the User Maintenance page.
Comment
Do you have corrections or additional information about this article? Leave a comment! Do you have a question about what is described in this article? Please contact Support.
0 comments
Please sign in to leave a comment.